Author of the article:
Anastasia Vorontsova
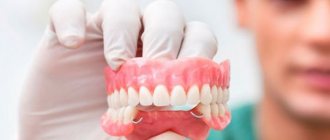
Photo: Computer modeling method
To install veneers, you will need to visit the dental clinic at least twice.
At the first visit, the doctor will prepare the tooth for installation of the onlay, take an impression, select the required color, depending on the color of the patient’s other teeth, and install a temporary veneer.
After one to two weeks, the patient will need a second visit to the dentist, during which the doctor will try on the manufactured veneer and fix it on the tooth.
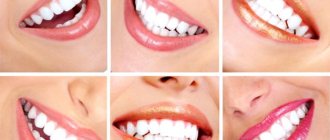
Tooth color determination
Color selection must be carried out according to the recommendations given in the relevant section.
It is preferable to do this at the beginning of the visit, since it is possible to focus on the color of the tooth that has not yet been prepared (if the color has not changed) and the tooth is naturally moisturized. When drying from prolonged opening of the mouth, especially when using a rubber dam, the teeth become lighter and more dull, which can lead to errors in color selection. It is important to determine the color of the tooth based on the shade that the dental technician will work with (in the case of laboratory production). No translation from one colorway to another (for example, from Vitapan to Chromascop) is accurate, because each colorway has unique, non-repeating colors.
Historical reference
Composite materials are modified plastics with improved aesthetic, strength and handling properties. Their connection with tooth tissues is due to adhesion.
Adhesion (Latin adhesio - fusion, adhesion) is the phenomenon of adhesion between two surfaces brought into contact. Systems created on the basis of this phenomenon are widely used in dentistry.
Currently, there are seven generations of these systems , with the fourth to seventh being used in clinical practice. They differ from each other in adhesion strength, the relationship of the components (separately or in combinations) and indications for use.
The widespread use of veneers dates back to the 1980s.
Preprint
A preliminary impression is necessary to make a temporary veneer.
If the shape of the tooth is intact or slightly changed, then this impression can be used for the clinical fabrication of a temporary restoration, and then it is enough to take it with a partial tray.
If a laboratory is involved in making a temporary veneer, it is necessary to take an impression from the entire dentition, as well as a second impression from the antagonist dentition.
For preliminary impressions, alginate masses are most often used, since they allow better brightening of the cervical area in one step or more, and are economical.
During storage, the alginate impression must be placed in a tightly closed plastic bag without adding anything to it. Such storage is preferable to storage in water, since it will prevent the impression not only from excessive shrinkage, but also from the occurrence of porosity as a result of leaching of mass particles. It is worth noting that impressions made from modern alginate materials, when properly stored, do not shrink within 100 hours.
Indications for the use of veneers
Indications for the use of veneers
- Changes in tooth color (discoloration);
- Tooth surface defects – stained cracks, non-carious lesions extending beyond the middle of the vestibular surface;
- The presence of gaps between teeth with a sufficient area of remaining healthy enamel and refusal of orthodontic treatment;
- Dental trauma;
- Abrasion along the cutting edge.
Preparation
It is incorrect to assume that preparation for a veneer corresponds to preparation for a ceramic crown, but only from the vestibular side. Indeed, the shape is similar, but for a veneer the minimum preparation depth along the ledge can be only 0.6 mm, in contrast to the crown, which should be no thinner than 1.0 mm in this place. Along the cutting edge, the veneer should be no thinner than 1.0 mm, and the crown – 2.0 mm.
When preparing teeth for veneers, doctors often use special sets of burs. At a minimum, these kits include a marker bur, a basic preparation bur, and a finishing bur.
A marker bur can be in the form of a wheel-shaped bur or consists of disks of a certain diameter strung on an axis at regular intervals. This bur is used to mark the preparation depth. And then, with the main bur, the hard tissues of the tooth are ground down to the bottom of the resulting marker grooves. Preparation without the use of marker burs is acceptable, but their use allows you to accurately calculate the depth of preparation, taking into account the small thickness of the veneers, and is strongly recommended for novice doctors.
The main preparation is most often done with a cone-shaped bur with a rounded top. In this case, the bur is placed parallel to the axis of the tooth, and the tip of the bur is held at the level of the future ledge, repeating the contours of the gum as it moves. Particular attention is paid to the transition from the vestibular surface to the contact surface. If the natural contact point is not broken, then the preparation is carried out in such a way as not to affect it.
There are two main options for preparation in the area of the incisal edge (or tip of the canine) - with and without overlap. The choice depends on the occlusal relationship of the patient's teeth and the doctor's preferences. The main thing is that the transition zone from the veneer to the tooth tissue does not fall into occlusal contact in the central occlusion, which is checked using articulation paper. Therefore, preparation with overlapping of the cutting edge, in which a ledge is formed on the oral side, is preferable.
The preparation is completed by smoothing out sharp transitions and finishing the surface. For these purposes, a bur of the same shape as the bur for basic preparation, but fine-grained or carbide, is best suited. Such smoothing is necessary not only for a more accurate representation of the relief in the print and, accordingly, on the model, but also to prevent chipping of the ceramic, since stress is concentrated in sharp transitions.
Installation steps
Photo: Veneers on a plaster model
- Cleaning the tooth surface from plaque. Products that do not contain oils and fluoride are used.
- Selection of the required shade of filling material.
- Grinding of the front surface of the tooth with preliminary anesthesia. The required amount of enamel is removed from the surface of the tooth. The depth of enamel grinding depends on the thickness of the veneer overlay.
- Taking impressions. To take dental impressions, a special spoon is used, on which a special paste is applied, then the spoon is pressed against the teeth until the mass hardens.
- Based on the dental impressions obtained, a plaster model is cast in the laboratory to obtain an exact copy of the patient’s teeth.
- Making a veneer using a cast plaster model.
- After the doctor has prepared the teeth, a temporary veneer is made directly in the office.
- Trying on the finished veneer after its manufacture. If necessary, adjustments are made, deficiencies are eliminated, and the bite is checked.
- The tooth and veneer are washed under running water and dried with air. Then, to increase the strength of fixation of the plate to the tooth, the doctor etches the enamel with a special gel. Only after this is the veneer fixed to the tooth using special cement.
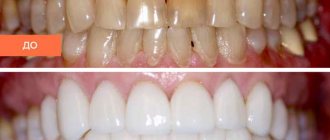
Cleaning teeth from plaque
Photo: Cleaning teeth from plaque before installing veneers.
It is a must when carrying out any types of restorations.
- Cleansing is performed with a special paste that gently cleanses the tooth of plaque and plaque.
- The dentist applies the paste to a rotating standard polishing disc or brush and cleans.
- To prevent heating, the paste is taken in large quantities.
- In this case, saliva is a kind of saliva ejector.
- After treatment with the paste, the tooth is thoroughly rinsed with water.
Ignoring this procedure leads to a fairly rapid formation of plaque around the lining and pigmented border.
Selecting the shade of filling material
With the patient in a sitting position, the color of the filling material is selected in natural light.
The tooth and reference should be wet when choosing the color, which gives them a natural look.
The choice of shade should be made in natural light.
Tools and equipment for tooth preparation
High-quality grinding of a tooth before covering it with veneer requires the use of modern, highly functional dental equipment.
- The preparation unit must have water-air cooling, a tip washing system, a fiber optic device, a scaler, a 270° rotation of the control panel around the chair, an air-water gun and a control unit for three tips.
- The spittoon must be equipped with an air vacuum group: a dust and saliva ejector, and a built-in clean water system.
- The presence of a lighting device - a reflector, creating a uniform illuminated field with clear boundaries.
- Equipping the dental chair with a silent electromechanical lift makes it possible to treat the patient in a lying position with four hands.
Working impression and occlusion determination
When making a veneer in a laboratory in a clinic, it is necessary to take an impression from the dentition, including the prepared tooth, an auxiliary impression from the antagonist dentition, and determine the patient’s usual occlusion.
Precision polyvinylsiloxane (silicon-A) materials are best suited for the working impression. For preparations with a shoulder at or below the gingival level, gingival retraction is performed and a two-layer impression is obtained using a one-step or two-step technique, depending on preference.
For an auxiliary impression, alginate mass is used. And to register occlusion, special silicones are used again. The advantage of these special materials over waxes is that they are more rigid and allow the application of registration material after closure of the dentition and control of occlusion. The base layer of the impression mass, as well as the base wax, are not suitable for recording occlusion, since they are not rigid enough and can lead to significant errors.
Dental care with veneers
The service life of a veneer is more than 10 years, provided proper care and systematic checks by a dentist. Experts recommend:
- Clean your teeth daily using a brush and floss to avoid the occurrence of caries in veneered teeth;
- Avoid excessive force on teeth with veneers - do not bite your nails, do not bite threads, do not crack nuts, etc. Otherwise, it is difficult to avoid the porcelain plate being displaced or broken.
Aesthetic dentistry from the Interdentos dental laboratory provides for the production of ceramic veneers at attractive prices.
Manufacturing/fixation of temporary veneer
A temporary veneer is made from a preliminary impression or template made in a dental laboratory. To do this, the undercuts in the impression are cut off and material for temporary restorations is added to it. After this, the impression along with the material is brought into the oral cavity and pressed out. After hardening, the restoration is removed from the impression, processed with cutters and polished.
Sometimes a temporary veneer is made like a direct veneer from a composite filling material, but always without the use of adhesive systems so that it can be completely removed.
Before fixing the provisional veneer, it is recommended to treat the tooth stump with a desensitizer (for example, “BV” material). This is necessary to reduce the risk of increased tooth sensitivity. The principle of operation of these agents is to seal the tubules of exposed dentin. In this case, it is precisely desensitizers that should be used, and not, for example, composite adhesives, in contrast to which they practically do not create a film on the dentin surface, without compromising the accuracy of the fit, and at the same time, which is very important, they do not impair the strength of subsequent adhesive fixation. Therefore, desensitizers can be used repeatedly, both before taking impressions and after, without fear of breaking the marginal seal.
For temporary fixation, eugenol-free temporary cements, such as Systemp, should be used. link, because they do not cause inhibition of adhesive systems during permanent fixation. In difficult cases, fixation is carried out using a bond, spot etching or, without etching the surface of the stump at all.
Materials used
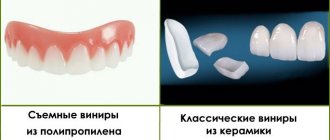
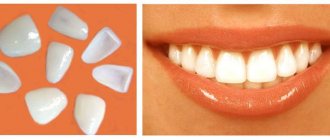
Ceramics and filling material are used to make veneers.
There are two types of ceramics - porcelain and zirconium dioxide. Porcelain is very similar to natural tooth enamel; it is highly durable, does not change color even after a long time, and is translucent. Thanks to this, overlays made of this material look very natural and natural, even if you look at them from a close distance. Zirconium dioxide overlays have a long service life and high reliability. They do not absorb food dyes and do not fade over time. Filling material is what veneers, called composite, are made from. They are performed directly in the dental office. As a rule, such dentures are installed on the front teeth without grinding them down.
The cost of composite veneers is lower compared to ceramic ones, but they deteriorate faster and are not able to last a long time.
In addition, there are so-called lumineers - ultra-thin veneers made of very durable porcelain, whose thickness is only 0.2-0.5 millimeters. They do not affect the enamel and can be removed if desired. There is no need to grind down your teeth before installing lumineers; they are secured using a mixture that does not dissolve in saliva.
Fitting
At the fitting stage, the marginal fit, occlusal contacts, shape and color of the veneer are checked.
The accuracy of the marginal fit is assessed using a corrective layer of impression mass. In places where the mass is pressed through, the veneer is ground off with diamond burs.
Occlusal correction is then made as far as possible. Due to insufficient fixation of the veneer during fitting, the final occlusal correction can be carried out after cementation.
The shape of the veneer is agreed upon with the patients. Corrections are made if necessary.
The color of the veneer is assessed by placing it on the stump using special glycerin try-in gels. The color of the gel fully matches the color of the fixing material, therefore, based on it, you can accurately select the one you need from the assortment of adhesive cement. In this case, inaccurate color matching can be corrected.
Benefits of porcelain veneers
Veneers, compared to other types of dental restorations, have two main advantages:
Porcelain veneers give the tooth a natural appearance. Until recently, all materials used by dentists to improve the appearance of restored teeth were opaque or translucent. This means that light, hitting the surface of such materials, was immediately reflected from their surface without penetrating deep into it, which did not allow achieving a complete resemblance to natural teeth. Porcelain veneers are transparent and this is their main advantage compared to all other materials.
Porcelain is a ceramic, glass-like material that is smooth and completely impenetrable, so there will be no stains or discoloration on its surface.