15.12.2020
Modeling the base of the prosthesis - creating a wax prototype of the base of the prosthetic structure. This is an important stage on which the aesthetics and functionality of the prosthesis depend. Classic technologies involve carrying out all clinical and laboratory stages manually. With the help of increasingly popular CAM/CAD systems, modeling of the base and the entire prosthesis is carried out on a computer.
Classic basis modeling
The process consists of two stages - preliminary and final basis modeling. The preliminary is aimed at preparing the accluder and articulator for testing the design, the final is aimed at giving the wax base and teeth a look that best matches the finished prosthesis.
Pre-modeling stages:
- Adding wax to areas lacking volume.
- Fastening artificial teeth, and for partial structures and clasps.
- Cleaning the occlusal and vestibular surfaces of teeth from hardened wax.
- Smoothing the wax base, giving it uniform thickness.
- Rounding the edge of a composition.
- Smoothing out irregularities.
After this, the clinic checks the design of the prosthesis, tries it on in the patient’s mouth, returns it to the laboratory and begins the final modeling of the prosthesis base. Its stages:
- Fixation of teeth separated during fitting with wax.
- Removing wax from all surfaces of teeth.
- Design of the edge of the artificial gum - leveling or, on the contrary, creating contours that repeat the anatomical ones. The latter technique contributes to more reliable fixation of the prosthesis. To give a natural look, a lower roller is formed in older patients, and a high one in young patients.
- Modeling the base of the upper jaw. The wire arch is removed, ensuring uniform thickness of the artificial gum. Heated wax is applied to the palatal surface to form a relief, the distal edge is reduced to nothing, and connected to the gum.
- Excess wax is removed from the surfaces of the teeth.
- The wax base is glued to the model.
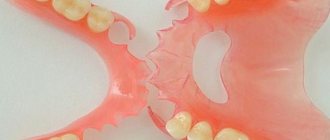
Making a removable laminar denture in the absence of teeth
Prosthetics for patients with complete absence of teeth consists of the following clinical and laboratory techniques:
1) obtaining anatomical casts of the jaws for the manufacture of individual spoons;
2) obtaining plaster models and making individual spoons;
3) fitting individual trays using functional tests and taking functional impressions;
4) obtaining working models from functional casts and making wax bases with occlusal ridges;
5) determination of the central ratio of toothless jaws, selection of the shape, size and color of artificial teeth;
6) plaster casting of models into an articulator (occluder) and placement of artificial teeth;
7) checking the design of wax compositions of prostheses;
 plastering models into cuvettes, replacing wax with plastic, finishing, grinding and polishing prostheses;
9) checking and applying dentures to the jaws.
Depending on the technique used and the type of impression material, the number of clinical and laboratory stages may vary.
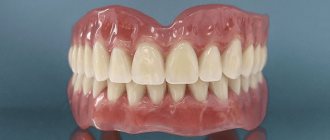
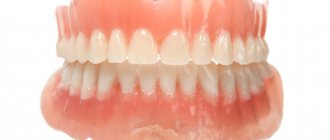
Rice. 1 Finished dentures
1. Obtaining models from anatomical impressions. Individual spoon .
Plaster, thermoplastic and alginate masses can be used as impression material.
In a dental laboratory, a plaster model is cast from an impression, on which an individual tray is made from one or another material (wax, stens, plastic, metal, etc.)
wax spoon On a plaster model of the jaw obtained from an anatomical impression, the boundaries of the individual tray are marked:
- on the upper jaw, the boundaries of the spoon cover the alveolar tubercles, passing vestibularly below the highest point of the arch of the transitional fold, bypassing the buccal and labial frenulum. At the point of transition of the hard palate into the soft palate, the border passes 2 mm behind the palatine fossae;
-on the lower jaw: the vestibular border of the spoon passes 2-3 mm short of the transitional fold and bypasses the buccal and labial frenulum; in the retromolar region it is located 2 mm behind the mucous tubercle; on the lingual surface, from the tubercle, the border goes vertically down to the maxillary-hyoid line and passes forward slightly below it, slightly short of the deepest part of the sublingual space, bending around the frenulum of the tongue in front . Having specified the boundaries of the future tray determined by the doctor on the model, the dental technician heats up the wax plate and presses the model tightly, cutting off the excess strictly along the marked boundaries. In the anterior section of the tray for the upper jaw, a handle is modeled.
The wax mold of an individual spoon, together with the model, is plastered into a cuvette in the reverse way and the wax is replaced with plastic.
In some cases, an individual wax tray made in this way, after correcting its edges in the oral cavity, is used to obtain a functional impression using fluid impression materials.
An individual wax tray can be made directly in the oral cavity using G.B. Brakhman’s method, which speeds up the process of making a prosthesis and reduces the number of visits to the patient.
When making an individual spoon from plastic standard AKP-II plates, the latter are softened in hot water or over a gas burner flame and pressed onto the model. Excess plates are cut off with scissors after preheating the corresponding areas.
To speed up and simplify the process of manufacturing individual trays from AKP-II plastic, polystyrene, polycarbonate, you can use the stamping method in the Vacuoform installation (Czechoslovakia), a dental orthopedic press installation (SDPU) designed by E. A. Vares or a vacuum installation designed by Yu. K. Kurochkina.
Operating principle. The plaster model is installed on the base of the installation, covered with a plastic plate, covered with a casing and the electric lamp is turned on. After 5 minutes, when the plate acquires plasticity, its edges are pressed with a clamping ring to the base of the installation, heating is stopped and the vacuum pump is turned on. The plastic plate tightly compresses the plaster model and accurately reproduces its relief.
Making an individual spoon from quick-hardening plastics, “Protacryl”, “Redont”) consists of preparing plastic dough, forming plates of a certain shape and thickness and pressing them onto a plaster model manually or using the above-mentioned devices.
2. Obtaining working models of toothless jaws
Based on functional impressions obtained using individual trays and various impression materials, working models of the jaws are cast. To do this, the print is edged on the outside with a strip of wax 2-3 mm thick below its edge by 3-4 mm. This allows you to maintain the thickness of the edges of the cast on the model and prevent their damage when opening the model.
The boundaries of the denture base marked on the impression are transferred to the working model, they are specified by a dental technician before making a wax base with an occlusal ridge.
Maintaining the exact boundaries of the prosthesis base on models of edentulous jaws is crucial in matters of fixing the prosthesis and preventing undesirable effects on the underlying tissues.
The boundaries of the base of the prosthesis on the upper edentulous jaw are located vestibular along the transitional fold - the deepest place of the arch, bypassing the attachment points of the frenulum of the upper lip and bucco-alveolar cords. The depth and direction of the notches in the edge of the prosthesis base must correspond to the degree of expression, place of attachment and direction of the formations of the mobile mucous membrane, so as not to injure them and throw off the prosthesis during functional load.
In the distal sections, the base of the prosthesis overlaps the maxillary tubercles, rising to the middle of the pterygomaxillary recesses, without overlapping the pterygomaxillary folds running from the distal surface of the maxillary tubercle to the retromolar region of the lower jaw.
The reference points for determining the location of the end of the posterior edge of the prosthesis base are the palatal (blind) fossae located on the sides of the posterior nasal protrusion and close to the so-called vibrating zone “A”, determined when pronouncing the sound “A”. The degree of possible lengthening of the distal edge of the prosthesis base depends on the shape of the slope of the soft palate (steep, flat and average), the width and degree of compliance of the mucoglandular zone.
With a gentle slope of the soft palate and a wide mucoglandular (valvular) zone, the distal edge of the prosthesis can be placed in front of the blind fossae; with a narrow valve zone, their overlap is a prerequisite.
The boundaries of the base of the prosthesis on the lower edentulous jaw are vestibularly located along the transitional fold with the release of the frenulum of the lower lip and bucco-alveolar cords; distally - partially or completely overlap the mandibular (mucosal) tubercles; orally - along the transitional fold, freeing up space for the frenulum of the tongue and slightly overlapping (or at their level) the internal oblique lines (depending on the degree and nature of atrophy of the alveolar part in the distal sections).
In addition to the boundaries of the prosthesis base, the following anatomical formations are noted on the working models: the incisive papilla, palatine fossae, torus, maxillary cusps, crest of the alveolar part, midlines, contours of the mylohyoid ridge and mandibular mucous tubercle. The midlines of the models of the upper and lower jaws, as well as the lines corresponding to the middle of the ridge of the alveolar parts, are extended anteriorly and posteriorly to the base of the model. This preparation is intended for the targeted modeling and placement of occlusal ridges and placement of artificial teeth.
3. Making wax bases with occlusal ridges
Due to the complete absence of teeth in the jaws, it is necessary to know and strictly adhere to the size and location of the occlusal ridges in the anterior and lateral sections, strict adherence to the boundaries of the base of the prosthesis, its thickness and tightness of fit to the model.
On a plaster model, previously moistened with water, the wax plate is pressed and the edges are trimmed along the marked boundaries. Having secured the wire arch on the oral slope of the alveolar part (process), occlusal ridges are prepared from durable wax and modeled according to the shape of the jaw. The width of the ridge on the upper jaw in the anterior section should be 5-8 mm, in the lateral sections 8-10 mm and end at a distance of 5 mm from the middle of the maxillary tubercle. The anterior section of the upper ridge is located at a distance of 8-10 mm anterior to the center of the incisive papilla. The height of the cushion in the anterior part of the upper jaw model is 15-20 mm, in the distal part 10-12 mm, and in the lower jaw model 10-15 mm.
Then the vestibular and oral surfaces of the occlusal ridges are modeled, achieving a direct transition to the surface of the wax base. The angle formed by the vestibular (oral) surface with the occlusal plane of the roller should be 90-100°.
When working on solid bases, the latter are made by replacing the wax base with plastic according to the generally accepted method. Plastic bases are placed in the oral cavity, checking their fixation on toothless jaws, clarifying the boundaries and thickness. Then wax occlusal ridges are made and placed on solid bases in compliance with the requirements described above.
The use of solid bases for subsequent work in the clinic to determine the central relationship of edentulous jaws and check the design of prostheses facilitates the doctor’s work, prevents errors and improves the fixation of finished prostheses. They are used for significant atrophy of the bone base of the jaws and for conducting phonetic tests at the stage of checking the design of prostheses.
Determining the central ratio of toothless jaws is a clinical stage at which the doctor creates conditions for the correct design of the dentition and the prosthesis as a whole. It includes the following operations:
1) establishing the height of the occlusal ridge of the upper jaw in the anterior section;
2) determination of the occlusal plane;
3) determination of interalveolar height;
4) determination and fixation of the central relationship of toothless jaws;
5) application of anatomical landmarks to the vestibular surface of the occlusal ridges for the placement of artificial teeth (midline of the face, canine line and smile line).
4. Methods for placing artificial teeth in complete removable dentures
Positioning of teeth in an individual articulator during extraoral recording of movements of the lower jaw. Before proceeding with the placement of artificial teeth, it is necessary to position and secure the models in the articulator space. To do this, the models and the bases with occlusal ridges located on them are connected to each other in the position of the central ratio and, together with the Snow face bow, are installed in the articulator space. Their correct location is facilitated by the face bow, which is strengthened in the area of the “joints” of the articulator. It helps to reproduce the position of jaw models in relation to the temporomandibular joint.
Having strengthened the arch, the models are plastered to the articulator and after removing it, the articulator is adjusted according to the obtained data on the angles (sagittal and lateral).
The placement of artificial teeth begins with the upper model, creating the shape of the dental arch in accordance with the vestibular relief of the occlusal ridge.
Then they place the teeth on the lower model, starting with the second premolars, sliding, identifying the cusps that interfere with this and grinding them down. Then the first and second molars, first premolars are placed, and each time the presence of contacts is checked during movement on both sides. The lower teeth are placed with the chewing surface inclined in the medial and oral directions.
When placing the lower anterior teeth, the degree of their overlap with the upper anterior teeth is determined by moving the upper frame, achieving contact in the anterior and lateral parts of the dental arch.
After completing the setting of the teeth, check for the presence of multiple contacts during lateral movements of the lower jaw on the working and balancing sides, as well as when moving the lower jaw forward.
This technique has a number of disadvantages. Firstly, when recording movements of the mandible extraorally, the arch rests on soft tissue in the area of the temporomandibular joints, the thickness of which varies from person to person, which is not taken into account when transferred to the articulator. Secondly, it is difficult to position the models taking into account the direction of the nasal line due to their deviation in the vertical plane. Based on this, they most often proceed as follows.
Having removed the arch, the maxillary model is placed on the articulator platform, focusing on the occlusal plane, the tip of the midline index and the midline of the occlusal platform. In this case, the model of the upper jaw is located in the articulator within an equilateral triangle, where the apex is the tip of the midline indicator, and the base is perpendicular to the protrusions on the vertical part of the lower frame.
Having plastered the upper model to the artnulator frame, remove the occlusal platform and, attaching the lower model to the upper one, strengthen it to the lower frame. Then the articulator is adjusted according to the obtained angle records and the artificial teeth are placed.
When using the intraoral method of recording movements of the lower jaw, the models are plastered into the articulator and the artificial teeth are placed as follows. Having plastered the models in the position of central occlusion into the articulator, remove the bases with occlusal ridges. It is inserted into the oral cavity and a sagittal shift is established, filling the distal gap between the ridges with wax. Having removed the bases from the oral cavity, they are installed on the lower model and, after loosening the screw in the area of the “joints” of the articulator, the upper model is inserted into the bed of the base. In this case, the angle of the sagittal articular path required for the given case is automatically set. The resulting position of the models is fixed with screws. Then the same operation is performed with lateral movements of the lower jaw.
You can use another method. The models are cast into an articulator with an average angle value. Then the artificial teeth are placed according to the method described above and, having been inserted into the oral cavity, the patient is asked to move the lower jaw forward until the marginal closure. In this case, a wax plate is placed on the chewing surface of the teeth of the lower jaw to obtain an imprint of antagonist teeth. Having removed the wax reproductions of the dentures from the oral cavity and installed them on the lower model along with the wax imprint, move the upper model until it is installed in the template bed. The same is repeated with lateral movements of the lower jaw. New positions of the upper jaw model are secured with screws, and correction of the set teeth is carried out only on the lower jaw.
5. Method of placing artificial teeth
First, the occlusal surfaces of the wax ridges are shaped and the prosthetic spherical surface is determined using a special device consisting of an extraoral facebow and an intraoral removable forming plate, the anterior part of which is flat, and the distal parts have a spherically curved surface with a radius of 9 cm.
First, an occlusal spherical surface is formed on the upper occlusal roller, cooled and, without removing the device, the lower occlusal roller with a softened surface is inserted. When the jaws are closed, the device forms a spherical surface on the lower occlusal ridge.
After this, the models are plastered into an occluder (articulator) and artificial teeth are placed. In case of unexpressed asymmetry of the alveolar parts (processes), the staging platform is installed on the lower occlusal ridge according to the general rules, and its thickness is reduced by half until the coarse bone is exposed. Artificial teeth are placed in contact with the surface of the platform (with the exception of the lateral incisors), first the upper ones, then the lower ones. In case of pronounced asymmetry, another platform is used, consisting of 3 parts: the front and two side ones, having a spherical surface radius of 9 cm and hingedly connected. In the middle of the side parts there are slots for directional arrows. The platform is first strengthened on the upper occlusal ridge, then transferred to the lower one so that its lateral parts rotate, and, having removed the upper ridge, arrows are installed according to the interalveolar line. Having fixed the side parts of the platform, the arrows are removed and artificial teeth are placed.
Fig.2 Alignment of teeth along the axis when setting teeth.
6. Modeling the wax structure of a denture
After setting the teeth, the wax base must be given a certain appearance, which is achieved by careful modeling and shaping of all surfaces. The edges of the wax base of the upper jaw along the transitional fold should be located along the marked boundaries, have a thickness corresponding to the edge of the functional cast, and be smooth and rounded. The thickness of the wax base should be uniform, the surface should not have unevenness, and be smooth.
The teeth are thoroughly cleaned of wax, and a small rounded protrusion is modeled in the neck area. The palatal surface of the chewing teeth is modeled at the same level with the surface of the wax base, without depressions and protrusions.
On the lower wax base, in the area of the vestibular surface of the necks of the anterior teeth, a small protrusion is modeled, which helps stabilize the prosthesis due to the adhesion of the orbicularis oris muscle. The lingual surface in this area is modeled smooth, without delimitation into individual teeth.
In the area of the lateral teeth, small hyoid processes are modeled, located under the lateral surfaces of the tongue and helping to hold the prosthesis on the jaw.
The edges of the wax base of the lower jaw must be of a certain thickness, which is dictated by the thickness of the edges of the functional impression; they are located along the transitional fold.
After placing artificial teeth and modeling the bases, wax reproductions of the dentures are sent to the clinic to check the structure in the patient’s oral cavity. In this case, the doctor pays attention to the boundaries, thickness and tightness of the wax bases on the plaster models; correct placement of artificial teeth (in the occluder); integrity of working models; correct placement of artificial teeth (in the oral cavity); degree of fixation and stabilization of wax reproductions of prostheses; correct determination of the interalveolar height and the central ratio of toothless jaws; density of contact between artificial teeth; phonetic test.
7. Final modeling of wax denture bases
After testing the wax reproductions of the dentures in the clinic and before plastering them into cuvettes for replacement with the base material, careful modeling of the base is required, which facilitates the finishing of the denture after polymerization.
To do this, the edge of the artificial gum is glued to the model with molten wax along its entire length. The plate covering the palate is replaced with a new, thinner (1.5-2 mm) and without a wire gasket. The places where it connects to the base along all artificial teeth are smoothed.
If the transverse folds of the hard palate are reproduced on the basis of the prosthesis, they are thickened by adding wax before applying a new plate. This technique makes it possible to accurately convey the relief and dimensions of this important anatomical formation of the hard palate onto a wax base.
If there is a torus of the hard palate or other bony protrusions, insulation is created in the base by covering these formations on the model with insulating pads, and the thickness of the base is increased accordingly.
The necks of artificial teeth should be covered with wax by 0.5-1 mm, which contributes to their reliable strengthening in the base and creates conditions for artistic modeling in this area. The wax between the teeth is formed in the form of a triangular interdental papilla.
On the vestibular surface of the base, weakly expressed wide grooves can be created, corresponding to the intersocket septa. The surface of artificial teeth is thoroughly cleaned of wax and other contaminants and clearly engraved near the necks to better strengthen them in the plaster of the ditch and prevent displacement. When modeling the base for the lower jaw, the wax plate is not changed; the base is made thicker than the upper one (2-2.5 mm), due to the small size of the prosthetic bed and the possibility of breakage.
After modeling is completed, the model is quickly passed over the burner flame and all irregularities are smoothed out in wax, giving the surface of the base a shiny appearance.
8. Methods for fixing dentures in the absence of teeth
Fixation and stabilization of dentures on edentulous jaws, especially on the lower jaw, is associated with great difficulties. All proposed methods can be divided into mechanical, biomechanical, physical and biophysical.
Mechanical methods of fixation include coil springs between prostheses, now of primarily historical interest; increasing the height of the alveolar processes by replanting cartilage, plastic or metal frames. Biomechanical methods involve taking into account and using anatomical formations, in particular the retromolar and sublingual space of the lower jaw to improve the fixation of the prosthesis.
Physical methods played a significant role in solving the problem of fixing dentures on toothless jaws. These include adhesion, i.e. adhesion of the surfaces of two dissimilar bodies, cohesion, i.e. adhesion (attraction) of molecules in the physical body due to intermolecular influence. When a precisely manufactured prosthesis is applied to the jaw, a thin layer of saliva remains between it and the mucous membrane of the prosthetic bed, and the prosthesis, thanks to adhesion and cohesion, is quite firmly fixed. Physical methods also include the use of atmospheric pressure differences. At one time, chambers were made in the base of the prosthesis on the side adjacent to the mucous membrane of the palate, from which the patient sucked out air, creating a rarefied space between the prosthesis and the mucous membrane of the palate. Physical methods have improved, but have not solved the problem of fixing a complete removable denture.
The main method of fixation and stabilization is biophysical, since it is based on physical laws, and the neutral zone is formed by living tissues. The tight fit of the edge of the removable denture to the semi-movable zone of the mucous membrane along the border of the prosthetic bed prevents the penetration of air under the denture. Due to the mobility of the mucous membrane of the neutral zone, it follows the edges of the prosthesis, providing stable negative pressure under the prosthesis, fixation and, to some extent, stabilization of the prosthesis at rest and during function. This method of fixing the prosthesis is called functional. Full stabilization of the prosthesis, i.e. its stability during biting and chewing food, depends mainly on the design of the dentition.
"Self-control"
1)
Material used for ______________________________________________________________
2)
Positioning of teeth in ____________________________ occlusion.
3)
Base wax consists of ______________________________________________________________
4) The upper dentition is designed in the form of ____________, the lower – ___________________.
5) Placing artificial teeth on glass:
a) ____________________ is positioned symmetrically to the midline so that the cutting edges ___________________________.
b) The lateral incisors are slightly deviated from the midline in the cervical part and the cutting edge is ______________________.
c) ____________ with their tearing tubercles touch the glass and form _______________________________________.
d) The first premolar is placed so that it touches the glass only __________________________________________ __________________________.
e) The second premolar touches the glass _________________________.
f) The first molar touches the glass only with its ____________cusp. Medial vestibular tubercle ____
_______________________________________________________
_______________________________________________________.
g) Second molar ________________________________________
_______________________________________________________.
6) When modeling the wax composition of the prosthesis base, the following requirements must be met:
a) The edge of the prosthesis and its thickness should ____________________
_______________________________________________________
_______________________________________________________,
b) The vestibular relief of the wax base should ___________
_______________________________________________________,
c) The configuration of the palate of the prosthesis should _____________________
_______________________________________________________,
d) To ensure the strength of the prosthesis base, it is important that __
_______________________________________________________.
7)
Reference lines are applied to the model: 1______________,
2 ________________, 3 _____________________.
Establish the correct sequence for making an individual spoon: ___________________________________.
1 – delineation of the boundaries of an individual tray, 2 – processing of an individual tray, 3 – obtaining working models from anatomical impressions, 4 – mixing and molding of cold-curing plastic, 5 – insulation of the gypsum surface of a working model, 6 – modeling of an individual tray, its polymerization.
9) ______________ is a term that refers to the boundaries between the hard and soft palate. Revealed when pronouncing the sound “A”. Serves as a guide for determining the posterior edge of the palatal base.
10)
Main types of faces a) ______________, b) ____________________,
V)________________________.
11)
The main styles of artificial teeth: a)____________________,
b) _________________________, c) ___________________________.
12)
Give the name ________________________________________________
13)
Give a name to the laboratory stage of making a custom spoon__________________________________
14)
Zones ______________ and ________________ support on the top (a)
and lower
(b)
jaws
15)
Give the device a name_________________________________
16)
Give the device a name_________________________________
17)
The curve demonstrating the relationship of the cutting edges of the lower artificial teeth to the prosthetic plane is called ____________________________________________________________.
18)
Give a name to the laboratory stage of manufacturing a complete removable denture _______________________________________.
Test control
CAM/CAD modeling of prostheses
Prosthetics for toothless jaws is the most difficult problem in orthopedic dentistry. This is due not only to the complete loss of teeth, but also to atrophic processes due to the lack of chewing load. As a result, the landmarks that determine the height and shape of the alveolar processes are lost, new relationships between the arches of the jaws arise, which significantly complicates the determination of the interalveolar line common to the upper and lower jaws.
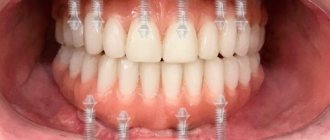
CAM/CAD technologies allow you to accurately calculate divergence angles, automate the modeling and production of the prosthesis, and create the most comfortable and aesthetic prosthetic design for the patient. Modeling of the frame, base, teeth is performed on a computer in specialized programs for three-dimensional graphics. First, the jaw is scanned using a tomograph or silicone impressions are made, followed by scanning; further steps are performed in the program. You can construct the model manually or use the library of blanks.
Typically, digital technologies are used in modeling non-removable prosthetic structures, but they are increasingly being used in the creation of clasp and complete removable dentures. Automated systems make it possible to create high-precision structures in a short time with minimal technical costs.
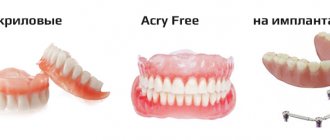
What is a clasp prosthesis and its types?
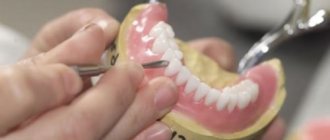
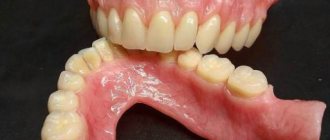
A clasp denture helps to normalize chewing function and restore attractiveness in a short period of time. It is used when part of the dentition is lost, as well as when for certain reasons it is impossible to install an implant or bridge. To understand what a clasp prosthesis looks like and how it should be used, just look at the finished product.
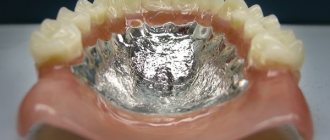
This is a removable structure made of artificial teeth with a base simulating gum, installed on a cast metal arch (clasp). Attaching clasp dentures is designed to fix the structure to crowns, healthy teeth or implants. The device helps to evenly distribute the chewing load throughout the jaw. Most often, fixation of clasp dentures is ensured with the help of clasps linked to the units in the installed position. The model does not have a palate characteristic of plate microprostheses. The design is compact, does not cause discomfort, and is practically invisible in the oral cavity.
Separate parts of the clasp prosthesis are included in all existing models. These include:
- Frame of a clasp prosthesis (arch). This is the base that performs the supporting function and holds together all the parts of the structure. It should follow the shape of the hard palate or alveolar area of the lower jaw;
- Fixing parts;
- The base part on which artificial teeth are placed.
To extend its service life, it is important to follow the rules of care and know how to remove a clasp prosthesis of a specific model.
Types of clasp dentures are classified depending on the material used to make artificial teeth (plastic or composite materials) and the method of fixation.
Methods for fixing clasp dentures
1. On clasps . They are considered budget designs. They are easily removed and are held on the supporting teeth with the help of flattened metal hooks - clasps. Clasps firmly hold the device in the mouth without damaging tooth enamel. Hooks are manufactured in accordance with the parameters of the supporting units. The clasp clasp prosthesis is strengthened only when it reaches the front side of the dentition and is noticeable during conversation, which is considered a disadvantage of this model.
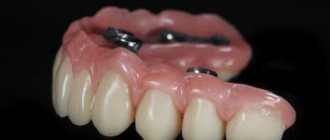
2. On attachments (micro-locks). Fixation is carried out using micro-locks, invisible from the outside. The elements of a clasp prosthesis of this type are located as follows: one of them, the patrix, is located in the microprosthesis itself, the second, the matrix, is mounted in a metal-ceramic crown, which is put on the abutment tooth. Fixation is performed automatically when put on. There are rail, crossbar and spherical micro-locks. When asked which clasp prosthesis should be chosen and which is better, experts generally indicate the model on the attachments. It differs from the clasp type in its high aesthetic characteristics, it is compact, lightweight, and has a reliable fixation. The condition for establishing this type of device is the absence of periodontal tissue diseases and the presence of the required size of the coronal zone of the supporting part. The downside is the inevitability of grinding the supporting teeth.
3. On telescopic crowns . Fixation is done using composite crowns. The removable element is an artificial tooth with a cavity inside, and the supporting base is a stump turned to the appropriate shape, covered with metal on top. It is used in the absence of the majority of teeth, the smoothness and small size of the remaining fragments, as well as in the presence of chronic pathologies of periodontal tissues. The design is lightweight, has high aesthetic characteristics, and helps concentrate the load when chewing only on the supporting parts, thus reducing the likelihood of damage to the mucosa.
4. Splinting fastening . Splinting clasp prosthesis is used for periodontitis, the absence of a large number of teeth and the unstable condition of the remaining ones. A prerequisite for this is the presence of elements with the required height on which the structure will be attached. The arc of the clasp prosthesis of this model connects the caps (fixed part) and matrices (removable part). It is attached to healthy teeth from the inside using metal plates that accurately follow the shape of the teeth. Long-term wearing of the device does not spoil the enamel or damage the mucous membrane.