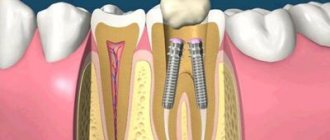
What are root canals
The dental nerve, or pulp, is located not only inside the tooth, its crown, but also inside the roots. Root canals are elongated cavities located inside the roots of teeth. This is where the dental nerve passes within the root. The number of root canals in one root may vary. There may be two or more channels in one root. The root canal can be very thin, thinner than a human hair, so high-quality treatment can take quite a long time. The difficulty is that even with the use of modern microscopes, the doctor cannot see absolutely all parts of the root canal. Work in the deepest part of the root is carried out almost blindly, which requires experience and skill from the doctor.
Clinical cases. Repeated canal treatment.
Today I want to continue to present you with my own clinical cases, from which you can more clearly understand some of the details of endodontic treatment.
In one of the previous posts, I showed one of the main reasons for the development of chronic inflammation in the bone tissue around the tooth root, namely, canals missed during primary treatment. Today I will show 2 more cases, approximately similar, when I had to deal not only with errors during the primary treatment of canals, but in addition to this, with an incorrectly chosen method for restoring “dead” teeth.
So.
Case one. Quickie...
A patient approached me with a request to try to “save” the lower 6th tooth from removal. This is what it looked like in the mouth.
The blue arrow shows the anchor pin showing through the composite filling. Black arrows indicate violations of the seal's fit to the tooth. The patient often notices the problem only when there is a “hole” in the tooth, or when the tooth is completely falling apart. Such fillings, which at first glance last for several years, are no less dangerous because microflora from the oral cavity can penetrate through the cracks for a long time without any symptoms into the tooth and root canals. At the same time, the formation of “granulomas” and “cysts” at the tops of the roots occurs.
What do we see here? Well, firstly, the tooth anatomy is completely absent. The huge cavity is plastered over (there’s no other word for it) without the slightest attempt to create on the tooth the surface relief necessary for chewing with tubercles and grooves between them. The anchor pin shines through the material, which is designed to hold this “slap” inside the tooth. Secondly, along the edges of the filling there is noticeable staining of the border, i.e. The filling has long been leaky, which means that the microflora of the oral cavity leaks inside, causing relapse of caries and an inflammatory process in the bone tissue around the root. Thirdly, we can see only 2 preserved walls of our own teeth, which are also quite thinned. Considering that the tooth has been dead for a long time, the restoration method clearly chosen was unsuccessful. And at the same time it was executed very poorly. The fact is that our chewing teeth experience quite serious loads when chewing (according to various sources, about 100 kg per cm2), and the remaining tonic walls can crack at any moment. Often the crack goes deep under the gum and eventually the tooth has to be removed. Therefore, if a tooth is pulpless and has significant damage (as in our case), then it must be restored with a crown. Only in this case will you be insured against any unpleasant surprises. But for this tooth this is only half the story. There was no less problem inside.
On an X-ray of a tooth, we can see several underlying problems. The red line outlines the outline of a bone tissue defect caused by chronic inflammation. The white dotted line shows a void in the canals that were not adequately expanded and sealed. The white arrow marks the position of the anchor pin, which “strengthens” the filling. You can see that this pin only enters the canal a few mm, and therefore does not serve the function of holding the restoration. In this case, it is not clear who is “strengthening” whom; rather, the filling is holding the pin. And finally, a pink arrow marks a filling hanging over the gum, which leads to food getting stuck between the teeth and gum inflammation. In general, a whole bunch of medical “jambs”.
This X-ray image shows, first of all, “empty” root canals and a fairly large focus of inflammation (what is often called a granuloma, cyst) at the top of one of the roots. In general, a whole bunch of mistakes and imperfections were concentrated in one tooth; in a word, this is an example of the dentist’s dishonest work. I always try to speak well of my colleagues or remain silent, but in this case we have to face the truth - it was the dentist who ruined the tooth. Initially there were no objective difficulties for high-quality work here. But now they have appeared. The future prognosis for such teeth is always based on 2 main problems - how successful canal re-treatment will be and how successful will be the attempt to adequately restore the tooth after that. Having assessed the likelihood of long-term success of these two components, you can decide whether to “save” the tooth from the surgeon’s forceps. After all, in any case, treatment costs money, and it is impossible to guarantee the result. One can only guess the likelihood of success. In this case, the channels did not appear impassable. And it was still possible to restore the tooth with a crown, even despite the high degree of destruction. Therefore, the decision was made to begin treatment. To begin with, the anchor pin was removed from the canal using ultrasound.
Then, not without difficulty, all 4 canals of this tooth were processed.
A control x-ray was taken immediately before filling.
This is what the final result looks like in the picture.
The canal treatment protocol in this case is standard, and is described by me here. The first part of the rescue task was completed. Now this tooth will be under observation for 3-4 months. After this period, a control x-ray will be taken, which should show how successful our attempt was to save the tooth from removal , namely, we expect a decrease in the focus of inflammation around the root. If this tendency is clearly noticeable, only then will a final decision be made to restore the tooth with a crown. And next in line for this patient is the “twin” neighbor of this long-suffering 6, the 7th lower tooth. What can I say?.. Recognizable handwriting of the previous doctor.
Case two. About the benefits of computed tomography in root canal treatment...
In the second case, everything started out quite similar.
In this case, everything is like a carbon copy, although this is a different patient. Here the anchor pin is also visible (and actually sticks out) (indicated by a black arrow). And despite the fact that the filling holds quite securely in the cavity and does not think of falling out, it has long been leaky, as evidenced by the staining of the border between the filling and the tooth (blue arrow) and the general darkening of the tooth . As in the first case, this leakage leads to the penetration of microflora into the tooth and the development of granulomas on its roots.
The same leaky filling, the same anchor pin... but the hard tissues are preserved much better than the first case. Along the entire perimeter of the tooth, the cavity boundary is located above the level of the gum, which means that at least the prognosis for the longevity of the restoration will be quite optimistic.
After removing the old filling and anchor pin, you can see what is happening inside the tooth under the seemingly good filling.
The photo immediately after removing the filling and removing the anchor pin shows the reason for the darkening of this tooth. In addition to the filling material (orange-colored gutta-percha), in the canals there is a noticeable amount of “dirt” that has seeped into the tooth for a long time through a leaky filling. However, the patient was not bothered by anything. Therefore, it is important that even if you do not have any symptoms, you show your teeth to the dentist at least once a year. Then you can avoid serious problems. Also, this situation is clear evidence that if the tooth remains standing for many years after treatment, does not bother you, and the filling has not fallen out, then this is not a reason to think that the treatment was carried out efficiently.
As for root canals, this is where the main difficulties were. Both canals were not very well processed and sealed, as a result of which granulomas .
This image also clearly shows the defects of the previous treatment. The black dotted line shows the outlines of the two roots of the problem tooth, the red line shows the untreated and unfilled areas of the root canals, the blue line shows the boundaries of the inflammatory process in the bone tissue
But a regular X-ray produces a flat, 2-dimensional image, with different structures superimposed on each other, and the complex anatomy of the canals cannot always be seen. Which is what happened in this case. One of the channels had a double bend. During the previous treatment, the doctor, for some reason, was unable to see and pass this bend, but rested against the walls of the root, creating the so-called. "step".
This figure shows a diagram of the formation of a “step” - one of the most unpleasant complications in endodontics, which a dentist can do with his own hands. The blue arrow shows the true direction of the tooth canal. The red arrow shows the straight part of the canal that the doctor was able to process with instruments. The green arrow shows that same “step”, i.e. the dentist loses the true direction of the canal and creates an artificial passage. During repeated treatment, the instrument, as a rule, also rushes along the most direct path and getting back into the bend of the natural canal in order to completely process it is very problematic.
This is a rather unpleasant complication, because... during repeated treatment, it is very difficult to “feel” again the real course of the natural canal. Without this, it is impossible to count on the success of treatment. Imagine that you need to feel, with your eyes closed, thread the thread into the smallest eye of the needle... In this case, the eye of the needle is located deep in the channel with a diameter of only 1-2 mm. This is approximately what the endodontist encounters every time in such cases. Solving such problems requires great skill, good equipment, spatial thinking, a fair amount of patience (and on the part of the patient too), well, and a bit of luck.
In this case, in order to better understand the structure of each canal, a computer tomogram (CT) of the teeth . Thanks to this x-ray method, we have the opportunity to trace in 3 dimensions the structure of any part of the dental-facial system, incl. and root canals. In our case, we got the following pictures.
A tomogram allows you to “split” a tooth into parts and look at each root separately, while unlike a conventional x-ray, we can examine any structure in detail, since there is no overlap of different formations on each other. This is the palatal root of our tooth shown separately. And in this picture, its “trickiness” is now visible in all details - a double bend in the middle, which became a stumbling block during the previous treatment. The dark halo around the root apex is a granuloma around the palatine root.
Now we see the buccal root separately. It does not stand out in anything special. A regular straight root with the same straight canal. However, it was also not adequately processed, and we also remember that the seal was leaking. Therefore, as a result, there is also inflammation at the apex in the form of a dark halo.
This is another projection of the same tooth. Since the tomogram gives us a 3D image, we can look at the tooth from any side. In this case, it’s as if we cut it lengthwise into 2 halves, but in a different plane. And now we can clearly see the tooth cavity with two diverging canals.
After this, it became clear in which direction the tools needed to be bent in order to find the “eye of the needle” of the real channel. This is what the tools looked like after several attempts.
This is only half of the pile of tools that eventually had to be thrown away. This is a clear demonstration of why complex re-endodontic treatment is so time- and resource-intensive, and, accordingly, why it is so expensive.
But the main thing in all this is that if you manage to save your natural tooth from removal, then it’s worth it. Because with all the advancement of implantation technologies today, the coolest and best “implant” is your own tooth. And therefore, it is not surprising that many patients are willing to preserve their teeth, despite the fact that the cost of canal retreatment and subsequent tooth restoration is comparable to the cost of installing an average price category implant.
This picture shows how, after many attempts, we managed to find the true course of the channel. The red arrow shows the very “step” in the canal that we managed to bypass and where the tool initially rested.
Photo of an absolutely clean tooth cavity after thorough washing, first of all, with sodium hypochlorite (“bleach”) and ultrasonic cleaning. Now the canals are ready for filling.
Final photo after completion of treatment. Both canals are sealed to the apex. The whole process took about 2.5 hours (for 2 visits). Now all that remains is to wait for the inflammatory process to disappear.
In this case, from an endodontic point of view, everything ended well for the tooth. In the future, after about 3 months, a control photograph will be taken to ensure the effectiveness of the treatment. Namely, we will wait for a decrease in the foci of the inflammatory process in the bone tissue, i.e., simply put, the dark spots around the tips of the roots should become smaller. In this case, such a tooth can be safely restored and count on its long service life.
This is what some mistakes and how to eliminate them during root canal treatment . And here it is easy to notice that it is much easier and cheaper to prevent punctures during the initial treatment than to correct them later.
Root canal treatment
Root canal treatment takes place in several stages. Before treatment, X-rays or computed tomography must be taken. Using CT or X-ray images, the doctor will determine the approximate length of the root canals, shape, and the presence of obstacles to their cleaning.
Preparation for root canal treatment involves administering anesthesia and isolating the tooth from saliva using a rubber dam. If a tooth is severely damaged, the doctor can first restore its walls using temporary filling material.
Features of treatment
Various techniques are used to treat impassable root canals:
- devital amputation of the pulp followed by mummification,
- depophoresis.
A special approach is required if the root canal:
- strongly curved
- completely closed,
- narrowed,
- is located next to the neighboring root.
To make the canal passable along its entire length, modern dentistry uses:
- durable extractors - nickel-titanium files, which allow you to go through the canal without preliminary tooth preparation;
- drills - special instruments with spiral blades designed for quick and safe removal of gutta-percha, pastes, cements and other filling materials;
- solvents - necessary for unsealing previously sealed canals; they cope well with soft and plastic materials.
The treatment tactics for impassable root canals in each clinical case are determined by the doctor. The procedure is performed under anesthesia. Depending on the complexity, treatment is carried out in one or several stages. To obtain the desired result, 2-3 visits to the dentist may be required.
Cleaning and expansion of root canals
Root canal cleaning begins with measuring its length. A special instrument that resembles a needle in appearance is inserted into the root canal. A special apparatus is attached to this instrument - an apex locator. When the root apex is reached, the device beeps and the distance to the apex appears on its display.
After measuring the length, the doctor begins to clean the canal from the remnants of the nerve and expands it. Root canals can be expanded using hand instruments that the doctor holds in his hands or using machine or rotary instruments. Rotary instruments are inserted into a special tip - an endomotor. Development with machine tools is more modern and more expensive. It speeds up the process and provides higher quality processing. In order for a doctor to achieve a similar effect using hand instruments, the doctor will need much more time. After each insertion of each instrument, the doctor rinses the root canal with a chlorine-containing antiseptic.
After processing and drying the root canal, it is filled.
Measles canal filling
The procedure for filling root canals is carried out in various ways, for example: by the method of cold lateral (side) condensation of gutta-percha pins (reliable and affordable). Pins that resemble gutta-percha sticks in appearance are inserted into the root canal. After insertion, these sticks are compacted against one of the walls of the root canal. Between the gutta-percha there is a special paste for filling the canals.
The most modern method is filling the root canals using the vertical condensation method of hot gutta-percha. With this method, the doctor seals the top of the root canal using a heated gutta-percha pin. After this, the remaining volume is filled with hot liquid gutta-percha. This method is more expensive.
After the filling, if everything is done well, the doctor removes excess gutta-percha and sealer, and then installs a temporary filling. X-ray control is required. Permanent tooth filling in one visit is carried out only in exceptional cases, since it is necessary for the material to cool completely.
After root canal filling, discomfort may persist for some time. The tooth may be sensitive when biting. Within a few days the pain goes away.
Causes of obstruction of dental canals
The root canals of teeth can become obstructed for a variety of reasons. The most common include:
- features of the anatomical structure of the tooth - highly curved roots with small branches, flattened areas and transverse bridges;
- inflammatory processes in the neurovascular bundle - with dental injuries and chronic pulpitis with a subacute course, the root canals can become overgrown;
- age-related changes in tissues - over time, dentin deposits accumulate on the walls of the root canals, which lead to a narrowing of the lumen;
- dental procedures using phosphate cement - this material has a high density and cannot be destroyed by ultrasonic waves, instruments and solvents.
Before starting endodontic treatment, it is important to accurately determine whether the canals are patent.
How to understand whether the root canal is filled properly
Signs of a properly treated canal are visible on x-ray: filling to the tops of the root, dense filling of the canal without any excess or voids. It is not desirable to have material residues outside the root canal. If the paste does not dissolve, an inflammatory process may develop in the future. But the quality of work depends not only on the attending physician: the patient himself also plays an important role. By following all the dentist’s recommendations, observing the rules of oral hygiene, as well as a careful approach to the health of your teeth, this is the only way you can achieve the desired results.
Root canal treatment and filling should always be trusted only to experienced specialists. An experienced dentist in Minsk is waiting for you at the Family Dentistry Center. Comfortable treatment, modern equipment of European quality, highly qualified specialists and an individual approach to each patient. Thanks to the use of drug sedation, all procedures can be performed without stress and pain, and children's fears of the dental office will go away on their own.