Causes of floss getting stuck
Before you figure out how to get dental floss stuck between your teeth, you need to understand why it gets stuck in the first place. Indeed, according to their structure, floss is thin silky threads that consist of many fibers that mechanically remove plaque. Manufacturers make flosses in such a way that they glide well and do not cause injuries. For example, regular flosses are very thin; they can penetrate even the narrowest interdental spaces. Waxed flosses are slightly thicker, but they are impregnated with wax, which improves glide. So what causes dental floss to get stuck between teeth? Let's consider all possible risk factors further.
Incorrect use
Dental floss must be used carefully, slowly moving it into the interdental space (especially if the teeth are very close to each other). There is no need to make sudden “sawing” movements. So, firstly, the enamel and gums are injured, and secondly, the clamped thread will simply break and get stuck.
Poor quality floss
There is a possibility that if a person “runs into” a low-quality product or a fake, even if floss is used correctly, he will find that the dental floss has broken or split. And its fibers or pieces got stuck between the teeth.
Dental disease
It happens that the floss is of high quality, and a person uses it correctly, but the floss still gets stuck between the teeth. This can happen, for example, if there are cracks and microscopic chips on the side (contact) surfaces of the crowns. And also for caries in the same area. Another reason is the growth of tartar in the interdental space, on which the thread clings and breaks. As a result, she gets stuck.
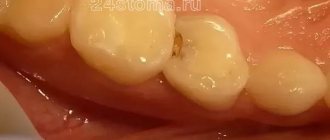
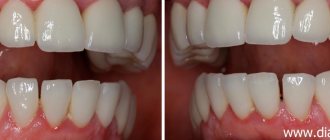
Treatment of caries
1 - here you can see darkening between two teeth, the patient noted that the thread got stuck between them; 2 - due to poor polishing of the filling border, caries recurrence occurred; 3 - the filling itself had completely fallen out, the same “hole” in the tooth that forced the patient to see a dentist... she had no idea about the existence of problems with the neighboring teeth
So, the problem has been identified, the need to visit the dentist has become obvious to you. You have taken some time to carefully select a dentist. Now you need to understand whether the doctor you have chosen really works in line with modern standards.
Let's consider the main stages of treatment, their sequence and the time required to properly complete them.
1. Pain relief (2-15 min).
There's probably no need for any special explanation here. Modern anesthetics are supplied ready-made in carpules and the procedure is performed with a special carpule syringe. This is perhaps the only somewhat unpleasant manipulation. And even then, with the help of special preparations in the form of a gel or spray, you can first numb the mucous membrane at the injection site. Depending on the tooth, the wait for the drug to take effect after the injection may vary. From 1-2 minutes in the case of any upper as well as lower front teeth, and up to 15-20 minutes in the case of the lower lateral teeth.
2. Cleaning the tooth from plaque (1 min)
Before starting treatment, the surface of the problem tooth should be cleaned with a paste and brush. If the patient has plaque, sub- and supragingival dental deposits, then even before treating caries, he should undergo professional cleaning of the oral cavity.
3. Tooth isolation (2-5 min)
By modern standards, this stage is very important, especially when working with light composites (in most cases today doctors use them), and the service life of the restoration largely depends on it. Composite materials are very sensitive to moisture (blood, saliva and even moisture from the patient’s breath), so its penetration onto the surface being restored is unacceptable. At the same time, many doctors still continue to use cotton rollers to isolate the working tooth, as they did many years ago. I will not categorically say that this cannot be done, but this method is already a thing of the past and in many cases is insufficient for high-quality long-term isolation.
The rubber dam allows the dentist to completely isolate the working area from the rest of the oral cavity. Moreover, during treatment the patient can even cover his mouth without the risk of saliva getting into the working area
Problem teeth are isolated using a rubber dam as reliably as possible from saliva, blood and even moisture from the patient’s breath
4. Tooth preparation (2-10 min)
The time in this case is determined by which tooth needs treatment, how convenient it is to access it, as well as the size and location of the carious cavity. What can the patient note for himself at this stage? The doctor must treat the tooth intermittently (i.e., do not “drill” the tooth without lifting the bur from it), always with powerful water cooling. Accordingly, in modern conditions the patient does not spit out anything every second, and all water is removed with a saliva ejector and a vacuum cleaner. Unfortunately, there are still doctors everywhere who work without water cooling. This habit sometimes remains especially true among doctors of the old Soviet school, who are accustomed to working on old types of dental units. Such luxury as water was not provided in them, and the oral cavity was sprayed, at best, once at the end with water from a syringe or enema. After which the patients, each to the best of their accuracy, spat it all into the spittoon - very unhygienic and inconvenient. Thank God, times have changed, although not everyone can keep up with it. And if installations without water are already difficult to find even in district clinics, then judging by what I saw, there are plenty of doctors who turn off the water specifically for the sake of their “convenience.” Why is it so important that the tooth is well cooled during preparation? Any living tissue suffers from overheating, which occurs when the boron rubs against hard tissue. And if this elevated temperature is not quickly removed by a water-air flow, then the overheated tooth pulp will soon greet you in the form of inflammation - pulpitis. And the need will come to remove it, i.e. very expensive root canal treatment.
“Any living tissue suffers from overheating”...
Lack of cooling can lead to unpleasant health consequences
In addition, highly infected dust generated during tooth preparation without water is inhaled by both the patient and the staff (even despite masks). You understand that breathing this “air cocktail” is not very useful, especially for people with chronic respiratory diseases, asthmatics, etc. And besides, after flying a little, this dust, as it should be by the laws of physics, settles on everything in the office. Including what the doctor and assistant handle during the appointment, which means the risk of cross-infection of patients increases. Unless you do a wet general cleaning after each patient, which, you see, is out of the realm of fantasy.
So now, when entering a clinic or office, if you smell the smell of “scorched teeth” that is so familiar to visitors to regional clinics, then you can safely turn 180 degrees. Nothing good awaits you there for sure.
5. Treatment of the prepared cavity with antiseptics (30 sec)
In general, I wouldn’t even stop at this point, because it’s unlikely that you will be able to understand anything here or even notice this stage. The main thing is that the doctor, having barely taken the burr out of his hands, does not immediately begin to stuff filling material into the cavity. Unfortunately, I also saw this when, while still a student in practice, I had to plunge into the everyday life of district clinics. Moreover, the indelibility of this impression of mine over time is also due to the fact that the doctor was working without cooling. At the same time, he didn’t even bother to wash off the dust from the tooth with water, and immediately began to wall up the dirt in it with cement, which I had just lovingly and according to all the rules mixed in with. So, in general, I became acquainted with the realities of free and affordable dentistry.
6. Adhesive cavity preparation (2-3 min)
What's the clever term in the name of the stage? Yes, in general, everything is simple. All modern filling materials are “glued” to the tooth with a special “glue” - an adhesive (or bond). It is he who holds the filling in the cavity. To increase the bonding surface, concentrated acid is first applied to the tooth. It creates micro-roughness on the enamel surface. And then the doctor uses a brush to introduce adhesive into the tooth cavity. If you have not had a rubber dam installed, then when washed off the tooth, acid residues may enter your mouth and you will feel a sour taste. I have also seen how some doctors, after washing off the acid, asked the patient to spit out the “sour water” on their own. Everything would be fine, but under no circumstances should the surface of the tooth come into contact with saliva after treatment with acid. Otherwise, the whole meaning of the procedure is lost, and the technology is thus grossly violated.
After treating the tooth with acid, the same “glue” - adhesive - is introduced into it with a brush and illuminated with a light lamp.
This is what the “glue” looks like for composite restorations from various manufacturers
7. Adding filling material (5-40 min)
This is the longest and most difficult stage. It requires from the doctor not only mechanical skills, but also artistic skills in order to recreate a close-to-natural shape and color during aesthetic tooth restoration. These skills acquire particular importance when working with the anterior group of teeth, which, for obvious reasons, have a special aesthetic significance. Therefore, the time spent by the doctor on this stage can vary greatly, depending on the size and shape of the cavity, and on the meticulousness with which the doctor approaches recreating the shape and color.
What can the patient notice, and what is important to know about this stage?
The filling material is introduced into the cavity in small portions, each of which should be illuminated with a lamp for 10 to 40 seconds. Those. This is a rather labor-intensive and time-consuming process if you follow the rules. Some doctors don’t bother much, and even if there is nothing left of the tooth, they cook it completely from 2-3 “pieces” of material. This is a gross violation of technology, and it will certainly affect the service life of such a restoration. I had to deal with the fact that some patients interpret this moment in their own way, with the exact opposite meaning. They say that one doctor was digging into something for a long time and tediously, which means he is inexperienced, inept, his hand is not full, but another doctor quickly did everything for me in two or three movements - and the tooth is like new, a real pro! I think there is no need to explain now that this interpretation is fundamentally erroneous.
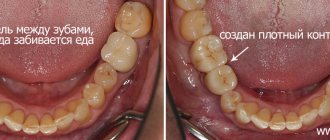
If caries has affected the contact surface of the tooth (this is the surface in contact with the adjacent tooth in the dentition), then the doctor must install special separating devices (matrices) before adding the filling material so that the filling material does not stick to the neighboring tooth and does not hang between the teeth above the gum. More than once, unfortunately, I have seen just such fillings placed as a single “monolith” on 2 teeth and squeezing the gums between them. After treatment is completed, this point can be easily checked by trying to pass dental floss into contact between two teeth. The thread should pass with little effort and a slight click at the point of contact of the teeth, without fibering, getting stuck or tearing. If this happens, or it does not fit between the teeth at all, it is a defect. Such a restoration must be modified or completely redone. It is also bad if the thread “flies” without any delay, i.e. There is no contact between the teeth. This means that food will get stuck there, causing gum inflammation.
Here you can see how, when working with the contact surface of the tooth being restored, a matrix (1) is installed, supported against the tooth with a wooden wedge (2) and a special ring (3) so that the filling material fits tightly to the tooth near the gum
8. Grinding and polishing of the restoration (approx. 10 min)
Also an equally important step, which some doctors almost completely ignore. And the service life of the previously done work largely depends on the thoroughness of its implementation.
Grinding of the restoration is done to remove all excess material, smooth out the boundaries of the restoration, and remove overhanging edges in the gum area. Sometimes, if the doctor “overdid it” when restoring a tooth, the grinding stage can take a long time, because the filling “interferes with the bite.”
As a small digression, I want to say that this is precisely the weak point of the technology for restoring teeth with composite materials directly in the mouth. Tooth restoration is virtually done by eye, especially if the tooth is severely damaged and anatomical landmarks are lost. In the middle of work, the doctor does not have the opportunity to ask the patient to close his teeth, move them in different directions, and thus orient himself as the work progresses. But a dental technician has such an opportunity when “fillings” (more correctly speaking, inlays) are made from ceramics or precious alloys in the laboratory on plaster models of the patient’s teeth obtained from impressions. But I will tell you more about this technology in another article.
So, there is no need to be shy if you feel uncomfortable closing your mouth and making other movements. Some patients, dreaming of jumping out of the chair as quickly as possible, or simply out of excessive modesty not wanting to burden the doctor, wave their hand: “Yes, everything is fine, it will rub itself in later.” You shouldn't do that. The consequences of overestimation can be very different, even quite serious and unpleasant. Therefore, in general, although the doctor usually asks whether it is comfortable for you to close your teeth and rub them, he must determine the degree of need for grinding himself, using objective methods. Basically, determining the point of excess contact occurs with the help of thin articulating paper, similar to carbon paper (due to poverty, some still use ordinary carbon paper). At the same time, this should not be a small piece for exactly one treated tooth, but strips for the entire dentition, and the doctor should place them on both sides, even where the teeth were not touched at all.
After finishing the grinding, the doctor must carefully polish the restoration to an almost mirror-like shine. Underpolishing, especially in places that are difficult to reach with a toothbrush, leads to increased accumulation of plaque and increases the risk of recurrent caries.
Ultimately, if the doctor performed this step well, you should not feel any joints between the filling and the tooth, the border should not be felt to the touch. The surface of the restoration must be absolutely smooth and free of roughness (just do not confuse this with the restored natural relief, for example, on a chewing tooth, where there are tubercles and “folds”-fissures).
This is only part of what is needed to grind and polish the filling. In this case, these are rubber and silicone heads with diamond chips
Diamond-coated paper discs of varying degrees of grain size are also often used.
Lavsan strips with abrasive coating of different grain sizes for treating contact surfaces of teeth
Polishing pastes, which, as a rule, end the whole process. Moreover, they also contain abrasives of varying degrees of grain size.
Now a few words about the relief. After completing treatment, take a closer look at the restoration on the chewing teeth. They should not be flat, resembling a table surface. The relief of the tooth in the form of tubercles and “cracks” between them (fissures) has its own functional (very important!!! I must say) role. And therefore it must be restored as close to natural as possible. Even if the previous doctor did not do this. There have been cases when patients who spent a long time with such “tables” in their mouths had a correct restoration made from the point of view of relief, they complained that the tooth had become uneven, the tongue was getting into these irregularities and it would be better to file them down so that it would be like before and so on. It was not always possible to immediately explain why it is so important that these “irregularities” on the tooth be restored. So, very often we see patients who have such “tables” stuck on each chewing tooth. As a result of long-term walking with such fillings (after all, to an unprofessional eye they can be completely normal - the tooth does not hurt, the filling has been in place for many years, which means the doctor is a “carpenter” with golden hands, and the patient has been going to him for many years) a “decrease in height” occurs bite” (I apologize to my colleagues for the simplified term), neighboring healthy teeth are subject to increased wear, and problems may arise in the temporomandibular joint. As a result, at some point the patient “ends up” with quite complex and expensive treatment for complete restoration of the dentition and treatment of the joint. But the relief and the correct anatomical shape of the chewing teeth were not restored in time.
This is how restorations should not look... in addition to poor polishing of the edges, there is an absolute lack of hints of the correct anatomical relief
In this case, in place of the tooth, the doctor molded an absolutely flat and even “stump”... This is in addition to the fact that the method of restoring the pulpless tooth was chosen incorrectly, which led to a crack and the removal of the tooth... but it could have served its owner for a long time
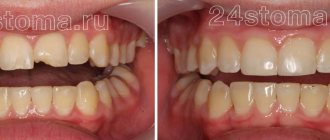
And this is what high-quality modern work should ideally look like (the work of Dr. Maxim Belograd, Ukraine). The situation during the preparation process...
...and the final result. In this case, not only was the surface relief restored, but the restoration was also painted to disguise it as much as possible
I’ll dwell a little on the “timing” of the process. If you add up all the working time required to complete each stage, it turns out that to treat caries at the proper modern level, even the fastest and most agile doctor will need from 35 minutes to 1.5 hours of pure working time. And even then 35 minutes - this is in the case of a literally pinpoint tiny cavity on 1 surface of the tooth. On average it takes about 1 hour. This is also an important marker feature. If after 10-15 minutes you are thrown out of the chair with the words “everything is ready!”, be sure that savings have been made on the quality of treatment. And “being full of hands”, “extensive experience” will not help in any way to reduce work time without loss of quality... and haste is only needed in another activity...
And finally, we will “revive” everything written above once again to reinforce the material with a real video of treatment of a real tooth. In this case, even the demonstrative nature of the work did not hide some of the roughness in the execution, but this will be noticeable only to gourmets and aesthetes. But in general, this is exactly how everything should happen in standard cases. As a small introductory note for those who are unfamiliar with the English language... The authors of the video admit that the choice of the method of restoring a tooth with a composite in this case is not the best. Because the amount of destruction is significant, several tubercles have been lost and, moreover, the carious cavity has a border below the level of the gum. In this situation, a ceramic inlay should have been chosen, but for financial reasons the patient opted for direct restoration with a composite. Even in countries that are more prosperous in terms of living standards, the money factor often outweighs medical indications, alas...
{youtube}7cFOiQ0z-_Y{/youtube} {youtube}Wi5KSNH2wFk{/youtube}
This is an approximate solution to a seemingly banal problem - caries. And this is in a rather short version. I hope this note will now help you understand how modern and high-quality your treatment was or will be performed. And draw the right conclusions for yourself.
PS In this note, I touched only on the most common type of treatment for caries or replacing old fillings, when the doctor restores the defect directly in the mouth with a composite material. There are other, less common, more durable, albeit more expensive methods. We are talking about “fillings” made in a dental laboratory - inlays made of ceramics or drag alloy. But about them in another article.
What are the consequences
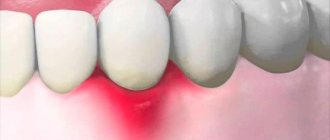
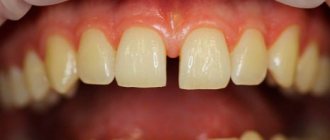
You need to understand that harmful microbes are present in the “narrow” interdental space. Food plaque also accumulates here, in which pathogens “love” to settle. And a floss stuck between the teeth, as well as unsuccessful attempts to pull it out, can lead to the following complications:
- gum injury: bleeding, redness,
- gingivitis, periodontitis, gumboil (periostitis): the transfer of microbes from the thread into the soft tissue provokes superficial inflammation of the gums. Then it invades deeper areas and can “spread” to the gums next to adjacent teeth, to the jaw bone,
- trauma to tooth enamel: a microscopic groove is formed on the lateral surface of the crown, which subsequently deepens. Then microbes penetrate the enamel, causing the development of caries.
How to floss your teeth correctly?
Many users who even purchased dental floss, but cannot understand the instructions and rules of use, ask this question. After all, the technique of brushing your teeth is no less important than choosing the right type and model of floss.
To effectively and safely floss your teeth, it is imperative to remember the following rules and follow them step by step:
- Keep your hands clean, wash them thoroughly before using thread;
- Do not skimp on floss, because for effective one-time cleaning you will need at least 40 centimeters of dental floss;
- You need to wind the thread on two fingers of different hands with a gap of 4 centimeters, for each interdental gap you need to use a new gap, because otherwise you will transfer bacteria from one tooth to another;
- Move the floss carefully between the teeth, slowly, try not to touch the gums;
- This type of action must be applied to each dental space.
What to do if a floss gets stuck between your teeth?
Such cases happen quite often and may mean that you have come across a not very high-quality product or that you have chosen the wrong floss for the structure of your teeth. Also, this may mean that you used it incorrectly, in which case you should not be nervous and pull out the thread using great force. Try to grab it with tweezers, after cleaning it well.
If the tip of the thread does not stick out anywhere, then try pushing it out with another dental floss, preferably not as thick as the previous one. Some people recommend using fishing line to push out the stuck floss, but it is not always thinner than the stuck floss and there is a risk of infection and gum damage.
Do not forget about the thread stuck between the teeth, because over time it will make itself felt with extremely unpleasant consequences, therefore, if all of the above methods do not help, then you need to go to the dentist, who will deal with this problem instantly.
How to use floss with braces?
Many people think that braces and dental floss are incomparable things, and you can’t use it to clean your teeth if you have a braces system installed, but this is not at all true. Quite the contrary, it is necessary to do this and at the same time regularly.
Although such procedures are associated with some difficulties, we will provide you with step-by-step instructions for performing them:
- The thread should be waxy, with good sliding properties, so that it does not get stuck in the braces;
- The thread length must be at least 25 cm;
- First, move the floss carefully under the base of the braces, after which you can move it between the teeth, being careful;
- Repeat this step for each tooth.
Important note for parents! This procedure requires good dexterity and patience and may be difficult for your child to do on his own, so help him with this at least in the initial stages.
What to do if the floss gets stuck
How to remove dental floss if it is stuck between teeth? Here you can first try to get it yourself. The following methods are often used for this:
- active rinsing of the mouth with water,
- washing the interdental space with an irrigator or a stream of water from a syringe (without a needle),
- you can try to remove the problematic piece with a new thread (sometimes it is better to use a thinner floss),
- if it’s not a lint that’s stuck, but the whole floss seems to be “jammed,” then you need to carefully cut it off on one side and pull it out,
- You can use clean tweezers.
“Somehow my dental floss got stuck. It just tore and that’s it, both halves remained in my hands. But I feel like something is getting in the way. I tried to pull it out with another thread, and that one also broke. In general, there was no way they could get it from there. The next morning I started to feel pressure on my teeth and had to go to the dentist. They got her there in one fell swoop.”
Lisa_0101, review from the woman.ru forum
What you shouldn't do on your own
Sometimes you can hear or read that stuck dental floss is removed using a fishing line. There is no need to do this, because the fishing line is solid (and floss consists of several twisted threads) and is very strong - that is, it can seriously injure the tissues of the oral cavity. Also, do not use a needle, toothpick, fork tine or knife - one careless movement and injury is guaranteed, or the thread will get stuck even more.
Good to know! As for chewing gum, it can help push out a piece of floss or “stick” it to yourself. But provided that it is not stuck very deeply. However, it may happen that the chewing gum pulled out the floss between some teeth, and pushed the same piece deeply between others - so it got stuck again.
Consequences of food stuck between teeth
The result of constant jamming is that the teeth lose their hardness.
And there is a negative progression in this problem. The food penetrates further into the pocket, deepening it, and the bone is affected. Tooth decay occurs when food gets stuck between adjacent teeth. It doesn't show up right away. And treatment is complicated by poor access to the lesion site. The damage caused by stuck food is irreversible. Not only the tooth suffers, but also the tissues supporting it. If left untreated, its destruction and removal cannot be avoided. When stuck food sits in your mouth for a long time, it can ferment and cause an unpleasant odor.
When do you need dental help?
Even a small piece of dental floss can cause quite dangerous and painful pathologies [1] that require timely treatment. Therefore, it is necessary to remove this piece. If you can’t get it at home, you need to see a dentist as soon as possible. A professional will be able to remove it quickly and without problems, especially if he has a special microscope at his disposal.
Read on the topic: a microscope for teeth - an expensive whim of a dentist or a guarantee of quality treatment?
The doctor will also find the reason why the floss is stuck. If the cause is caries or tartar buildup, then appropriate treatment or professional oral hygiene will be carried out.