Methods of tooth restoration in modern dentistry
Dental restoration methods in modern dental clinics make it possible to completely recreate the shape, color, shine, transparency and light refraction of dental tissue.
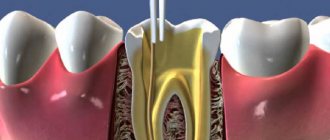
I would like to proudly note that teeth restored at the Interdent dental clinic are considered healthy even by dentists from other clinics. What teeth are subject to restoration and what methods of restoration exist? To begin with, it should be noted that teeth that are subject to restoration often require endodontic treatment. Removing inflamed dead pulp residues from the canals, then making a high-quality filling. Without professional root canal treatment, there is no point in proceeding with the actual restoration. The remains of dead tissue, “immured” in the roots or under the roots, will sooner or later make themselves felt by pain or swelling of the gums. Very rarely, a tooth is destroyed in such a way that it needs to be restored with living pulp. In such cases, after a thorough diagnosis, the doctor restores the tooth, keeping it alive. The restoration itself can be single-stage or multi-stage.
When should a tooth be restored?
Teeth are destroyed for many reasons, but the main enemy of teeth is caries, which affects teeth at any age. Most often, caries affects the teeth of those with a sweet tooth, since sweet carbohydrates are a favorable environment for the proliferation of pathogenic bacteria. Over time, bacteria penetrate into the deep tissues of the tooth and form carious cavities in them. Treatment of caries consists of clearing these cavities of dead tissue and filling the tooth. When tooth decay has reached such proportions that it can no longer be restored, the tooth is removed.
One-step restoration
One-stage restoration is a therapeutic procedure, while multi-stage restoration is the restoration of a tooth using an orthopedic method (inlays and veneers). A tooth in need of restoration is significantly damaged, and often, in order to restore the shape of the tooth therapeutically, it is first necessary to install a pin in the root. Pins are available in metal and fiberglass. The latter have little flexibility, which completely prevents root fracture during installation. And they come in white and transparent, which eliminates the influence of their color on the final color of the filling.
Fiberglass posts are more expensive than metal ones, but they are preferable for anterior teeth where esthetics are important. Next, the filling mass is applied layer by layer to the installed pin, like a frame. And this is where the real art begins.
The doctor is not limited in time, because The filling will not harden until it is exposed to the light beam of a gel lamp. But the amount of each layer of material, the sequence of application of different shades, the actual choice of color, and ultimately the modeling depend solely on the professionalism of the dentist. Next, the filling is ground and polished, giving it a final sparkling shine.
Methods for restoring chewing teeth. Modified approach
V. V. Shcherbakov , dentist, Royal-Dent aesthetic dentistry clinic (Moscow)
The main goal of restoration of chewing teeth is, first of all, functional rehabilitation. Functionality, in turn, is determined by the anatomical correctness and accuracy of the manufactured structure. The convex and relief chewing surface forms multiple point contacts with antagonist teeth, evenly distributing the occlusal load. The contact points should be small in area, ensuring rapid opening of the teeth during excursion movements.
Wide and flat occlusal surfaces are more likely to remain in contact during mandibular movements. This creates friction, leading to more pronounced wear of teeth and restorations and a decrease in chewing efficiency. Hardly anyone would dispute the need to accurately reproduce chewing morphology when carrying out restoration. However, achieving this goal for the vast majority of doctors is fraught with significant difficulties. One of the most common problems is that the doctor, after painstaking and lengthy modeling of the chewing surface, has to mercilessly cut off all the tubercles and fissures with a bur at the stage of integrating the tooth into the occlusion.
The approaches that will be discussed in this article are designed to greatly facilitate the work of doctors
All the beauty that a specialist recreates ultimately turns into a shapeless, unaesthetic and low-functional “cake”. The dental literature describes a large number of various techniques to avoid such difficulties (compass method, orientation to adjacent teeth, occlusal compass, all kinds of schematizations, simplified construction algorithms, etc.). However, all these solutions provide only approximate results. The approaches that will be discussed in this article are designed to greatly facilitate the work of doctors and will allow the production of high-precision restorations. The main idea taken as the basis for this approach is that, depending on the degree of tooth decay, correspondingly different methodological variations of restoration are used. It should, however, be noted that these techniques are focused on working with vital teeth, that is, in conditions favorable for the formation of a strong adhesive connection. According to the degree of destruction, three conditional classes can be distinguished (the classification was developed by the author of the article).
Method of restoring teeth of the 1st class of decay
A typical representative of class 1 is fissure caries, which is quite common. This pathology is very unpredictable, and often the volume of the lesion turns out to be much greater than the expected depth. The fissure form of caries, as a rule, is characterized by almost complete preservation of the chewing morphology, and no matter how high the skill of the restorer, we still will not be able to recreate the chewing surface better than it was. Therefore, it would be quite reasonable to copy the preserved anatomy and transfer it to a future restoration. This can be achieved using the occlusal key technique. The main difference between this approach and the traditional restoration option is that before the preparation, a key (small impression) is removed from the chewing surface, which could subsequently be used to press down a portion of the composite to give it the original tooth shape. The most suitable material for making a key is hard bite silicones for bite registration. They have sufficient hardness to push through the smallest details of the chewing surface, and at the same time practically do not stick to the composite.
Clinical case
Figure 1 shows the initial situation. Classic fissure caries of teeth 16 and 17. As in most similar cases, the carious process is completely asymptomatic.
Rice. 1
After isolating the working field (Fig. 2) and mechanically removing plaque from the surface of the teeth, the key is removed with bite-silicone, taking into account the dimensions of the clamp (Fig. 3).
Rice. 2
Rice. 3
The appearance of the occlusal key is shown in Figure 4.
Rice. 4
Next, preparation and adhesive preparation are carried out using the XP Bond™ system based on tert-butanol (Fig. 5).
Rice. 5
After restoration and polymerization of the dentinal layer (Ceram•X™ duo+), shades of the base and surface enamel (Esthet•X® HD A2 and AE) with a total thickness of 1.5-2 mm were added one after another, carefully adapted to the surface with approximate contours marked without subsequent curing (Fig. 6).
Rice. 6
Now comes the turn of the occlusal key (Fig. 7).
Rice. 7
To prevent possible gluing, apply a small amount of adhesive to the silicone surface. The key is placed on the tooth and pressed slowly. After the silicone print is in place, you need to slowly remove it with light rocking movements. You should not rush and try to remove the key with one jerk: this will lead to deformation of the composite material. If done correctly, the portion of uncured enamel composite should take the exact shape of the original occlusal surface (Figure 8).
Rice. 8
Excess filling material is easily removed with a brush. If any deformation occurs, the key can be reinstalled. Next, polymerization is carried out for 30-40 seconds, taking into account the thickness of the composite layer (Fig. 9).
Rice. 9
After this, if desired, you can reproduce the characteristics using composite paints. View after finishing and polishing (Fig. 10).
Rice. 10
Occlusal correction is usually minimal or absent. View of the restorations after two days (Fig. 11).
Rice. eleven
It should be noted that an important condition for successful restoration using the occlusal silicone key technique is the use of composite materials that have a sufficiently dense consistency and are capable of retaining the shape transferred by the silicone key. In this regard, a very good option is the Esthet•X® HD composite, which, in addition to excellent chromatic and mechanical characteristics, also has the required degree of density and perfectly holds any shape.
Method of restoring teeth of the 2nd class of decay
Among the clinical cases of this category, deep carious cavities and failed fillings are most common. The main feature of the second class is that with fairly high destruction - up to 50% of the chewing surface - the main outlines of tubercles, ridges, parts of the ridges, etc. are still preserved. Having such landmarks at our disposal, we can easily continue the external contours of the preserved occlusal elements and get a chewing surface very close to the original. For this, the traditional method of layer-by-layer restoration is used, without any changes. The only addition that could help make the restoration more comfortable is the use of modeling tools in a specific sequence.
Algorithm for restoring the chewing surface. Three Tools Concept
Figure 12 shows the initial situation.
Rice. 12
Figures 13-15 show the layer-by-layer introduction of material into the cavity: a layer of dentin, a layer of chromatic enamel (the composite is distributed throughout the cavity without polymerization), a layer of surface enamel.
Rice. 13
Rice. 14
Rice. 15
To adapt the material, it is convenient to use a brush slightly moistened with adhesive (Fig. 16).
Rice. 16
Next, tool No. 1 is used - a large plugger for preliminary marking of all chewing elements (Fig. 17).
Rice. 17
They also outline the lines of future fissures and remove excess material. Modeling continues with tool No. 2 - a small plugger, which reproduces all the main forms, brings out additional ridges, side ridges, secondary recesses, and also emphasizes fissures of the first order (Fig. 18).
Rice. 18
At this stage, the excess composite is finally removed. In some cases, a small brush with lubricant can be used to make anatomical transitions smoother. The last tool (No. 3) is a sharp probe for creating the thinnest elements and emphasizing fissures (Fig. 19).
Rice. 19
After this, polymerization of the composite material is carried out (Fig. 20).
Rice. 20
As a final element, the pigmentation of the fissures can be reproduced with composite paints using a thin endodontic file (Fig. 21-23).
Rice. 21
Rice. 22
Rice. 23
Clinical case
In (Fig. 24) the situation before treatment. An old, failing filling with obvious secondary changes in the surrounding tissue.
Rice. 24
The working field is isolated (Fig. 25) and the carious cavity is prepared (Fig. 26).
Rice. 25
Rice. 26
The quality of treatment is controlled by a caries detector. The deepest areas of the cavity were also stained, but in this case it was not the demineralized tissue that was stained, but the tertiary reaction dentin. Due to the fact that this type of dentin is formed compensatory in response to the action of irritants and is not structurally complete, has cellular inclusions and voids, it is also susceptible to indication by a caries detector. This dentinal bridge is usually the last stable barrier to the pulp chamber and should not be removed. Next, the cavity is sandblasted (Fig. 27) and adhesively prepared with the 5th generation XP Bond™ system (Fig. 28).
Rice. 27
Rice. 28
After thoroughly drying the adhesive before polymerizing it, a very thin layer of low modulus SDR™ composite was applied to the dentin and then co-polymerized. The purpose of this technique is to stabilize the hybrid zone, as well as to prevent the formation of an oxygen-inhibited layer in the adhesive interface.
Part of the cavity is filled with SDR™ composite (Fig. 29).
Rice. 29
It has a high ability to self-adapt, very low polymerization stress and optical characteristics similar to dentin. A portion of Ceram•X™ duo+ D3 composite is applied on top of the SDR™ material to imitate dentin (Fig. 30), then a layer of Esthet•X® HD YE surface enamel (Fig. 32) and a layer of Esthet•X® HD A3 chromatic enamel (Fig. 31).
Rice. thirty
Rice. 31
Rice. 32
The composite spreads over the surface, but does not polymerize. Figure 33 is a view after an instrumental simulation carried out in strict accordance with the three-instrument concept described above.
Rice. 33
Next, the characteristics were reproduced (Fig. 34, 35).
Rice. 34
Rice. 35
Figures 36, 37 show the view after occlusal integration, finishing and polishing.
Rice. 36
Rice. 37
It should, however, be remembered that in order to successfully perform a restoration using the traditional technique, the doctor certainly needs to have some experience and developed skills in anatomical modeling. The most effective way to learn to accurately reproduce the chewing surface is constant practical training.
You need to draw teeth, sculpt them from plasticine, grind them from plaster, model them from wax, reproduce them in the mouth with a composite, etc. All this must be done, guided by the general principles of shaping and knowledge of the myotopography of anatomical elements. Gradually, a sense of form will develop, the ability to “read” characteristic anatomical details, some dependencies will be revealed, and in the end a complete understanding of the entire process of reconstruction of the occlusal surface will come.
Method of restoring teeth of the 3rd class of decay
This category of defects includes large-scale carious lesions, voluminous old fillings, uncomplicated chips of tubercles, walls and any other pathologies characterized by a large deficiency of hard tissues. Such teeth are on the border of indications for direct methods of restoration, and in cases where the destruction of the crown reaches a level of more than 50% of the volume, indirect restorative structures such as composite or ceramic inlays, overlays or crowns are indicated. The biggest challenge in reproducing occlusal morphology in clinical cases in this category is the lack of sufficient landmarks. Under such conditions, we cannot find the required shape and determine the correct spatial position of each anatomical element. In the dental laboratory, such problems are solved with the help of preliminary wax modeling of the teeth in a correctly adjusted articulator. This technique is based on exactly the same principle: before starting tooth restoration, preliminary modeling with a composite is carried out in the mouth directly on top of old fillings and pathologically changed areas. The doctor reproduces the morphology of the tooth as he sees fit, and then checks the occlusal relationship, removing excess with a bur. Thus, all major corrections are carried out at the beginning of work on a preliminary composite model, and not on the finished restoration.
Clinical case
Figure 38 shows the initial situation.
Rice. 38
Deep carious cavity of tooth 26 with significant destruction of the palatodistal, palatomedial cusps, as well as the accessory cusp of Carabelli. The demineralization process, however, is stabilized, the bottom of the cavity is solid, and is practically not stained with a caries detector. Upon completion of the modeling, the necessary occlusal corrections are made (Fig. 40).
Rice. 40
As a result of all articulation tests, a shape is created that can be transferred to the final restoration in the future using a silicone key. Before preparing the cavity, a preliminary composite modeling of the chewing surface is carried out, reproducing all the missing anatomical elements (Fig. 39).
Rice. 39
The procedure is performed before anesthesia is administered and without a rubber dam. Figure 41 shows the process of removing the key using hard silicone.
Rice. 41
Excess impression material is cut off taking into account the dimensions of the future clamp. The view of the occlusal key is shown in Figure 42, the view after preparation is shown in Figure 43.
Rice. 42
Rice. 43
Next, adhesive preparation of the cavity was carried out with the XP Bond™ system (Fig. 44), and the dentinal layer was reproduced with Ceram•X™ duo+ D3 material (Fig. 45).
Rice. 44
Rice. 45
Then, one after the other, without polymerization, the base and surface layers of enamel (Esthet•X® HD A2 and AE) are added and adapted (Fig. 46).
Rice. 46
Due to the fact that after preliminary modeling we receive only an approximate occlusal blank without anatomical nuances, we will need to finish them with thin instruments on the enamel layer after pressing the composite with a key (Fig. 48).
Rice. 48
This must be done carefully so as not to displace the position of the main masticatory hillocks. If serious deformation of the material has occurred, you can try to press the tooth again with a silicone template. Pressing the uncured composite with a silicone key is shown in Figure 47, the view after clarifying the chewing morphology is in Figure 49.
Rice. 47
Rice. 49
The characteristics are reproduced (Fig. 50).
Rice. 50
Figure 51 shows a view of the restoration after occlusal integration, grinding and polishing, and Figure 52 shows a view after three days.
Rice. 51
Rice. 52
Conclusion
These methodological approaches make it possible to obtain the most accurate results of restorative treatment, even when restoring severely damaged teeth. Optimal composite materials also have significant potential to interact with the presented techniques.
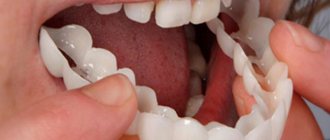
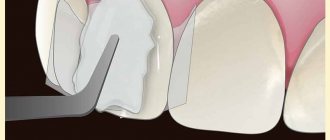
Restoration with veneers
A veneer is a ceramic or composite “facet” that is attached to the front (front) surface of the tooth with special light-curing cement. Veneers are used to restore mainly the front group of teeth, the color and shape of which are of particular importance. In order to restore a tooth with a veneer, only the front and slightly cutting surfaces of the tooth are ground down within the enamel layer by only 0.5 mm. Naturally, for this purpose the tooth does not need to be depulped (removing the nerve), unless there are other indications.
Then impressions are taken of the ground tooth or group of teeth, the color is determined, and a ceramic or composite “onlay” is made in the laboratory.
Veneer, unlike filling material, does not change color over time and does not lose its shine. Moreover, a veneer, unlike a one-step tooth restoration, has a clearer marginal fit to the gingival tissue, which is important for the prevention of periodontal diseases.
Most Frequently Asked Questions
Is missing a tooth just unsightly or harmful to health?
Violation of the integrity of the dentition has many negative consequences for health.
- Due to lack of load, periodontal tissue and bone quickly atrophy. The risk of other pathological processes occurring in them increases.
- Violation of chewing function entails a number of gastrointestinal diseases. Vitamins, microelements and other beneficial nutrients are poorly absorbed. This weakens the immune system and triggers the aging mechanisms of the body.
- The teeth shift, do not close completely, and an incorrect bite is formed. As a result, the functioning of the temporomandibular joint is disrupted. A person is bothered by headaches, poor sleep, and strange “clicks” in the head and neck.
- A person is embarrassed to smile, talk, communicate with other people. As a result, he withdraws into himself, leads a solitary life, and develops depression.
I urgently need to restore a lost tooth in 1 session - what method do you recommend?
Installing a temporary immediate denture (they are often called “butterflies” due to their unique shape) allows you to restore the dentition in an extremely short time. The prosthesis is made from individual impressions directly in the dentist’s office and is immediately fixed using special fasteners.
- It looks very natural and is completely indistinguishable from real teeth.
- Does not require preliminary grinding of adjacent teeth.
- Prevents tooth displacement and bone atrophy.
- Provides chewing function.
- Comfortable to wear and does not injure gums.
- Has a low cost.
- It will serve you for several months and protect the ground tooth while a permanent prosthesis is being made or the implant is being healed.
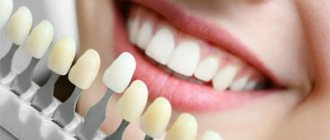
What material makes teeth look most natural?
At the moment, zirconium dioxide is considered the most aesthetic material. Only a professional can distinguish crowns and bridges made from it from natural teeth. The material has good biocompatibility, high strength and even some antibacterial effect. Thanks to the translucency characteristic of real tooth enamel, zirconium dioxide dentures look exactly like natural teeth.
Restoration with tabs
Inlays are also made in the laboratory and come in ceramic and composite. The teeth for inlays are processed in the same way as for filling materials, i.e. all carious dentin is removed, a cavity is formed, and then impressions are taken from it and sent to the laboratory. The finished inlay is attached to the tooth in the same way as a veneer. The advantage of inlays over filling material is that inlays do not undergo polymerization shrinkage, i.e. do not shrink in volume like filling material under the influence of a light beam from a gel lamp. Further, when restoring with inlays teeth that are destroyed in the area of the contact surface with another tooth, almost one hundred percent restoration of the contact point is ensured, which is very important for interdental hygiene.
Veneers and inlays are not polished, since they are provided with shine already in the laboratory. Teeth restored simultaneously with composite filling materials must be polished every 6 months due to the fact that the surface layer of the light-curing composite, the structure of which differs from the structure of the enamel, wears out, becomes rough and retains microparticles of food debris and microbes.
Of course, it is up to the specialist to decide whether to restore using filling material or an orthopedic method, but there are situations when the doctor can offer both options for restoring a tooth, justifying all the pros and cons. Naturally, restoration with veneers and inlays is more expensive, but having paid once for quality treatment, you will not have to periodically return to the doctor with the same problem.
Composite materials for restorations
Performing direct artistic restoration requires the use of reliable, color-stable and durable materials that cannot be erased.
Due to their excellent characteristics, light-curing composite materials are used in dentistry. Photocomposites have excellent adhesion to dental tissue at the molecular level and do not change their position due to the ability to diffuse into enamel and dentin, and at the same time they do not violate the aesthetic perception of the tooth. These materials are applied in very thin layers to compensate for shrinkage due to photopolymerization. If the application technology is followed, a long-term, consistently high-quality effect is achieved.
To most accurately match the material to the mechanical characteristics of the tooth and its color (everyone’s teeth are individual), dentists layer materials of different shades and properties on top of each other. The result is a complete imitation of high-strength translucent enamel.
The strength of photocomposites allows them to be used in the restoration of anterior and chewing teeth that receive maximum load. Many of these materials contain fluoride ions, which helps prevent the development of secondary caries over the entire surface of the filling.
When restoring teeth of irregular shape, their visual contour is often corrected, the corners are smoothed or, on the contrary, sharpened, giving an individual uniqueness to the smile.
The advantage of direct restoration is that all the work will be done in one visit to the dentist (2-6 hours). Modern materials are suitable for closing gaps between teeth, changing their shape, size and color.
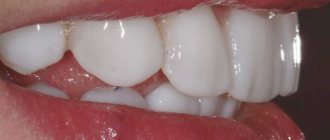
Is it so easy to put an invisible filling on a front tooth?
If the tooth is not very badly damaged, you will be offered to restore it with a filling. Aesthetic restorations made in one visit to a dentist are called “direct”.
The procedure for restoring a chipped part of a tooth seems simple, but it is not: the tooth is unevenly colored - it is darker at the gums, and almost transparent at the cutting edge. It will surprise you to know that teeth contain colors ranging from pink to blue, but the main shades are yellow, brown and gray.
Only with practice does a dentist develop an intuitive understanding of the sequence and which shades to use when layer-by-layer restoration of a particular tooth.
If you are interested, watch a video about how aesthetic restoration of the front teeth is done using Enamel plus material.
Direct and indirect dental restoration
Direct and indirect dental restoration are methods of restoring hard dental tissues. The restoration is performed taking into account the anatomy, morphology and functionality of the tooth. The main differences between these methods are the material from which the future restoration will be made, the technique of execution and, as a result, strength and aesthetic appearance.
So when performing the direct method
For restorations, light-curing composite materials are used, and for
indirect
restorations, all-ceramic or all-zirconium blocks are used.
The advantages of ceramics over composites are obvious. Numerous studies have shown that ceramics are not prone to staining, abrasion, do not absorb odor and prevent the formation of plaque due to its perfectly smooth surface.
The time required for direct cosmetic restoration of teeth is a little from 1 to 2 hours, and the production time for indirect, ceramic restoration of the tooth shape is several days.