I. K. Lutskaya, Doctor of Medical Sciences, Professor BelMAPO (Minsk)
Modern endodontics in most cases guarantees high efficiency in the treatment of pulpitis and periodontitis. However, violation of the algorithm of interventions or clinical protocols can contribute to the development of errors and complications.
Regular clinical and radiological examinations are extremely important to assess the quality of endodontic treatment.
According to the European Society of Endodontics, assessment of the results of root canal treatment should be carried out within 1 year after treatment and thereafter as necessary. The high quality of therapy is evidenced by the following results: absence of pain, swelling and other symptoms, absence of changes in the sinuses, preservation of tooth function and x-ray confirmation of the presence of a normal periodontal gap around the root. Uneven expansion can be considered as the outcome of the disease - scar tissue changes.
The causes of complications after root canal filling may be errors made at the stages of endodontic treatment.
1. At the preparatory stage:
- Root canal infection.
- Lack of adequate access to the root canal orifice.
- Perforation of the bottom and walls of the tooth cavity.
2. During mechanical treatment of the root canal:
- Obturation of the root canal lumen with dentine filings.
- Formation of an apical ledge when the canal is bent (“Zipping”).
- Excessive lateral expansion of the middle third of the canal along the internal curvature of the root (“Stripping”).
- Perforation of the root walls.
- Destruction of anatomical (physiological) narrowing.
- Fracture of the instrument in the canal.
3. During the process of filling the root canal:
- Heterogeneous, insufficient filling of the canal lumen.
- Removal of filling material beyond the apical foramen.
- Longitudinal root fracture.
Root canal infection
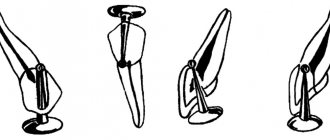
Penetration of microorganisms into the root canal can occur due to merciless preparation with pressure on the coronal pulp, careless amputation and removal of tissue from the orifice. The development and proliferation of microbes is possible due to the repeated use of tools, including burs and excavators. Infection of the root canal increases the risk of post-filling complications such as painful percussion, lack of positive dynamics after treatment of pulpitis or periodontitis. In preventing this complication, great importance is attached to careful isolation of the surgical field, since microflora can penetrate into the canal along with oral fluid. It is optimal to use protective equipment such as rubber dam and its analogues (Fig. 1). Before instrumental treatment, it is advisable to completely excise carious dentin from the walls of the carious cavity in order to prevent infection from entering the root canal.
Rice. 1. Treatment of pulpitis using a rubber dam.
Contraindications
Trepanation is not advisable in the following cases:
- if it is necessary to extract a tooth, if restoration of its functions is impossible;
- with impassable root canals with curvatures;
- for severe periodontal pathologies;
- for tooth root fractures.
In these cases, the tooth must be removed.
Stages of the procedure
Trepanation includes several stages:
- administration of local anesthesia;
- applying a rubber dam to isolate the element;
- crown opening;
- performing trepanation.
For preparation, a turbine drill with a diamond or carbide tip (with coolant) is used:
- The doctor opens the crown by drilling a point contact between the carious cavity and the inner surface of the tooth.
- The crown is opened by removing overhanging fragments of the enamel-dentin layer.
- To remove the coronal part of the pulp, a sharp excavator is used, while EDTA is supplied to the oral cavity to soften the surface dentin, as well as the disinfectant sodium hypochlorite. Cavity walls and canal mouths do not require additional preparation.
The most important task of trephination is to provide access to the tooth canals. Once achieved, trepanation is considered complete. After this, subsequent endodontic therapy is carried out as prescribed by the doctor.
Errors in creating access to root canal orifices
The reasons for this situation are insufficient preparation of the carious cavity, incomplete excision of the roof of the pulp chamber, and lack of control over the insertion of the endodontic instrument (Fig. 2). The consequence is the following complications. Overhanging edges of the cavity do not allow completely removing the remaining pulp from the tooth cavity, which inevitably leads to the appearance of pigmentation and worsens the aesthetic parameters of the tooth.
Rice. 2. Incomplete opening of the tooth cavity.
Due to poor visibility, it is not always possible to identify all existing root canal orifices, which precludes treatment and filling of undetected canals (Fig. 3).
Rice. 3. Poor quality treatment of the cavity walls.
The apparent “saving” of hard tooth tissues in the process of cavity formation can lead to poor-quality endodontic treatment.
At the same time, excessive, excessive tissue removal causes a decrease in the tooth’s resistance to mechanical stress.
A measure to prevent such an error is the formation of correct access, which is characterized by the absence of overhanging edges and the straightness of the cavity walls, which should be smooth, without roughness or notches.
Injury to the root pulp
When treating pulpitis using the amputation method, injury to the root part of the pulp is possible in the absence of adequate access to the mouths of the canals (Fig. 4).
Rice. 4. Hypertrophied gums obstruct the view of the cavity.
Excessive pressure on the bur or excavator will cause bleeding from the canal due to rupture of the neurovascular bundle. The application of a therapeutic pad over the mouth of the canal under pressure contributes to the disruption of blood circulation and the functioning of the root pulp (Fig. 5). In any case, trauma to the root pulp increases the risk of ineffective treatment of pulpitis with a biological method.
Rice. 5. Therapeutic lining over the mouths of the canals.
This complication can be avoided by careful preparation of the carious cavity with complete excision of the altered dentin and subsequent careful removal of the roof of the pulp chamber.
Indications
Manipulation is prescribed in cases where it is necessary to gain access to the inside of the tooth for:
- vitalization or removal of the nerve;
- canal obturation;
- pin installation, etc.
As a rule, trepanation is performed for deep carious cavities in the coronal part with a thinned septum between it and the pulp chamber. Pathogenic microorganisms can penetrate through the thinned wall, which leads to infection of the dental nerve. Trepanation is also indicated for pulpitis in chronic or acute form, or any form of periodontitis.
Perforation of the bottom and walls of the tooth cavity
May occur during the search for root canal orifices and their expansion; with poor visibility of the bottom of the tooth cavity as a result of inadequate formation of access to the root canals.
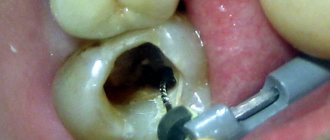
The presence of softened pigmented dentin, intense staining of hard tooth tissues after previous treatment (resorcinol-formalin method, silvering) also greatly complicate the search for root canal orifices (Fig. 6).
Rice. 6. Dentin pigmentation and paste residues at the bottom of the cavity.
In some cases, the causes of perforation are the following factors: insufficient or, on the contrary, excessive expansion of the tooth cavity; carrying out endodontic treatment through an artificial crown. Insufficient knowledge of anatomical features, such as displacement of the tooth axis and a decrease in the height of the crown due to its significant abrasion, contributes to the commission of errors.
Preventive measures for perforation of the walls of the tooth cavity are rational excision of hard tissues, adequate pressure on the bur during the preparation process, its correct direction and precise control of the depth of insertion of the rotating instrument.
Incomplete removal of the root pulp is allowed in cases where adequate access to the canal mouths is not provided or the latter are inaccessible due to the location of denticles in them. The reason may be insufficient expansion of the canal mouths or incorrect determination of the working length. The anatomical features of the structure of the roots can also become a factor in the poor patency of the canal for instruments. Violation of the work technique, for example, removal of tissue with a pulp extractor with rupture of the neurovascular bundle, incomplete removal of the root pulp, leads to bleeding from the canal, which prevents further endodontic interventions.
Obstruction of the canal lumen by dentine filings is manifested by the impossibility of reintroducing a small endodontic instrument to the entire working length. The reason is the accumulation of dentinal filings in the lumen of the canal and their compaction. An attempt to re-pass the canal with force may entail pushing the products of mechanical treatment of the root canal (endolubricants, dentinal filings, pulp residues, etc.) beyond the apical foramen, which can cause pain after endodontic treatment.
This complication is prevented by carefully passing the canal to the apical narrowing with small instruments after every second step, as well as washing the canal lumen with solutions.
The formation of apical enlargement (Zipping effect) most often occurs in curved canals. During canal treatment, slipping of the instrument tip during rotation leads to the so-called “Zipping” effect. The reason is the use of large, inflexible files, which cannot follow the shape of the canal. The canal lumen may be blocked by dentine filings. The risk of creating an apical expansion significantly increases when working with files that have an aggressive apex.
Excessive longitudinal expansion of the canal in the middle third along the internal curvature (Stripping) occurs during mechanical treatment of curved root canals. The reasons may be the following: the use of rigid, inflexible files; mechanical treatment without taking into account the thickness of the canal walls, as well as underestimation of the degree of root curvature.
Due to excessive removal of dentin in the area of the internal curvature of the root, not only does the tooth’s resistance to mechanical stress decrease, but there is also a real risk of longitudinal perforation of the root canal wall.
Destruction of the anatomical (physiological) narrowing occurs when the working length is incorrectly determined. Another reason is a slight decrease in the working length of the channel during straightening. If further processing of the canal is carried out to the previous working length, destruction of the physiological narrowing is inevitable.
Prevention of this complication consists in accurately determining the working length and its correction during mechanical treatment of a curved root canal.
Perforations of the root canal walls occur most often during instrumental treatment of curved roots.
Perforations of the mouth and middle thirds are formed mainly when the filling material is removed from the canal in the process of creating a bed for the anchor pin, as well as when the latter is screwed into the canal.
Apical perforations can occur when using insufficiently flexible rotating instruments in difficult, curved canals. A similar complication is possible from the application of excessive pressure during machining with hand tools, when trying to forcefully pass the canal. The cause of lateral perforation is the passage of a curved canal with an endodontic instrument with an aggressive tip without prior bending.
Measures to prevent various types of perforations are good access to the mouths of the root canals, analysis of the configuration of the root canals according to radiographs (Fig. 7). During mechanical treatment, obstruction of the canal lumen with dentinal filings should be avoided; pre-bend the tool; use an anticurvature technique for passing the canal.
Rice. 7. Excessive preparation and perforation of the wall of the first molar.
Opening and formation of the access cavity and localization of root canals
Author: American Association of Endodontists
The endodontic triad, including biomechanical preparation, disinfection and complete obturation of the root canal space (RC), remains the basis of endodontic treatment (ET). However, even if access to the ostia of the CC and apical foramina is ensured correctly, achieving the goals of this triad will still be labor-intensive. The main goal of EL is to create conditions in which the body can heal on its own. Adequate access is the key to achieving this goal and, accordingly, the success of EL. The purpose of this article is to assist the practitioner in understanding the technique of providing access to the dental cavity and orifices of the oral cavity. A systematic approach to addressing this issue is described below.
Basic principles
The pulp complex is a continuum (continuous structure) starting from the pulp horns and ending at the apical foramen. In order to completely remove the pulp, access to the coronal part must be ensured in such a way that the localization and cleaning of the CC can be carried out fully and without weakening the coronal dentin and enamel.
The process of cleaning and forming the access cavity and CC can be divided into 4 stages: analysis of access, removal of the roof of the tooth cavity, identification of the tooth cavity and the mouths of the CC, instrumentation of the CC.
Access Analysis
Removal of pulp tissue begins with an analysis of the anatomy of the tooth being treated and the anatomy of the surrounding tissue. To completely remove all pulp tissue, it is necessary to identify the coronal and root parts of the pulp complex. According to Krasner and Rankow, the cavity of each tooth is centrally located at the cemento-enamel junction, a feature called the “law of centrality.” Confirmation of this law can be seen in Fig. 1A and 1B.
Rice. 1. Sample slices demonstrating the law of centrality.
The law of centrality can be used to guide the initial formation of access. However, the operator must understand that this law is valid only at the level of the CEJ and is not related to the anatomy of the chewing surface.
Therefore, the initial penetration into the tooth cavity must be made in the center of the central epithelium. Therefore, the doctor must make an approach, mentally imagining the localization of the central epithelium, while ignoring the anatomy of the clinical or artificial crown. As can be seen in Fig. 2, artificial crowns disorientate clinicians, since their anatomy is not centered relative to the CEJ.
Rice. 2. Localization of the central epithelium, which does not correspond to the anatomy of the artificial crown.
Step 1
The first step in gaining access to the dental cavity is physical identification of the shape and location of the CEJ. This is done with the help of a periodontal probe, which is used to examine the circumference of the CEJ to get a mental picture of its size and boundaries, as shown in Fig. 3 A-D.
Rice. 3.AD. Periodontal probing to localize the central epithelium.
After visualizing the CEJ on the occlusal surface, a penetration point is selected. On the surface of the restoration, this point may not be related to the anatomy of the occlusal surface. This can be seen in Fig. 3E, where the correct penetration point on the chewing surface is marked with a blue circle. This point was determined using radiographic examination, periodontal probing, and a mental representation of the CEJ perimeter.
Rice. 3. E. Localization of the primary penetration point, based on determining the perimeter of the central epithelium.
Visualization of the final contour of the tooth cavity can be supplemented by the use of another law related to its anatomy - the law of concentricity. This law states: “the walls of the tooth cavity at the level of the CEJ are concentric with respect to the external contour of the tooth.” The law of concentricity is shown in Fig. 4.
Sample slices demonstrating the law of concentricity.
This law helps clinicians to correctly open the tooth cavity. If there is a convexity of the CEJ, the tooth cavity will also have a corresponding convexity. For example, if a tooth is narrowed mesiodistally, the tooth cavity will also be narrowed in that direction, as shown in Fig. 5a and 5b.
Step 2
The second step is to determine the angulation of the tooth (mesio-distal inclination). This is done using radiography (Fig. 6) and clinical examination. CBCT can provide information about the vestibulo-oral inclination of the tooth.
Rice. 6. Determination of angulation using radiography. You should pay attention to the inclination of the second molar of the HF. Step 3
The third step, as shown in Fig. 7, is the measurement of the distance from the top of the tubercle to the furcation using a radiogram. Once this distance is determined, a shorter length bur is placed in the handpiece to avoid perforation of the furcation. If a shorter bur is directed directly along the center of the central joint, parallel to the long axis of the tooth, then perforation is practically eliminated.
Rice. 7. Measuring the distance from the occlusal surface to the furcation. Step 4
After all parameters are determined, the primary access point is selected. Its location may vary relative to the occlusal surface of the tooth and will depend on all of the above factors. All recommendations regarding starting access from holes or depressions are erroneous. In some extraordinary cases, the primary access point may even be on the tubercle. The principle follows from this: the internal anatomy of the pulp chamber determines the external contours of the crown. The shape of the crown can be triangular, trapezoidal or irregular.
Access technology
Step 1
Before starting the mechanical component of access formation, all defective restorations and carious tissues must be removed to avoid bacterial contamination during the treatment process.
Step 2
The type and shape of the working surface of the bur is selected individually by the clinician. The most commonly used are spherical carbide (carbide) or diamond and fissure burs. For orthopedic structures, special burs are used to cut metal. After selecting the bur, penetration of the occlusal surface is carried out at the point determined by the above characteristics. The bur must move towards the center of the mentally imagined CEJ until the moment of “falling through” or until the head of the tip touches the tubercle of the tooth. However, “sinking” is felt only when the depth of the tooth cavity is at least 2 mm.
When a doctor evaluates the possibility of treatment on his own or referral to another specialist, it is necessary to take into account the distance from the roof of the tooth cavity to the bottom. Patients with a calcified dental cavity, as shown in Fig. 8, it is better to refer to more experienced specialists with appropriate equipment.
Rice. 8. X-ray of a molar with calcified CC. Step 3
The goal of proper access is to completely remove the roof of the tooth cavity. During the process of removing the roof, there is no need to search for the mouths of the roof, since after its complete removal and, accordingly, completion of the formation of the access, the mouths can be found without much difficulty.
The roof of the tooth cavity can be removed in two ways: place the bur parallel to the long axis of the tooth and open the tooth cavity with lateral movements, or place a spherical bur in the access cavity and, grasping the lateral overhanging edges of the roof, move the bur towards the chewing surface (Fig. 9).
Using various burs to remove the roof of the tooth cavity. The roof of the tooth cavity is sequentially removed, after which the formation of the access can be considered complete. One of the most important steps during this process is when it is determined that access has been completed. In order to accurately determine this point, the doctor needs to know the “law of color change.” The law states that the color of a tooth cavity is always darker than that of the surrounding walls. As long as the walls are light, there is a place where they transition into the darker bottom of the tooth cavity. This connection between the wall and the bottom is shown in Fig. 10, passing through the entire bottom of the tooth cavity.
Rice. 10. Sample section showing the connection between the walls and the bottom of the tooth cavity. Fig. 11. Sample slice demonstrating full access.
The operator knows that the access formation is completed in case of a complete view (360 degrees) of the connection of the bottom and walls of the tooth cavity (Fig. 11). If this connection is not fully visible, the operator will need to remove additional overhanging structures (restorative material, reparative dentin, or overhanging edges of the roof of the dental cavity). This intervention to provide a complete view can be seen in Fig. 12.
Clear visualization of the wall-floor junction is one of the main aspects of providing access for endodontic treatment.
If the doctor cannot carry out this manipulation for any reason, then he must refer the patient to another specialist. In Fig. Figure 12 shows a defective approach where a full view of the wall-to-bottom connection is not visible.
Rice. 13 illustrates full access, where the transition of the walls to the bottom is visualized along the entire perimeter of the tooth cavity.
Rice. 12. Sample of defective access.Fig. 13. Sample of full access.
Estuary localization
The number of CC orifices in each specific tooth should be known in advance before treatment. Although radiographs help in some cases to determine the number of roots, and the average values of the number of roots and CC for each tooth are also known, most often the number and location of the orifices of the CC remain unidentified.
So how does a clinician determine the exact number of CB orifices without causing iatrogenic destruction to the tooth? The only effective and safe way to visualize all formations of the floor of the dental cavity is to use a variety of anatomical landmarks.
There are several laws for identifying the localization of the mouths of the CC:
- I law of symmetry: with the exception of the molars of the HF, the mouths of the CC are equidistant from a line drawn in the mesio-distal direction through the center of the bottom of the cavity (Fig. 14);
- II law of symmetry: with the exception of the HF molars, the mouths of the CC lie on a line perpendicular to the line passing in the mesio-distal direction through the center of the bottom of the tooth cavity (Fig. 15);
Rice. 14.Fig. 15.
- law of color change: the color of the bottom of the tooth cavity is always darker than the color of the walls (Fig. 16, A and B);
Rice. 16. A-B.
- I law of localization of the mouths: the mouths of the CC are always located at the point of transition of the walls into the bottom of the tooth cavity (Fig. 17);
- II law of localization of mouths: the mouths of the CC are located at the tops of the wall-bottom connection (Fig. 18).
Once the wall-bottom connection is clearly visualized, all laws of symmetry and location of orifices can be used to determine their exact position and number.
If you look at the localization of the mouths at the bottom of the tooth cavity in Fig. 19, then knowledge of the l and ll laws of symmetry indicates not only the presence of the 4th mouth, but also its exact location.
The laws of localization of mouths l and ll can be used to determine their number and location. Since all orifices may be located along the wall-bottom junction, any black spots, indentations or white spots that are observed elsewhere (on the walls or dark bottom) should be ignored to avoid perforation. ll law of localization of mouths helps to focus on their exact location. The vertices or corners of the geometric shape of the dark bottom of the tooth cavity will indicate the exact location of the orifices. If the CC is calcified, then this apical position will determine the need for the bur to penetrate the reparative dentin of the upper part of the CC (Fig. 20).
Rice. 19. Localization of mouths using symmetry laws. Fig. 20. Sample sections showing the vertices of the floor of the tooth cavity. l and ll laws of localization of orifices in combination with the law of color change are often the only possible indicators of the presence and localization of the second CC in the bucco-medial root of the first molar of the HF (Fig. 16). In Fig. 16A shows the bottom of a tooth cavity; along the wall-floor junction there is an angle between the orifices of the bucco-medial and palatal CC. l and ll laws of localization of orifices indicate the presence of a second CC in the buccal-medial root, as can be seen in Fig. 16B. This orifice is present in the vast majority of HF molars; it can be located at different distances from the orifice of the first CC, but is always located along the line of connection between the wall and the bottom of the tooth cavity.
All of the above laws apply to all teeth with the exception of high-frequency molars. They are especially valuable in cases of unusual anatomy. Pay attention to the schematic representation of the bottom of the tooth cavity of the second premolar tooth in Fig. 21(A). Knowledge of the laws of the anatomy of the bottom of the tooth cavity will immediately indicate the presence of three CCs in this tooth (Fig. 21 (B)).
Localization of the mouth of the third CC using the laws of the anatomy of the bottom of the tooth cavity. Another example of the value of knowing the anatomy of the bottom of the tooth cavity can be seen in Fig. 22(A), which shows a LM molar sectioned along the CEJ. In accordance with the laws of the anatomy of the bottom of the tooth cavity, it can be argued that there are only two CCs in this tooth. Their location is shown in Fig. 22(B). However, the physician should be aware that the number of orifices does not always correlate with the number of CCs. Sometimes there may be several CCs at one mouth.
Anatomy of the dental cavity, demonstrating the presence of two CCs in the molar of the lower jaw. Despite all our attempts to ensure high-quality access, problems may still arise during the treatment process. Listed below are the most common problems faced by practitioners and how to resolve them.
Schematic representation of problems and options for eliminating them
Problem: inability to localize the bottom of the tooth cavity due to excessive bleeding. Cause: pulp tissue of the tooth cavity or CC. Methods of elimination: 1. Expand access by removing the roof of the tooth cavity without touching the bottom (you cannot touch the bottom of the tooth cavity without completely visualizing the wall-bottom connection). 2. Place a hemostatic agent into the tooth cavity. 3. Use a pulp extractor to remove pulp tissue.
Problem: inability to determine the location of the bottom of the tooth cavity due to inadequate removal of the roof of the tooth cavity. Reasons: 1. Wrong choice of primary access point. 2. Inability to visualize the wall-bottom connection at 360 degrees. Elimination methods: return to the previous bur (spherical or fissure) and continue opening the tooth cavity until the wall-bottom connection is completely visualized.
Problem: inability to determine the location of the bottom of the tooth cavity due to inadequate lighting. Reasons: 1. Too little access. 2. Presence of crowns or restorations. 3. Lack of smooth surfaces on the walls and bottom of the tooth cavity (usually due to the use of too small spherical burs). Methods of elimination: 1. Enlarge the access cavity until the wall-bottom connection is completely visualized. 2. Remove the restoration material. 3. Use additional lighting devices (LED headlamps or operating microscope) if you have a crown. 4. Smooth out all irregularities on the walls and bottom of the tooth cavity using spherical burs.
Problem: calcifications, denticles. Cause: degenerative processes in the pulp Methods of elimination: after completely removing the roof of the tooth cavity and stopping the bleeding, use a non-aggressive spherical bur to smooth the bottom of the tooth cavity to remove calcification and clearly visualize the wall-bottom connection.
Problem: inability to determine the location of the bottom of the tooth cavity due to the overhang of the restoration material over the tooth cavity. Reason: inadequate removal of all restoration material before the start of access formation (in particular, with carious cavities of class 5, the restoration material can be introduced into the tooth cavity). Remedy: remove all restoration material before starting access.
Problem: inability to localize the bottom of the tooth cavity due to loss of landmarks. Reasons: 1. Using the occlusal surface as the starting point for access formation. 2. Problem with determining the inclination and rotation of the tooth. 3. Loss of landmark in the form of a circle along the central nervous system. 4. Wrong choice of angulation for primary access. Methods of elimination: 1. Correctly determine the orientation of the tooth before starting access formation. 2. Correctly mentally imagine the CES. 3. Remove the rubber dam to avoid loss of landmarks. 4. Select the appropriate penetration angle for the bur during initial access.
Problem: perforation of the bottom of the tooth cavity. Reasons: 1. Premature attempt to identify the mouths of the CC. 2. Incorrect measurement of the distance from the occlusal surface to the furcation. 3. Incorrect identification of the wall-to-bottom connection. 4. Inadequate access. Elimination methods: 1. Remove the roof of the tooth cavity before determining the location of the mouths of the CC. 2. Obtain a 360 degree view of the wall-bottom connection. 3. Use a bur of shorter length than the distance from the occlusal surface to the furcation. 4. Direct the bur along the center of the CES perimeter.
Problem: perforation of the lateral wall of the tooth cavity. Reasons: 1. Misconception about CES. 2. Incorrectly chosen angle when creating access. 3. Using the occlusal surface as a guide to begin penetration. Elimination methods: 1. Remove the roof of the tooth cavity before determining the location of the mouths of the CC. 2. Obtain a 360 degree view of the wall-bottom connection. 3. Direct the bur along the center of the CES perimeter. 4. Select the primary point of penetration based on the idea of the central nervous system.
Conclusion
To increase the likelihood of success of endodontic treatment, it is necessary to remove the pulp as completely as possible. In order to achieve this, it is necessary to find the mouths of all CCs. The only rational way is to use the laws of the anatomy of the bottom of the tooth cavity. To do this, it is necessary to create an access in such a way as to visualize the connections of the walls and the bottom of the tooth cavity along the entire perimeter. This article describes clinical conditions that may interfere with such imaging. The article is also supplemented with a schematic representation of possible problems that arise during the treatment process, and options for their prevention and elimination.
Amet Tabakov Kirill Kulik
Instrument fracture in the root canal
The risk of instrument fracture is very high in case of file deformation (bending, unwinding of turns) and most often occurs when passing and expanding narrow, curved, previously sealed canals (Fig. 8). The main reasons for this complication may be the lack of adequate access to the mouth of the root canal; violation of the sequence of use of endodontic instruments; use of instruments without taking into account indications; non-compliance with operating mode and rotation speed; application of significant force during manual or machine endodontic treatment; metal fatigue caused by repeated use of the tool.
Rice. 8a. Introduction of a curved file.
Rice. 8b. Broken instrument in the root canal.
Prevention of tool breakage consists in strict adherence to the operating mode and use of the tool according to indications. The sequence of use of tools must be taken into account. During machining, the use of endolubricants is recommended.
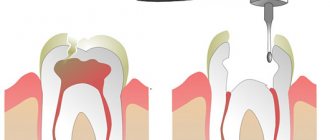
Incomplete and insufficient obturation of the root canal is mainly due to incorrect determination of the working length, incomplete passage of the canal (Fig. 9), the use of the technique of one gutta-percha or silver pin in canals that have an oval, dumbbell-shaped, slit-like (irregular) shape that does not correspond to the shape of the pin, and also using liquid-mixed paste for filling (using a channel filler). As a result, shrinkage is inevitable, as well as dissolution of the paste some time after filling.
Rice. 9a. Obturation of root canals: high quality.
Rice. 9b. Obturation of root canals: incomplete.
The removal of filling material beyond the apical foramen is often observed after excessive mechanical treatment of the root canal. The result is destruction of the physiological apical constriction. It can also be disrupted due to a chronic inflammatory process in the tissues of the apical periodontium. In addition, there is a real possibility of removing material beyond the apex when using a machine channel filler. The risk of complications increases sharply when filling a root canal without taking into account the working length (Fig. 10).
Rice. 10. Removal of a significant volume of sealer beyond the apex.
The removal of the filling material beyond the apical foramen is observed in the case of using a large amount of sealer, as well as as a result of excess pressure during the condensation of the filling material in the root canal.
Pushing the gutta-percha pin beyond the apex may be a consequence of incorrect determination of the working length and/or incorrect selection of the size of the main pin (Fig. 11).
Rice. 11. Removing the gutta-percha pin beyond the root apex.
Removal of gutta-percha beyond the root apex is possible during the process of lateral condensation of gutta-percha (Fig. 12).
Rice. 12. Lateral condensation of pins.
Preventive measures: control of working length at all stages of endodontic treatment; competent formation of the root canal; maintaining the integrity of the anatomical (physiological) narrowing.
If removing a small amount of sealer beyond the apical foramen may not cause problems, since it is quickly resorbed, then gutta-percha removed beyond the apex, which itself is biologically inert, can maintain inflammation in the apical periodontal tissues for a long time, being a mechanical irritant.
Longitudinal root is possible during the process of lateral condensation of gutta-percha pins and is a consequence of excessive thinning of the walls of the root canal during mechanical treatment. In addition, a longitudinal root fracture can be observed with strong lateral pressure on the sprider during the condensation of gutta-percha pins.
Prevention measures include assessing the condition of the hard tissues of the tooth root, their thickness, as well as improving manual skills and applying adequate efforts in the process of condensation of gutta-percha pins.
The instrument is broken in the tooth canal.
Breakage of a tool in a canal is an extremely unpleasant thing. In the practice of any dentist involved in root canal treatment, such a complication has occurred more than once. Why is this bad? By itself, a metal fragment inside a tooth cannot cause any harm - you won’t be ringing at the airport, the alloy from which the files are made (“canal needles”) is completely inert, and an allergy to it is also unlikely. So what's the problem? The problem is that these fragments clog the root canal and the dentist cannot properly clean the space behind the instrument. This may cause problems in the future. It is possible to remove a fragment from the canal without using a microscope only if it is located at the very surface. And even then, if you are lucky, it should be considered great luck. But if the “bummer” happened deep in the channel, then there is nothing to do there blindly. Rather, you can break new wood.
So, in this case, we see a “spiral” in one of the channels in the picture... It is shown by an arrow. The inflammatory focus around the tooth root is circled with dots.
In order to thoroughly clean the root canals, the task was to remove this fragment. At the same time, it was located quite deep and had a small size. Without an eye equipped with a microscope, the task would be difficult to accomplish. In the photo below, the red arrow shows a fragment deep in the canal. Seeing it, it is much easier for the dentist to remove the fragment and bring it out (green arrow).
Ultimately, the instrument was removed and the canals were completely cleaned and sealed.
Now there is no doubt that the granuloma that grew on the root of the tooth and threatened to remove it will go away in a few months. And the existence of the tooth will no longer be threatened.