The new nickel titanium ProTaper represent a revolutionary advancement in the field of root canal treatment. ProTaper files were designed specifically to meet certain criteria - they must have superior flexibility, unparalleled efficiency and high security. The unique design features of ProTaper allow clinicians to more consistently create a smooth, tapered shape in highly curved canals and canals with anatomical challenges.
Protapers are a new version of the world's most popular endodontic nickel titanium instrument system, meeting the requirements of all dentists in all clinical situations.
Protapers are unique, ultra-flexible nickel-titanium files of a new generation that allow high-quality preparation of difficult root canals that are difficult to traditional instrumentation.
Composition: the cutting part of these tools is made of nickel-titanium alloy.
Nickel-titanium instruments should not be used to remove polymer pastes from root canals.
ADVANTAGES OF UNIVERSAL PROTAPERS
+ Easier
- uniform sequence of instruments regardless of the shape of the root canal
- simply remember the application protocol (color coding)
- Root canal drying and obturation products are specially designed to work with the ProTaper system and are color coded
+ Faster
- in most cases only 3 tools are needed
- high cutting efficiency
+ More efficient
- increased apical taper for better root canal preparation
- Better removal of dentinal debris thanks to the unique “multiple taper” of the instruments
+ Safer
- rounded guide tip minimizes the likelihood of deviation from the channel
- There is a manual version of instruments for anatomically complex clinical situations, as well as for clinicians who prefer to use manual instruments due to better tactile control
New is well forgotten old
There is a huge range of opinions regarding the best methods for shaping and cleaning root canals and root canal systems. A review of the literature revealed significant disagreement on a range of fundamental clinical issues. Controversy continues regarding the sequence of root canal preparation, working length, and the use of the variety of files available. There is a complete lack of data regarding the amount of apical foramen expansion and suitable canal taper that would guarantee reliable three-dimensional cleaning and filling.
Confusion is growing when trying to identify and implement the best technologies and tools. No international agreement has been adopted either on the maximum effective concentration, temperature and volume of the irrigant, or on the cleaning ability of reagents in general. The greatest differences of opinion arise regarding the importance of lateral clearance depth, elimination of the smear layer and biofilm, and the impact of these factors on the success of endodontic treatment.
Of course, sooner or later basic scientific research will shed light on our practical experiences, but ultimately it is these clinical actions that determine professional success in treating a patient. More than 30 years ago, Dr. Herbert Schilder described the most predictable, reliable concepts and strategies for root canal preparation. Schilder Endodontics continues to serve as a guide on the path to professional confidence and success.
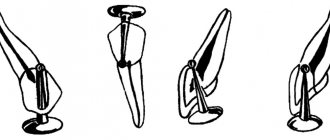
In his brilliant classic, Cleaning and Treatment of Root Canals, Schilder outlined 5 mechanical methods for shaping and cleaning root canals. Schilder showed that the dimensions of smooth, streamlined preparations will inevitably vary according to the anatomy of that particular root (Fig. 1). He noted that a well-designed canal has a “look” and greater potential for three-dimensional cleaning and obturation, which meets the biological goals of preserving critical teeth (Figure 2).
Rice. 1a. Visualizes root curvatures, external root concavities, and the anatomy of the root canal system
Rice. 1b. Enlarged view demonstrates that shaping promotes three-dimensional cleaning
Rice. 2. The step-by-step processing sequence makes it easier to shape and clean the root canals. Completed endodontic treatment is the basis for further periodontal treatment and prosthetics
Schilder's ingenious innovation was the use of a series of instruments to step-by-step shape the root canal: there is a strategic advantage to removing dentin from the coronal 2/3 of the canal before starting the preparation of the deeper and more complex apical region (Fig. 3).
Rice. 3. Endodontically treated maxillary first molar with five canals, each of which has a different anatomical configuration
Schilder shaping techniques are the standard against which other processing technologies are evaluated. This pre-expansion strategy differs significantly from the often used step-back and crown-down techniques. Each technique, described in different ways, offers something interesting and improves root canal preparation techniques. And, although the final shape of the root canal may theoretically be the same, all techniques differ significantly and each requires a different exact sequence of actions.
What follows is a brief overview of step-back, crown-down and pre-enlargement techniques.
PROTAPERS F1 PROTAPERS F2 PROTAPERS F3
Finishers are designed to finalize the apical third of the root canal, as well as to level and widen the middle third of the canals. They, like shapers, include 3 tools: F1, F2, F3.
The tip diameter of the F1 pro taper is 0.20 mm, F2 0.25, F3 0.30. It is characteristic that all 3 tools in the interval D0-D3 have a fixed taper (.07, .08, .09%, respectively). After D3, although the tool diameter continues to increase, the taper decreases to 0.055, thereby increasing the flexibility of the prop taper.
1. Indications for use: Protapers are intended for use only in a clinical setting by specially trained specialists. Scope of application: formation and cleaning of the root canal system.
2. Contraindications: Not known.
3. Warnings: None known.
4. Precautions:
- Repeated disinfection cycles and sterilization increase the risk of file fracture.
- These instruments should not be immersed in sodium hypochlorite solution.
- Cleaning of Instruments: Strictly follow the cleaning instructions recommended by the manufacturer.
- Irrigate generously and frequently.
- Create an adequate carpet runner using hand files up to a minimum of ISO size 15.
- Use the instruments at a constant rotation speed of 150 – 350 rpm with light apical pressure.
- Clean the tool grooves as often as possible and inspect the file for signs of deformation or wear.
- For optimal performance, it is recommended to use torque-controlled devices.
- Use the shaping files (S1, S2 and Sx), working in separate sweeping movements to create a straight-line approach to the root canal.
- Use finishing files (F1, F2, F3, F4 and F5) without using sweeping motions.
- Use appropriate finishing files to “passively” pass the entire working length of the canal and, once reached, immediately remove the instrument.
5. Adverse reactions: To date, no adverse reactions have been reported.
ProTaper manual
A.P. Hovsepyan
, consultant doctor of the concern Dentsply.g. Moscow
Nickel-titanium rotating ProTaper files are designed for the preparation of particularly complex, highly calcified and curved canals that are difficult to treat with traditional instrumentation. ProTapers incorporate all the excellent qualities of rotating nickel-titanium Profiles, but at the same time they have a number of exceptional qualities that are not possessed by any of their analogues. The unique design provides ProTaper instruments with superior flexibility, high cutting efficiency and significantly greater safety, allowing clinicians to create perfect tapered preparations even in anatomically complex and highly curved canals. The “philosophy” of these instruments is very simple - to achieve greater preparation efficiency using fewer instruments. The system consists of only six (6) files - three formative and three finishing. To better understand the mechanism of how Pro-Tapers work in clinical practice, let’s take a closer look at their design features, rules and methods of use.
ProTaper Geometry
Forming Files
The auxiliary shaping file, Shaper X (Sx), is easy to identify as there is no color marking on its gold-plated handle. The Sx has an overall length of 19 mm, which provides excellent access to the depth of the root canal. The Sx file has a modified Do tip with a diameter of 0.19 mm, and the D14 base has a diameter of about 1.20 mm. The degree of taper of the Sx file from Do to D9 compared to the other two shaping files is significantly greater. For example, diameters D6, D7, D8 and D9 of this file have cross diameters of approximately 0.50. 0.70. 0.90 and 1.10 mm respectively. This file is used to give an optimal shape to short root canals, as well as to clarify the direction of the canal, give the desired shape to the coronal part and provide access to the depths of long canals. Shaper X is much more effective than Gates Glide and other instruments that form the mouth of the root canal. The forming file S1 and the forming file S2 are easily identified by the purple and white identification rings on the handles, respectively. For files S1 and S2, the diameters of the guide tips Do are 0.1 7 mm and 0.20 mm, respectively, and the diameter of the base D14 is close to 1.20 mm. The S1 and S2 shaping files have a progressively increasing taper along the entire length of their cutting blades, with each instrument preparing only specific areas of the canal. S1 is designed to prepare the coronal third of the canal, and S2 expands and prepares its middle third. In addition to the fact that these instruments optimally prepare the coronal two-thirds of the canal, they also consistently enlarge the apical third.
Finish Files
Three finishing files called Fl. F2 and F3 have yellow, red and blue rings on the handles, which correspond to DO diameters of 0.20, 0.25 and 0.30 mm respectively. In between Do-D3 files F1. F2 and F3 have a fixed taper of 7, 8 and 9% respectively. Between D4-D14, each tool has increasing transverse dimensions, but more importantly, over the same length, each tool has a decreasing percentage of taper. Reducing the taper on a specific section of the file's cutting blades provides flexibility and also reduces the risk of the tool locking as it rotates. Although these instruments are designed to optimally complete the apical third, they also consistently widen and flatten the middle third of the canal. Only one finishing instrument is usually required to prepare the apical third of the canal.
ProTapers are designed for their benefits
<B>Multi-stage taper
A unique feature of shaping files is their progressive taper, which significantly improves flexibility, cutting efficiency and reduces the number of re-passes. For example, the Sx file has nine (9) progressive taper values from 3.5 to 19% between D1-D9 and a fixed taper of 2% between D10-D14. The S1 file has twelve (12) progressively increasing taper values from 2 to 11% between D1-D14. File S2 has nine (9) progressively increasing taper values from 4 to 11.5% between D1-D14. This shape geometry allows each shaping file to prepare its own root canal area using the crown-down technique. Therefore, during preparation, only a small part of the dentin is captured from the walls of the root canal, which reduces the torsional load, reduces the “fatigue” of the file and the possibility of its breakage.
Convex Triangular Cross Section A unique feature of ProTaper instruments is the convex triangular cross section, which gives the instrument extraordinary flexibility while at the same time strengthening the main shaft. This reduces the contact between the file blades and the canal walls, reduces the torsional load and ensures the safety of using the tool.
Varying angles and spiral steps
ProTaper files have a continuously varying helix and pitch angle over the 14mm cutting surfaces, allowing the blades to effectively extract waste material from the canal, preventing the file from becoming blocked in the root canal.
Various Tip Diameters
The three shaping files feature varying diameters of the modified semi-aggressive Do tip, allowing clinicians to safely and effectively advance deeper into the canal. In this case, the blade of each instrument first expands its zone in the coronal part of the canal. The S1 shaper has a Do diameter of 0.17 mm. The shaper Sx has a diameter Do of -0.19 mm, and the shaper S2 has a diameter Do of -0.20 mm. The finishing files have different diameters Do equal to 0.20. 0.25 and 0.30 mm, which, as a rule, corresponds to different diameters of the apical constriction. Typically, only one finishing file is required to optimally complete a preparation in the apical third of an anatomically complex and curved canal.
Modified guide tip
A distinctive feature of ProTaper files is the presence of a modified semi-aggressive tip. The new design of the tip shape allows each instrument to easily penetrate into the depths of the canal through soft tissue (pulp, waste particles) without damaging the walls of the root canal.
Short handles
Compared to the standard handle length of conventional rotary files, ProTaper files have short handles (12.5 mm). This improves access to the posterior teeth, especially in cases with limited interocclusal space.
Six (6) tool system
The ProTaper system offers only six rotating NiTi files, which is another step towards universalization and reduction in the number of instruments for preparing canals of any complexity.
Rules for use
When used correctly and following certain restrictions, ProTapers guarantee excellent results and a high degree of safety. When using the ProTaper, the clinician should follow basic specific guidelines for instrument sequencing and select the recommended speed and torque for each file type. But the main thing is that the doctor must follow the basic rules of endodontic intervention: creating a straight-line access, using irrigation and lubricants, examining the root system with a hand instrument and creating a guide before using rotating files, maintaining patency of the apical narrowing, giving the canal a conical shape within the working day.
Straight-line access
Creating straight access is the basis of successful endodontic treatment. Preparing the dental cavity to provide the shortest possible access is an important step in the endodontic treatment procedure. To create access to the canal orifice/pits, it is necessary to remove the roof of the pulp chamber and the excess dentin covering it on top. The size of the cavity is dictated by the topographic location of the orifice(s) at the floor of the pulp chamber. The internal walls of the cavity are prepared and smoothed to eliminate any interference during subsequent instrumentation and to provide easy, straightforward access to the root canal orifice(s). When all orifices can be visualized without changing the position of the dental mirror, the goal has been achieved and the cavity has been formed correctly. Ideally, the access cavity should follow the principles of restorative dentistry. Creating good access significantly improves the quality of root canal preparation and makes it easier to give it the desired shape. With a correctly formed access cavity, instruments are easily inserted into the canal mouth and, when rotated, slide freely along the smooth walls of the canal5-7.
Irrigation and lubrication
No instrument should be inserted into the root canal until the pulp chamber is filled with irrigant. Once direct access has been achieved and all orifices have been identified, the pulp chamber must be filled with warm 5.25% NaOCl solution. To ensure optimal safety, NiTi rotary instruments are always used with Glide type lubricant (Dentsply Maillefer).
Creating a Guide
Before using any NiTi rotary instruments, it is necessary to examine the channels and create a “guide” at the mouths. For this purpose, classic 2% taper steel hand files No. 10 or No. 15 are used, as well as C+ files specially designed for this procedure (Dentsply Maillefer). With the advent of NiTi rotary files, the role of hand tools has been significantly reduced and rethought. Many clinicians use small hand instruments primarily to obtain initial information, confirm access, or, if necessary, to create sufficient space in the canal orifices before using more effective NiTi rotary files. Hand instruments serve not only to locate orifices, but can provide additional information during tactile examinations: 1) Determination of the transverse diameter of the canal Hand files can determine the estimated diameter of the canal, the presence of access and the degree of calcification. Before the rotating NiTi file can be safely inserted into the canal, there must be sufficient space for insertion of the guide tip. In other words, a depression must be created at the mouth of the canal and a smooth “guide” must be created for the introduction of NiTi rotating files. In case of severe calcification, preliminary expansion of the coronal and middle parts with manual files is necessary using the usual method. 2) Confirmation of straight-line access to the canal Straight-line access to the depth of the root canal is confirmed by the position of the handle of the hand file. If a straight-line access is created in the coronal part of the root, then the handle of the file inserted into the canal will be located vertically, and the instrument itself will be parallel to the axis of the tooth. In cases where the file handle is offset from the tooth axis, located at an angle and is difficult to insert into the canal, additional expansion is necessary to ensure the vertical position of the file handle 10-11. Sometimes this also requires increased access and selective removal of the dentin triangle from the coronal third of the canal. Creating a straight-line access is a very important step, as it simplifies all subsequent procedures and eliminates many errors and failures during canal preparation. Traditionally, the Gates Gliden series of drills have been used for these purposes. Today, just one instrument, the ProTaper Sx, can be used to quickly, effectively and safely remove the dentine triangle from the orifice. The use of Sx provides good access to the depth of the root canal and simultaneous preparation of the middle and apical third of the root canal. 3) Examine the anatomy of the root system Hand files can provide useful information about the anatomy of the root system. For example, a detailed examination gives an idea of the degree of curvature, the shape of the canal, as well as the presence of splitting or merging of the canals. It must be understood that certain anatomical features of the root canal configuration sometimes make it impossible to safely use NiTi rotary files.
Maintaining patency of the apical constriction and working length
After finishing treatment of the apical third of the root canal, it is necessary to ensure its patency to the radiographic apex (RA). Usually, manual, small, flexible files are used for this. By working passively with a hand file, the remaining spent dentin particles can be removed at the same time, moving towards the apical constriction. At the same time, it is very important, while maintaining the patency of the apical narrowing, not to push the waste masses into the periodontium. This will avoid the creation of apical blocks from dentin particles and the creation of ledges and perforations. Most researchers and clinicians are of the opinion that conventional passage of the canal to the radiographic apex most often results in the tip of the instrument extending beyond the apical constriction. Since the apical third of the canal ends at the dentin-cement junction (DCJ), the so-called “apical constriction” or physiological apex, experienced clinicians suggest that this point be considered the starting point when measuring the working length. But this anatomical point varies significantly from tooth to tooth, from root to root, and it is not always possible to determine it tactilely. Therefore, previously, when determining the working length, clinicians relied on the radiographic apex. But with the advent of electronic apex locators, determination of the apical narrowing has become more accurate than radiography. Apex locators, embodying technological advances of recent years (“Root ZX”), provide greater accuracy in determining the working length of the canal, even containing exudates and electrolytes. It should not be assumed that apex locators can completely replace X-ray film. In our opinion, only a combination of the capabilities of electronic apex locators and X-ray examination provides a very accurate diagnostic result in determining the working length of the canal.
Method of use
ProTapers should be used passively, without applying apical pressure. The pressure required should be equivalent to the pressure used when writing with a finely sharpened pencil. The rotating instrument should be advanced in the canal in the apical direction until slight resistance is felt. If any Pro-Taper file stops advancing apically, remove it and determine which of the following four typical factors is preventing it from passively advancing apically: 1) Instrument diameter and canal diameter mismatch Instrument advancement in the canal may be difficult if the diameter the tip of the instrument is larger than the diameter of the canal due to calcification of the canal. In addition, NiTi rotary instruments cannot advance through a narrow channel that is sharply bent, divided, or has resorption defects in its walls. In the case of calcification, use lubricant in combination with No. 10 and No. 15 hand files and, if necessary, some larger hand instruments to create an extension that matches the tip of the NiTi instrument. 2) Presence of sawdust in the canal To remove sawdust accumulated in the canal, rinse the root canal generously and develop it with a #10 hand file to crush the sawdust and turn it into a kind of solution, then rinse the canal again. 3) Sawdust between cutting edges Accumulation of sawdust between cutting edges during preparation limits the apical advancement of the instrument. The sawdust between the cutting edges deactivates the tool because it pushes the active part away from the canal walls. In this case, remove the tool and clean it. irrigate the canal, then re-pass it with a hand file to ensure patency, and irrigate the canal again. 4) Features of the anatomy of root canals Some teeth have anatomically complex root systems, which makes it difficult to passively and safely advance the tip of a rotating instrument. In such cases, rinse and re-pass the canal with small hand files to increase the diameter of the canal "guide track". Admittedly, in some cases it is better to shape using hand files. However, the ProTaper S1 shaping file, which has a Do 0.17 mm diameter and a modified guide tip, can follow a smooth “guide path” that has been prepared and confirmed with hand files #10 and #15.
Reusable
Before use, any ProTaper file should be inspected for wear or damage, and its cutting edges should be cleaned frequently during use to optimize efficiency and reduce the possibility of breakage. Tools that show signs of damage must be disposed of. The main reason causing the breakdown of NiTi rotating instruments is a gross violation of control of speed, torque and non-compliance with the basic rules of endodontic intervention listed above. Sometimes doctors forget the main principle of healing - “do no harm.” The unique design of ProTapers provides unparalleled cutting efficiency, which sometimes lulls the vigilance of doctors and instills in them a sense of permissiveness, which always leads to failures and sometimes to unfortunate failure of the instrument. Before using the ProTaper instrument system for the first time in the clinic, it is necessary to repeatedly try them on special plastic training endoblocks and extracted teeth in order to acquire the necessary manual skills. We hope our recommendations will help you avoid failures when using the ProTaper tool system at the initial stage.
Actuators and handpieces
ProTaper instruments should be used in handpieces with electric drives that have controlled torque and a speed of 250-300 rpm. For example, the new electric motor "ATIAR Technika" (Dentsply Maillefer) has software that allows you to select the torque and speed for each ProTaper file. The new device promises significant simplification of clinical work and safety of use of rotating NiTi instruments.
Technique for using ProTapers
There are two techniques for preparation with ProTapers - for medium and long canals, and for short canals.
Technique for preparing medium and long canals Following the rules of endodontic intervention, begin by creating straight access to the canal orifices. Next, fill the pulp chamber with either sodium hypochlorite or Glide-type lubricant. ? Examine the root canal using a #10 hand K-file, moving forward in a back-and-forth motion. Advance the tool gradually and passively, within a few millimeters of the specified working length. ? Proceed with the ProTaper tools in sequence, starting with the SI shape file with the purple ring. Insert the instrument into the canal and advance apically to a shallow depth. In the most difficult canals, several attempts may have to be made to widen the coronal third of the canal. Rinse the channel, remove waste materials with a hand K-file No. 10 and rinse again. ? Then use the Sx shaping file (without the color ring). Selectively remove dentin using a scrubbing motion (similar to a brush). Remove calcified deposits at the orifice (they may interfere with the correct determination of the direction of the canal) and clarify the direction of the root canal. Having thus improved access to the depth of the canal, passively insert the Sx instrument deeper until a feeling of lightness arises with resistance. Using reciprocating movements in the direction from the apex to the crown, remove the waste masses, avoiding excessive resistance of the prepared dentin. Work the tool until about two-thirds of the total length of the working part is immersed in the mouth of the canal. Don't forget to flush the canal. ? Once the pre-enlargement procedure has been completed and good access has been achieved through two-thirds of the root canal, use a pre-curved No. 10 K-file to determine the final working length. After confirming the working length, lubricate the canal with Glide lubricant and finally calibrate it using the S1 shaping file (with purple ring) to the entire working length. ? After using the S1 shaping file, rinse the canal and continue with the S2 shaping file (with the white ring). Usually this file is immediately inserted to its entire working length. After using the instrument, rinse the canal. ? Once the coronal two-thirds of the canal has been prepared, the final preparation of the apical third can begin. To do this, use the finishing file F1 (with the yellow ring. ISO 020). Carefully insert instrument F1 into the irrigant-filled canal to working length and then remove immediately. ? Determine the diameter of the apical constriction by placing a hand-held K-file No. 20 into the canal. If the instrument fits tightly to the entire working length, then the diameter of the apical constriction corresponds to ISO 020 and the canal is ready for obturation. Use the finishing file F2 (with red ring, ISO 025}. Rinse the canal and continue preparation with the F2 instrument to the working length. Then determine the diameter of the apical constriction by placing a #25 hand K-file into the canal. If the instrument fits tightly to the entire working length, then The diameter of the apical constriction corresponds to ISO 025 and the canal is ready for obturation. Use the finishing file F3 (with blue ring, ISO 030). Carefully insert it to the working depth and carry out the same procedure for determining the diameter of the apical constriction with a manual K-file No. 30. Typically the diameter of the apical constriction depends on how much you have widened the calcified or curved canal.Short Canal Preparation Technique
• Once straight access to the canal orifice has been created, begin preparation with the Sx shaping file.Passively advance it apically until approximately two-thirds of the intended canal depth is reached.Rinse and re-pass the canal with the same • Insert a pre-curved hand K-file 10 and pass through the rest of the canal to ensure patency of the apical constriction and determine the working length. • Only then can the Sx file be used to its full working length. Insert the Sx file once to the working length for no more than one second. The file should easily go to working length by following the previous steps. Once the Sx file has been inserted to working length, rinse and re-pass the canal. ? Perform the final preparation with finishing files Fl. F2, and F3 according to the method described above.
Summary
Nickel-Titanium ProTaper rotary instruments have been specifically designed for the preparation of anatomically complex canals, but they can also be successfully used for work in ordinary canals. Thanks to their unique design, they offer outstanding flexibility, cutting efficiency and a high level of safety. One of the main advantages is that only a few ProTaper instruments are required to prepare canals of any complexity. The ProTaper rotating file system is the result of the joint efforts of Drs Ben Jonson, Pierre Mastu, Clifford Ruddle and John West, as well as engineers François Haebou and Gilbert Roth (Densplay Maillefer, Balague, Switzerland).
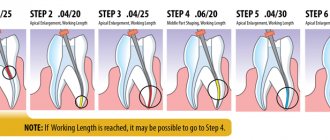
PROTAPERS - STEP-BY-STEP INSTRUCTIONS FOR USE
- Create direct access to the root canal orifice.
- Constantly irrigate and check the patency of the carpet with an ISO 15 size hand file.
- Usage protocol:
- Locate the mouth.
- Passively use an ISO size 15 hand file until you feel resistance.
- Use the S1 shaping file, working in a sweeping motion until you reach the penetration depth of an ISO size 15 hand file.
- Repeat this sequence until you have determined the working length using an ISO size 15 hand file and have gone through the entire working length of the canal using the S1 tool.
- Use the S2 shaping file, working in a sweeping motion until you reach working length.
- Confirm the working length.
- Use the F1 finishing file (without sweeping movements), moving it deeper with each insertion until you reach working length.
- Calibrate the apical foramen using hand files.
- Use the appropriate finishing file (F2, F3, F4, F5) without sweeping movements to the full working length if additional expansion is needed or if the apical foramen is larger. If necessary, use Sx sweeping movements to remove ostial dentin and/or to create a wider coronal portion of the canal.
Protaper Universal - video, operating method
6. Disinfection, cleaning and sterilization: Clean the instruments and stand first. Then sterilize the instruments in the bags using an autoclave at 134ºC, 3 bar pressure for 18 minutes.
6.1 General recommendations
- Tools marked "disposable" are not intended to be reused.
- The user is responsible for the sterility of the product upon first use and each subsequent use, as well as for the use of damaged or contaminated instruments.
- For your own safety, please use personal protective equipment (gloves, goggles).
- Use disinfectant solutions with proven effectiveness (listed by the German Society for Hygiene and Microbiology; CE marked; approved by the German Inspectorate for Hygiene and Microbiology).
- quality of food products and medicines).
- Tungsten carbide burs, plastic stand, hand tools and nickel - titanium tools are destroyed by hydrogen peroxide (H2O2) solution.
- Nickel-titanium instruments are destroyed when immersed in a NaOCl solution for more than 5 minutes with a concentration of more than 5%.
- Aluminum instruments are destroyed in a solution of caustic soda with mercury salts.
- Do not use acidic (pH < 6) or alkaline (pH > solutions.
- After 5 processing cycles, markings may be destroyed
Prospects
Starting this year, the production of ProTaper instruments under the name ProTaper Universal will begin again (Fig. 10). There will be 2 additional finishing files F4 (40/.06) and F5 (50/.05) for the preparation of large canals and the convenience of those dentists who prefer to further expand anatomically smaller root canals. Other modifications include shifting the transition angle between the safe tip of the file and the first cutting turn, equalizing the balance of file performance in a particular series, electropolishing, increasing the length to 31 mm and increasing the flexibility of larger F-files. The goal of these modifications is to cover the maximum variety of anatomical situations and, very importantly, to reduce the perceived need for hybrid technology among dentists.
Rice. 10. ProTaper instruments demonstrate significant progress in the efficiency and reliability of root canal treatment. Rotary ProTaper files can be easily converted to manual files using color-coded snap-on handles
PROTAPERS - RE-TREATMENT
D1+D2+D3: instruments specially designed for simple filling of root canals:
- the D1 instrument has an active tip, facilitating initial penetration into the root canal
- instruments have different lengths and taper of the working part for working in different parts of the root canal (coronal/middle/apical)
The sequence of using the tools is easy to remember
- From shortest to longest tool: D1 – D2 – D3
Easy identification
- dark gray handles no more than 11 mm long for better visibility
- instruments have one, two or three white rings respectively
PROTAPER D3 – FOR THE APICAAL PART OF THE CANAL
Rules for using ProTaper instruments to remove filling material from root canals
- instruments are inserted into the canal by applying light pressure in the apical direction
- regularly remove the instrument from the canal, check its working part and clean it
- if the instrument does not advance deeper, use a hand instrument to overcome resistance and confirm patency of the canal
Recommended speed:
- for removing gutta-percha or Thermafil/ProTaper® obturators: 500 – 700 rpm
- for removing pastes based on zinc oxide and eugenol: 250 – 300 rpm
You can buy ProTaper (ProTaper) machine S1, 25 mm, Dentsply, for the treatment of complex cases, blister (6 pcs) produced by Dentsply at ExDent.ru at a price of 3,530 rubles.