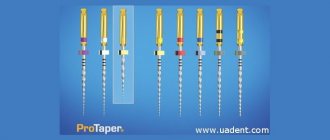
The new nickel titanium ProTaper represent a revolutionary advancement in the field of root canal treatment. ProTaper files were designed specifically to meet certain criteria - they must have superior flexibility, unparalleled efficiency and high security. The unique design features of ProTaper allow clinicians to more consistently create a smooth, tapered shape in highly curved canals and canals with anatomical challenges.
Protapers are a new version of the world's most popular endodontic nickel titanium instrument system, meeting the requirements of all dentists in all clinical situations.
Protapers are unique, ultra-flexible nickel-titanium files of a new generation that allow high-quality preparation of difficult root canals that are difficult to traditional instrumentation.
Composition: the cutting part of these tools is made of nickel-titanium alloy.
Nickel-titanium instruments should not be used to remove polymer pastes from root canals.
ADVANTAGES OF UNIVERSAL PROTAPERS
+ Easier
- uniform sequence of instruments regardless of the shape of the root canal
- simply remember the application protocol (color coding)
- Root canal drying and obturation products are specially designed to work with the ProTaper system and are color coded
+ Faster
- in most cases only 3 tools are needed
- high cutting efficiency
+ More efficient
- increased apical taper for better root canal preparation
- Better removal of dentinal debris thanks to the unique “multiple taper” of the instruments
+ Safer
- rounded guide tip minimizes the likelihood of deviation from the channel
- There is a manual version of instruments for anatomically complex clinical situations, as well as for clinicians who prefer to use manual instruments due to better tactile control
Design Features
Knowing the operating features and order of manual protapers, it is worth noting their design characteristics. It is thanks to them that the dentist’s work in hard-to-reach places is greatly facilitated.
The design feature that provides operational benefits is as follows:
- Multi-stage taper.
Improves flexibility and cutting efficiency, making it unnecessary to go through the canal repeatedly. For example, an Sx file between D1-D9 has a progressive taper from 3.5% to 9% and a fixed taper of 2% between D10-D14. Also, file S2 has nine values, and S1 has 12.
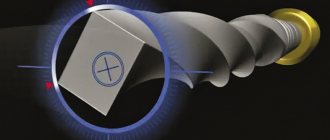
- The trihedral cross-section is convex.
Thanks to this, the main rod is strengthened, and the tool itself becomes super flexible. It also significantly increases safety, since the torsional load is reduced and the likelihood of contact between the walls of the channel and the tool blade is minimal.
- The spiral steps and angles change.
The helix and pitch angles are constantly changing, making it easier and more efficient to extract waste material.
- The tip diameter differs depending on the file.
Files, both finishing and forming, have different diameters for safe and efficient advancement deep into the canal.
- The guide tip is modified.
Due to the shape of the tip, the use of the instrument does not damage the canal walls, penetrating through soft tissue.
- Short handles.
The handles are up to 12.5 mm in size, which improves access to chewing teeth.
- Set of six tools.
Allows you to prepare canals of any complexity, making hand instruments universal.
PROTAPERS F1 PROTAPERS F2 PROTAPERS F3
Finishers are designed to finalize the apical third of the root canal, as well as to level and widen the middle third of the canals. They, like shapers, include 3 tools: F1, F2, F3.
The tip diameter of the F1 pro taper is 0.20 mm, F2 0.25, F3 0.30. It is characteristic that all 3 tools in the interval D0-D3 have a fixed taper (.07, .08, .09%, respectively). After D3, although the tool diameter continues to increase, the taper decreases to 0.055, thereby increasing the flexibility of the prop taper.
1. Indications for use: Protapers are intended for use only in a clinical setting by specially trained specialists. Scope of application: formation and cleaning of the root canal system.
2. Contraindications: Not known.
3. Warnings: None known.
4. Precautions:
- Repeated disinfection cycles and sterilization increase the risk of file fracture.
- These instruments should not be immersed in sodium hypochlorite solution.
- Cleaning of Instruments: Strictly follow the cleaning instructions recommended by the manufacturer.
- Irrigate generously and frequently.
- Create an adequate carpet runner using hand files up to a minimum of ISO size 15.
- Use the instruments at a constant rotation speed of 150 – 350 rpm with light apical pressure.
- Clean the tool grooves as often as possible and inspect the file for signs of deformation or wear.
- For optimal performance, it is recommended to use torque-controlled devices.
- Use the shaping files (S1, S2 and Sx), working in separate sweeping movements to create a straight-line approach to the root canal.
- Use finishing files (F1, F2, F3, F4 and F5) without using sweeping motions.
- Use appropriate finishing files to “passively” pass the entire working length of the canal and, once reached, immediately remove the instrument.
5. Adverse reactions: To date, no adverse reactions have been reported.
Marking of hand tools
The manual ProTaper is used for the same manipulations as the machine one, but in more complex cases. However, the markings on the products are the same. The standard set consists of six tools, which are distinguished by the color of the handle depending on the technical data.
Standard marking of the handles of assorted manual tapers:
- Sx – orange;
- S1 – purple;
- S2 – white;
- F1 – yellow;
- F2 – red;
- F3 – blue.
These symbols make it convenient to use hand tools in the required order. There are also F4 (with a black handle) and F5 (with a black and yellow), the length of the active area is 22 mm. They are intended for initial or final treatment of root canals.
PROTAPERS - STEP-BY-STEP INSTRUCTIONS FOR USE
- Create direct access to the root canal orifice.
- Constantly irrigate and check the patency of the carpet with an ISO 15 size hand file.
- Usage protocol:
- Locate the mouth.
- Passively use an ISO size 15 hand file until you feel resistance.
- Use the S1 shaping file, working in a sweeping motion until you reach the penetration depth of an ISO size 15 hand file.
- Repeat this sequence until you have determined the working length using an ISO size 15 hand file and have gone through the entire working length of the canal using the S1 tool.
- Use the S2 shaping file, working in a sweeping motion until you reach working length.
- Confirm the working length.
- Use the F1 finishing file (without sweeping movements), moving it deeper with each insertion until you reach working length.
- Calibrate the apical foramen using hand files.
- Use the appropriate finishing file (F2, F3, F4, F5) without sweeping movements to the full working length if additional expansion is needed or if the apical foramen is larger. If necessary, use Sx sweeping movements to remove ostial dentin and/or to create a wider coronal portion of the canal.
Protaper Universal - video, operating method
6. Disinfection, cleaning and sterilization: Clean the instruments and stand first. Then sterilize the instruments in the bags using an autoclave at 134ºC, 3 bar pressure for 18 minutes.
6.1 General recommendations
- Tools marked "disposable" are not intended to be reused.
- The user is responsible for the sterility of the product upon first use and each subsequent use, as well as for the use of damaged or contaminated instruments.
- For your own safety, please use personal protective equipment (gloves, goggles).
- Use disinfectant solutions with proven effectiveness (listed by the German Society for Hygiene and Microbiology; CE marked; approved by the German Inspectorate for Hygiene and Microbiology).
- quality of food products and medicines).
- Tungsten carbide burs, plastic stand, hand tools and nickel - titanium tools are destroyed by hydrogen peroxide (H2O2) solution.
- Nickel-titanium instruments are destroyed when immersed in a NaOCl solution for more than 5 minutes with a concentration of more than 5%.
- Aluminum instruments are destroyed in a solution of caustic soda with mercury salts.
- Do not use acidic (pH < 6) or alkaline (pH > solutions.
- After 5 processing cycles, markings may be destroyed
Method of mechanical treatment of root canals
Processing of canals using hand instruments is carried out in different ways, which directly determines the use of manual protapers in order.
Types of processing techniques:
- Standard.
Manual endotonic instruments are used starting from the smallest size. As you move along the channel, increasingly larger diameter propapers are used, reaching all the lengths of the passage. Processing occurs with one large K-file. Once fully inserted into the canal, the instrument is rotated 90 degrees clockwise in depth.
The reverse rotation occurs with slight pressure counterclockwise 270 degrees. Then follows another turn in the opposite direction by 180 degrees. After this, the instrument is removed from the mouth, treated with medications and reinserted into the canal for its entire length.
- Step-back.
First, the root canal must be expanded to the apical foramen, after which a K-file is inserted one size larger, but 1 mm less than the working length. Afterwards, the tool is changed, in which the working length gradually changes (by 2, 3 mm, and so on). With the help of H-files, the surface of the root is smoothed, and thus its taper is formed.
- Crown-down.
The formation of the ostial middle part and access to the apical third of the canal is carried out after expansion of the orifice. Next, the working length and tooling are determined. The canal walls are leveled in the final part.
PROTAPERS - RE-TREATMENT
D1+D2+D3: instruments specially designed for simple filling of root canals:
- the D1 instrument has an active tip, facilitating initial penetration into the root canal
- instruments have different lengths and taper of the working part for working in different parts of the root canal (coronal/middle/apical)
The sequence of using the tools is easy to remember
- From shortest to longest tool: D1 – D2 – D3
Easy identification
- dark gray handles no more than 11 mm long for better visibility
- instruments have one, two or three white rings respectively
Disadvantages of working with propapers
Despite having many advantages, manual tapers also have disadvantages.
The disadvantages include:
- inability to process wide canals (more than size 30), since there is no instrument with a large apical diameter;
- the maximum length of the canal that can be processed reaches 31 mm;
- a mechanism to prevent obstruction is not provided; a layer of lubricant may remain on the canal walls, which will subsequently prevent medications from entering the canal.
PROTAPER D3 – FOR THE APICAAL PART OF THE CANAL
Rules for using ProTaper instruments to remove filling material from root canals
- instruments are inserted into the canal by applying light pressure in the apical direction
- regularly remove the instrument from the canal, check its working part and clean it
- if the instrument does not advance deeper, use a hand instrument to overcome resistance and confirm patency of the canal
Recommended speed:
- for removing gutta-percha or Thermafil/ProTaper® obturators: 500 – 700 rpm
- for removing pastes based on zinc oxide and eugenol: 250 – 300 rpm
You can buy ProTaper (ProTaper) machine S1, 25 mm, Dentsply, for the treatment of complex cases, blister (6 pcs) produced by Dentsply at ExDent.ru at a price of 3,530 rubles.
Indications and contraindications for use
The method used by manual tapers is so delicate and filigree that the devices are used only in a medical facility by specialists who have undergone special training. The instruments are designed for shaping and cleaning root canals. Their super flexibility makes the channel easier to clean.
Their introduction is carried out with light pressure, which ensures patency of the area. But at the same time, you must observe the speed limit within 500-700 rpm. There are no contraindications to the use of hand tools.
Finishing tools for machining
Finishing instruments F1, F2, F3 are intended to complete the formation of the apical third of the root canal and expand and level it in the middle third. But usually one finishing file is enough to work on the apical third.
ProTaper Next Tool Set
A feature of their geometry is the different levels of taper of different blade segments. At D0:
- at 0.20 for F1;
- at 0.25 – for F2;
- in 0.30 mm – for F3.
The taper in D0-D3 is fixed at 7, 8 and 9%.
Over the course of D4-D14, each of the tools, with a steady increase in diameter, has a decreasing percentage of taper. This design feature allows for greater flexibility of individual sections of the file blade, reducing the risk of tool blocking.
Finish tapers are marked with rings on the handles of yellow, red and blue colors in accordance with the diameter of the blade and the sequence of use of the tool.
Correction devices
A standard set of machine tapers in dentistry consists of three sequentially used instruments with different lengths and tapers of the cutting element. These devices are designed for simple and most convenient filling of teeth.
The shortest propaper D1 is used for penetration of the coronal zone, the middle one D2 is used for the middle section, and the longest one D3 is used for the apex of the canal.
The tools are equipped with dark gray handles and a length of 11 mm. The algorithm for using them is very simple, and each file is marked with one to three white rings.
Where to unseal canals in Moscow
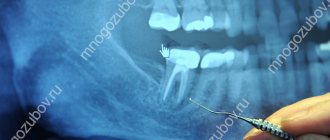
Beskudnikovo Dentistry employs doctors who specialize in the treatment of root canals, including those of complex anatomical structure. Our dentists use modern equipment, effective and safe medications, and high-tech instruments to open the tooth cavity and re-treat it.
If there are anatomical features of the canal, all manipulations are carried out under a microscope. The device provides an enlarged image several times, which eliminates medical errors, guarantees high quality treatment, and minimizes the risk of injury to tooth tissue. The cost of filling a tooth canal with a microscope is higher than conventional treatment, so the exact cost is discussed with the doctor during a free initial consultation.
Possible complications after canal filling
In the absence of complications, the process can take about one to one and a half hours. But in severe and advanced cases, it may require several visits to the dentist.
The most common type of complications after filling a tooth canal is the neglect of the inflammatory process, accompanied by focal tissue destruction. In this situation, a temporary filling is installed from a non-hardening paste containing medications. The time of wearing it and the composition of medications is determined by the doctor during an individual consultation. This treatment shows high effectiveness for diagnoses of cystogranuloma and periodontitis.
Materials for canal filling
Unfortunately, situations are common in which pain continues to torment the patient even after all medical procedures have been completed, and after the period adequate for rehabilitation has expired. The reason for this reaction of the body may be an error in choosing the filling material. There is still no universal substance that would suit everyone. Consequently, dentists, based on their knowledge and the results of examining patients, each time make a choice in favor of one material or another.
Today the following substances are used for canal filling:
- fillers. They are represented by gutta-percha, silver and titanium pins;
- sealers. These are different types of cements, including polymer, natural, glass ionomer or containing calcium hydroxide, as well as polydimethylsiloxanes.
Gutta-percha can be called perhaps the most popular material due to the complex of its properties:
- leaves the tooth color unchanged;
- copes with absolute sealing;
- not subject to dissolution;
- not subject to deformation.
Manual propapers: description, order of application, structural features
Protapers are a modern version of nickel-titanium instruments that are actively used during root canal preparation. They are ultra-flexible, so they work in areas that are difficult to reach with traditional tooling. Let's consider the structural features of manual tapepers, their advantages and disadvantages, as well as the procedure for use.
Advantages of working with universal propapers
Protapers are made of a special alloy, which is 56% nickel and 44% titanium. They have the same design as the machine versions, but are used in more complex clinical situations. Due to their ultra-flexibility, high safety and cutting efficiency, they are widely used by dentists in clinics.
Advantages of manual pro tapers:
Thanks to color coding, it is easy to select the sequence of instruments, regardless of the shape of the root canal. Drying and obturation products have the same color scheme.
The work requires only three tools that have high cutting efficiency.
- High performance.
Treatment of the root canal and removal of dentinal filings occurs efficiently due to the increased taper of the apical part.
The likelihood of deviating from the channel passage is minimal due to the rounded guide tip.
Most dentists prefer the manual option due to better tactile control when performing complex manipulations from an anatomical point of view.
Working with manual tapepers: classification
Dental tapepers for endoscopic treatment are used strictly according to the instructions. Each set contains six tools, which can be divided into two groups: shaping and finishing files.
Shaping files are designed to give the root canal a specific shape.
Types of forming files:
- SX - used to work with short root canals or to give the required shape to the coronal part of long passes (the length of the protaper is 19 mm, the diameter at the tip of the working part is 0.19 mm, the base circumference is 1.20 mm).
- S1 – used for preparing the upper third of the root canal (the size of the manual taper can be 21 or 25 mm, the diameter at the tip is 0.17 mm, the taper increases along the entire length of the working part from 0.02 mm to 0.11 mm).
- S2 – equal in length to the previous version, but designed for preparation of the middle third of the root canal (circumference at the tip – 0.2 mm, taper increases gradually from 0.04 mm to 0.115 mm).
Finishing files are used at the final stage to shape the apical third, align and widen the middle third of the canals. They are divided into the following categories: F1, F2 and F3. All have a fixed taper, are quite flexible, but differ in length. Size F1 - 0.2 mm, F2 - 0.25 mm and F3 -0.3 mm.
It is possible to use auxiliary shaping files (shapers), which are used to give the optimal shape to short channels, to access long passages or to determine the directional channel.
Marking of hand tools
The manual ProTaper is used for the same manipulations as the machine one, but in more complex cases. However, the markings on the products are the same. The standard set consists of six tools, which are distinguished by the color of the handle depending on the technical data.
Standard marking of the handles of assorted manual tapers:
- Sx – orange;
- S1 – purple;
- S2 – white;
- F1 – yellow;
- F2 – red;
- F3 – blue.
These symbols make it convenient to use hand tools in the required order. There are also F4 (with a black handle) and F5 (with a black and yellow), the length of the active area is 22 mm. They are intended for initial or final treatment of root canals.
Design Features
Knowing the operating features and order of manual protapers, it is worth noting their design characteristics. It is thanks to them that the dentist’s work in hard-to-reach places is greatly facilitated.
The design feature that provides operational benefits is as follows:
- Multi-stage taper.
Improves flexibility and cutting efficiency, making it unnecessary to go through the canal repeatedly. For example, an Sx file between D1-D9 has a progressive taper from 3.5% to 9% and a fixed taper of 2% between D10-D14. Also, file S2 has nine values, and S1 has 12.
- The trihedral cross-section is convex.
Thanks to this, the main rod is strengthened, and the tool itself becomes super flexible. It also significantly increases safety, since the torsional load is reduced and the likelihood of contact between the walls of the channel and the tool blade is minimal.
- The spiral steps and angles change.
The helix and pitch angles are constantly changing, making it easier and more efficient to extract waste material.
- The tip diameter differs depending on the file.
Files, both finishing and forming, have different diameters for safe and efficient advancement deep into the canal.
- The guide tip is modified.
Due to the shape of the tip, the use of the instrument does not damage the canal walls, penetrating through soft tissue.
The handles are up to 12.5 mm in size, which improves access to chewing teeth.
- Set of six tools.
Allows you to prepare canals of any complexity, making hand instruments universal.
Indications and contraindications for use
The method used by manual tapers is so delicate and filigree that the devices are used only in a medical facility by specialists who have undergone special training. The instruments are designed for shaping and cleaning root canals. Their super flexibility makes the channel easier to clean.
Their introduction is carried out with light pressure, which ensures patency of the area. But at the same time, you must observe the speed limit within 500-700 rpm. There are no contraindications to the use of hand tools.
Disadvantages of working with propapers
Despite having many advantages, manual tapers also have disadvantages.
The disadvantages include:
- inability to process wide canals (more than size 30), since there is no instrument with a large apical diameter;
- the maximum length of the canal that can be processed reaches 31 mm;
- a mechanism to prevent obstruction is not provided; a layer of lubricant may remain on the canal walls, which will subsequently prevent medications from entering the canal.
Precautionary measures
When using hand tools, you should adhere to certain rules.
Precautions are as follows:
- many instruments are marked for “single use” (reusable sterilization and disinfection increase the risk of file fracture);
- Protapers are not immersed in sodium hypochlorite solution, the concentration of which exceeds 5%;
- cleaning is carried out strictly according to the instructions;
- manual propapers are used at a constant speed within 150-350 rpm;
- the file is checked for possible deformation, the grooves should be cleaned as often as possible;
- to create straightforward access to the canal, it is worth using shaping files with separate sweeping movements;
- sweeping movements are not applied to finishing files;
- Using finishing files over the entire working length, you should immediately remove the tool.
Method of mechanical treatment of root canals
Processing of canals using hand instruments is carried out in different ways, which directly determines the use of manual protapers in order.
Types of processing techniques:
Manual endotonic instruments are used starting from the smallest size. As you move along the channel, increasingly larger diameter propapers are used, reaching all the lengths of the passage. Processing occurs with one large K-file. Once fully inserted into the canal, the instrument is rotated 90 degrees clockwise in depth.
The reverse rotation occurs with slight pressure counterclockwise 270 degrees. Then follows another turn in the opposite direction by 180 degrees. After this, the instrument is removed from the mouth, treated with medications and reinserted into the canal for its entire length.
First, the root canal must be expanded to the apical foramen, after which a K-file is inserted one size larger, but 1 mm less than the working length. Afterwards, the tool is changed, in which the working length gradually changes (by 2, 3 mm, and so on). With the help of H-files, the surface of the root is smoothed, and thus its taper is formed.
The formation of the ostial middle part and access to the apical third of the canal is carried out after expansion of the orifice. Next, the working length and tooling are determined. The canal walls are leveled in the final part.
General recommendations
According to the methodology, manual protapers undergo disinfection, cleaning and sterilization before use (18 minutes using an autoclave and at a temperature of 134 degrees, pressure no more than 3 bar).
General provisions include the following:
- Disposable instruments cannot be reused.
- The doctor who uses the instrument is responsible for the sterility of the product.
- To avoid contamination, you should use personal protective equipment (goggles and gloves).
- Disinfectant solutions must be of high quality.
- Hydrogen peroxide destroys tungsten carbide burs, nickel titanium instruments and plastic stands.
- Do not use caustic soda solutions, alkali or mercury salts.
- The maximum number of hand tool processing is limited to five. After this they begin to collapse.
Conclusion
Manual tapers, as dentists note, are much easier to use than machine ones. They are convenient and help in difficult situations with non-standard anatomical features of the root canal.
At the same time, you should use such tools strictly according to the instructions. It includes not only rules of use, but also precautions.
In general, hand tools have many more advantages, which is why they are used often.
Source: https://FB.ru/article/434573/ruchnyie-proteyperyi-opisanie-poryadok-primeneniy-osobennosti-stroeniya
Recommendations
Protapers of any type can only be used in a clinical setting, only for their intended purpose and by qualified dentists.
There are some precautions that should not be forgotten. So, it is prohibited:
- reuse of disposable devices;
- use of disinfectant solutions with unproven effectiveness;
- placing nickel-titanium protocols in a sodium hypochlorite solution for more than 5 minutes at a concentration exceeding 5%.
It is also worth considering the fact that nickel-titanium protapers are damaged due to exposure to hydrogen peroxide. Also, when working with files, you should not use alkaline and acidic solutions - they also negatively affect the condition of the devices.
Instruments must be cleaned, disinfected and sterilized in strict compliance with all rules developed by device manufacturers. The same applies to compliance with a certain algorithm of actions during the operation.
