2752
Preparation is a dental procedure that is based on grinding down a damaged tooth.
A manipulation is carried out to create additional space, which will then be used for the installation of an orthopedic structure.
Grinding is a mandatory procedure, without which it is impossible to properly fix the prosthetic structure.
The essence and purpose of the procedure
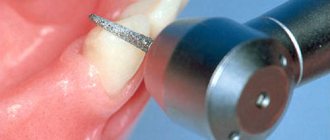
During turning, the surface layer of enamel is removed using special equipment equipped with high-speed burs with diamond tips.
Only with an ideally processed dental surface will the installation of the prosthesis be accurate and tight, which, in turn, will allow further avoidance of its rejection or the development of complications.
During preparation, the tooth is prepared for its further restoration. It takes on a cone-shaped shape (which simplifies the placement of the product), the remains of the carious cavity and old fillings are eliminated.
The procedure is considered by patients to be one of the most unpleasant in dentistry, so many of them do not decide to undergo prosthetics and end up losing their teeth.
But today, preparation technology has changed somewhat. The advent of new devices has made it possible to improve the technique, so there is virtually no pain or discomfort.
In addition, local anesthetics are used, which reduce the level of human sensitivity.
Treatment of caries
Everyone is accustomed to the fact that when visiting a dentist to treat caries, the doctor first drills the tooth for a long time, then puts a filling, after which he sends the patient home with peace of mind. Since many patients are very afraid of dentists and especially the sound of a drill, they often ask: “Is it possible not to drill a tooth?” It is impossible, both when treating caries and when grinding teeth.
The fact is that caries is a disease that affects not only the upper layer of enamel, on which a carious cavity is visible, but also the lower layers, which pathogenic microorganisms penetrate throughout. Before placing a filling, it is necessary to remove all existing infected tissue, which the doctor achieves by dissection.
If at least something remains, then a recurrence of caries will occur under the filling, which is often fraught with pulpitis - infection and inflammation of the nerve, which causes severe pain in the tooth.
Indications
The procedure is required in almost all cases when restoration is carried out in the oral cavity, namely:
- To restore or replace worn-out filling material;
- When reconstructing a dental element after a fracture;
- To correct a congenital defect of the coronal part;
- When installing veneers, crowns, etc.;
- To carry out other restoration activities as one of its stages.
Preparation is also necessary if caries is discovered during the removal of the enamel layer.
In this case, to prevent the spread of pathogenic microorganisms to neighboring units, carious tissue and infected dentin are removed.
Rules for the use of glass ionomer cement for fixation of crowns and bridges, composition and properties of the material.
Come here if you are interested in reviews about ceramic inlays for teeth.
At this address https://www.vash-dentist.ru/protezirovanie/nesemnyie-p/koronki-np/nuzhno-znat-o-titanovyih.html together we will calculate the price of titanium crowns for teeth.
Techniques
Not long ago, a special drill was used to treat problem units. Today, grinding technology has improved significantly.
Several new techniques have been developed that have made the manipulation more comfortable, as painless and safe as possible:
Ultrasonic
Grinding occurs using ultrasonic waves , which are emitted by a high-precision device. The advantages of the procedure include:
- absence of negative feelings;
- minimal risk of damage to hard tissues;
- pulp safety;
- painlessness;
- no heating of dentin and enamel.
Laser
This technique is based on the process of heating water in dental tissues using a pulsed laser. Its effect allows you to easily remove the affected areas with an air-water flow.
The advantages are considered to be high precision of processing, silent operation of the device, absence of damage and heating of tissues.
Disadvantages - there is a minimal risk of infection, the technique can only be used for surface treatment.
Air abrasive
Here, instead of a drill, a mixture of abrasive substance and air is used , supplied under pressure. This force is enough to remove the required amount of enamel and dentin.
The advantages of the technique are:
- safety;
- speed of manipulation;
- minimal heating of tissues;
- processing accuracy;
- no vibration;
- preservation of the maximum volume of healthy tissue;
- painlessness.
But at the same time, air abrasive grinding cannot be used as an independent technique due to the fact that it can only act on surface layers.
Can be used in combination with other methods of preparing teeth for prosthetics.
Chemical
Preparation involves the use of chemically active substances (for example, acids), which, through their action, soften the desired area of enamel.
The positive aspects of the technique are painlessness, safety for healthy tissues, and the absence of heating.
The only drawback is the length of the process (on average, it takes about 30 minutes to process one unit).
Tunnel
This technique is the most common due to its ease of implementation and the ability to accurately control the thickness of the surface being removed.
It is carried out using a special diamond tip (or metal) with high rotational ability.
The only advantage of tunnel preparation is the high precision of processing.
The method has significantly more disadvantages:
- strong heating of the enamel;
- need for pain relief;
- high probability of tissue damage;
- there is a risk of infection.
It is impossible to single out the best method from the entire list. All of them are selected individually for each patient , based on the condition of the oral cavity, examination results, and in accordance with the specific type of defect.
Types of ledges
A ledge is the part of hard tissue remaining after preparation on which the future prosthetic structure is planned to be secured. There are three varieties of it:
- Rounded . Used under metal-ceramic prosthesis. Allows you to preserve the maximum amount of hard tissue. Thickness varies from 0.8 to 1.3 mm.
- Knife-shaped. Designed for solid metal crowns. Ideal for turning inclined pieces. The width ranges from 0.3 to 0.5 mm.
- Brachial. It is the most reliable and durable when securing orthopedic products, but is uneconomical in terms of removing a large volume of tissue. The width is about 2 mm. Requires removal of the nerve from the tooth (depulpation).
If you do not create a ledge before prosthetics, the quality of the fit of the prosthesis will decrease significantly. This circumstance complicates oral care and increases the likelihood of developing recurrent caries.
Subgingival Tooth Preparation - Step-by-Step Protocol
Subgingival tooth preparation, i.e. placing the preparation margin under the gum is necessary in various clinical situations: to hide the edges of an unaesthetic tooth, to hide the edge when installing a more opaque restoration, when changing the tooth profile and sometimes to increase the volume of tissue for restoration. In other words, for aesthetics and retention purposes.
When planning subgingival preparations, it is very important to know the depth of the patient's gingival sulcus. Knowing how to prepare teeth and where to place restoration margins is essential to achieving a predictable and esthetic result.
In daily practice, I prefer to use the following steps, which work in almost any clinical situation:
- Preparation at the gum level.
- Placement of the first retraction cord, which retracts half of the sulcus. This provides vertical retraction.
- Moving the preparation border under the gum.
- Placement of a second cord for horizontal retraction.
- Removing the second thread to take the impression.
I will explain all these steps in detail in the following clinical case.
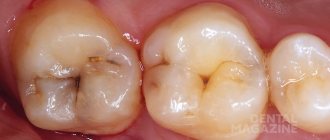
Rice. 1 - Initial situation. The patient complains about tooth 1.1, which is slightly darker than its neighbors; composite restorations are visible in certain lighting.
Composite restorations were made 1 year ago. I suggested another attempt using a composite, but the patient refused.
Taking into account the high aesthetic requirements of the patient, two ceramic veneers are proposed as a treatment method.
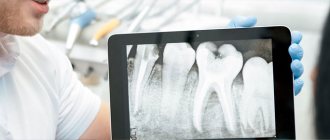
Rice. 2 - X-ray of the initial situation.
Tactics
The entire grinding process can be divided into two stages:
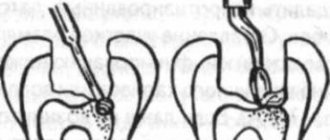
- Elementary. The dentist determines the amount of tissue to be removed (for this he makes grooves - special notches).
Be sure to clean the tooth of damaged enamel and dentin, and remove “extra” tissue from the lateral convex surfaces. Such actions allow you to create the optimal size of the unit and give it the desired shape. - Final. Includes removal of carious areas (if any) and “old” fillings, pulp protection, as well as final treatment of the tooth cavity and walls.
At the end of all manipulations, the doctor evaluates the quality of the turning and the degree of sealing before applying the composite.
What modern dentistry offers for increased wear of hard dental tissues, and how effective the treatment is.
In this publication, we will discuss how to prevent metal allergies from occurring in dentistry.
Here https://www.vash-dentist.ru/protezirovanie/nesemnyie-p/ottisknyih-materialov-ortopedicheskoy-stomatologii.html we suggest you familiarize yourself with the classification of impression materials in dentistry.
Some rules
Each orthopedic design has its own installation requirements. The stages of preparation also differ; let’s look at this in more detail.
Under the crown
In this case, the tooth surface is polished and about 2 mm of enamel and dentin are removed. This is a rather painful procedure that requires the use of anesthesia .
When using metal-ceramic crowns, preliminary removal of the dental nerve is required. If a patient has a porcelain crown installed, the shape of the ground tooth should be in the shape of a cone or cylinder.
Depending on the type of crown being installed, the doctor selects the necessary preparation method.
The video shows the stages of crown and bridge preparation.
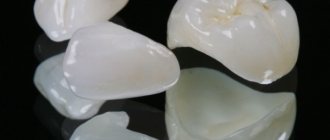
Under veneer
In this case, it all depends on what material the veneers will be used from. In the case of ceramics, preparation is carried out to the gum.
If the composite is applied directly to the tooth, then the outer surface is not prepared at all . In this case, the enamel is slightly roughened to improve adhesion to the veneer.
For tab
The main feature of this type of turning is making the side walls parallel, this ensures the best insertion of the product.
To reduce the risk of developing secondary caries, the dental cavity is slightly expanded.
When preparing a complex cavity, retainers must be installed to prevent movement of the dentition. The area for the inlay should be deep into the dentin.
Under a prosthesis
In this case, preparation is carried out to level the occlusal surface of the teeth by shortening them. This procedure in some cases requires preliminary removal of the pulp.
During cleaning, the doctor removes all sharp and thin walls of the tooth, protrusions of enamel and dentin. It is considered optimal to give the cavity walls an oval shape. .
For elderly patients, preparation becomes more complicated due to the fact that their pulp takes on a thread-like shape, and the amount of dentin increases several times.
When splinting
In this case, the preparation method is selected based on the selected type of structure for splinting.
Most often, doctors adhere to the technique used in the case of installing metal-ceramic crowns.
Some nuances
Each orthopedic product has its own rules and requirements for its installation. Depending on the type of prosthesis, the preparation stages differ.
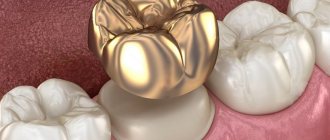
Under the crown
When it is planned to install a solid cast structure, grinding begins from the side surfaces to avoid damage to adjacent units.
For metal-ceramic crowns, about 2 mm of enamel is removed from the sides of the tooth, and a ledge is created that matches the type of product selected. To ensure a tight fit, the enamel is not polished, but is left slightly rough.
When a porcelain crown is installed, the tooth is ground down to a cylinder or cone shape, however, the ledge must be 0.1 cm into the gum.
If the prosthesis is made of zirconium, the ledge is formed with clear boundaries of a round or shoulder-shaped shape.
In the video, watch the process of preparation with a ledge for installing a crown.
Under veneer
Since a veneer is an overlay on the outer side of a tooth, when turning, special attention is given to the front surface
.
The sides are processed in two ways:
- leaving contact between teeth;
- with output to the inner side of the ledge boundaries.
Another point is that if the veneer is made of ceramic, the preparation is carried out to the gum. If a composite is used, no preparation is carried out (the layer is left slightly rough to improve adhesion to the material).
For tab
An inlay is a partial prosthesis, so when grinding it is important to make the side walls parallel and maintain the dimensions of the corners. Compliance with these conditions will ensure tight insertion and reliable fixation of the insert in the cavity.
Important! To eliminate the likelihood of developing repeated caries, the cavity of the tooth being restored is slightly expanded.
Under a prosthesis
In this case, preparation is carried out with the aim of shortening the prosthetic elements. During treatment, all thin and sharp walls, dentin and enamel protrusions are removed. The best option is to give the cavity an oval shape.
Under special circumstances, the pulp is first removed.
When splinting
Splinting is a procedure that secures units in a row and prevents their further loosening. The procedure involves minimal grinding of the enamel.
Typically, dentists adhere to the technique used when installing metal-ceramic crowns.
Medical Internet conferences
Basic principles of tooth preparation for metal-ceramic crowns.
In the technology of manufacturing fixed structures, the most critical link is the preparation of the supporting teeth, since the process itself is irreversible, unlike other stages, and making gross errors is unacceptable. Therefore, I believe that geometrically correct preparation of the supporting teeth, as well as careful processing of hard tissues in the area of the edges of the future structure, is a very important factor in ensuring the durability of the structure and its biological compatibility with surrounding tissues.
In general, when preparing abutment teeth, it is necessary to create a retention form of the stump, as well as the proper interocclusal space necessary to accommodate an aesthetically satisfying and load-resistant structure. In this case, it is desirable to avoid excessive grinding of hard tissues and trauma to the marginal periodontium. In some cases, a larger volume of grinding of hard tissues and a subgingival location of the preparation border are possible, justified by aesthetic requirements or to increase retention.
Types of ledges
Professor Martignoni offers a choice of three types of ledges
- Shoulder (covered with ceramics and metal)
- Shoulder with bevel (overlaid with metal)
- Rounded ledge with bevel (shamfer with bevel) (overlaid with metal)
The bevel of the edge of the ledge is necessary in order to achieve a tighter fit of the crown to the tooth. The angular shoulder (50 degrees), which Kuwata proposed, according to Professor Martignoni, must be covered with metal, otherwise it will not be possible to create an accurate outer contour of the crown.
The preparation scheme proposed by Martignoni is as follows.
On the vestibular surface there is a shoulder, on other surfaces there is a shoulder or a rounded ledge with a bevel. The width of the ledge is on average 1.2 mm; on proximal surfaces the width can be reduced to 0.8 mm.
Domenico Massironi suggests creating a ledge in the form of a modified rounded slope (a long rounded slope). This ledge is universal and suitable for any type of crown. The practitioner can control tissue reduction by using half the diameter of the diamond bur to prepare the preparation and by keeping the center of the bur as close to the final preparation line as possible. The angle of the ledge is approximately 60 degrees.
Two-plane preparation.
Picture 1
The theory of two-plane preparation was developed and described in detail by Kuwata, a famous Japanese dental technician. According to his theory, the vestibular surface of all teeth and the palatal (lingual) surface of molars and premolars has 3 planes:
- Cervical (which corresponds to the direction of the root plane)
- The main one (which coincides with the plane of the gum of the alveolar process)
- The plane of the cutting edge (in incisors and canines) or tubercle (in premolars and molars).
When preparing for a crown, it is necessary to take into account 2 planes: the main one and the cutting edge. The cervical plane will be important when creating a crown; ideally, the contour of the crown at the margin should coincide with the cervical plane and the direction of the root. Overcontouring of the crown will lead to chronic inflammation of the gums. Three-plane preparation is performed when processing the vestibular surface of the tooth for veneer.
Advantages of two-plane preparation.
- Sufficient space is created for the manufacture of an aesthetic metal-ceramic crown. This is especially important in the area of the cutting edge of the incisors and canines.
- Tooth tissue is preserved in the area of the middle third of the stump. Excessive tooth preparation is avoided.
- A more retentional shape of the stump is created due to less taper in the lower and middle third, that is, the so-called “retention zone” of the stump is not lost.
Conclusion
Planning the preparation of abutment teeth should be based on the following principles:
- maximum preservation of dental tissues performance of two-plane preparation
- providing conditions for retention of the future structure, creating a minimum angle of occlusal convergence
- compliance of the shape and surface of the prepared tooth with the requirements of a specific restoration manufacturing technology (casting, CAD/CAM milling);
- integrity of marginal periodontal tissues,
- dividing the preparation into 2 stages allows you to correct errors made during primary processing, avoid exposing the final preparation line in individuals with a thin periodontal biotype, and makes it possible to make an individual mini or full tray to obtain a one-stage impression.
Answers to frequently asked questions
Since the term “dissection” is not widely used among patients, many of them are keenly interested in information regarding this procedure itself.
- What layer of fabric is removed? The amount of grinding depends on the type of structure being installed, the characteristics of the tooth surface and its original volume.
Usually no more than 2 mm of hard tissue is removed. But this volume depends on the type of prosthesis being installed. So, before placing the inlays, only 0.5 mm is ground on each side. - How much does it hurt ? Modern technologies allow the procedure to be performed absolutely painlessly. When processing “live” units, local anesthesia is administered.
- How long does the process take? The duration of the process depends on the technique chosen by the doctor. On average, processing takes from half an hour to 2 hours.
- Is it possible to do prosthetics without preparation? Unfortunately, it is impossible to fix the product in a high-quality manner without grinding. If this manipulation is skipped, a person may face a number of negative consequences in the future.
- Can this be done for children ? This procedure has no restrictions regarding the patient's age. Children usually undergo chemical preparation.
- Why do my teeth and gums hurt, and what can be done ?
The cause of pain may be too deep grinding, as a result of which the dentist left a very thin tissue layer, and the nerves in the pulp react quite painfully when eating hot/cold foods. Another common cause of pain after turning is inflammation. In any case, the manifestation of this symptom is a reason to immediately seek medical help.
Tooth preparation
Since there is no need to change the proportions and position of the incisors, tooth preparation can be carried out based on the initial situation. Color changes will only be made for 1.1. Guide lines are designed for minimally invasive preparation.
Preparation at the gum level
As a first step, I prepare outside the sulcus without any retraction. A prerequisite is healthy tissue surrounding the tooth.
Rice. 5 - Preparation from the proximal sides was also made at the level of the gum, following the contour of the gingival papilla.
Rice. 6 - Therefore, the next step is to move the preparation margin subgingivally under careful control without disturbing the biological width.
Installation of retraction thread
I place the first thread, which fills half of the gingival sulcus. Installation of a retraction cord provides vertical retraction .
How deep under the gum should I prepare? Based on data from J. Kois and F. Spear, there are two rules:
- If the probing depth is 1.5 mm or less, the boundary is lowered to a level of 0.5 to 0.7 mm.
- If the probing depth is greater than 1.5 mm, the border is lowered to half the depth of the furrow.
Those. if the probing depth is 1 mm, preparation is made 0.5 mm under the gum, and with a depth of 2 mm - 1 mm under the gum.
Therefore, the answer to the question: “Which retraction cord should I use?” - the one that fills half of the gingival sulcus. If the selected thread does not correspond to half of the furrow, it should be replaced with a thicker one.
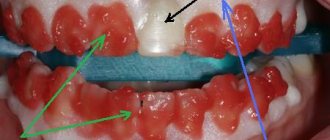
Rice. 8 - I usually start with #0 Ultrapack, Ultradent. In this clinical case, the depth of the groove is 1 mm. In the image, the #0 floss is placed on the right side of the tooth and we can see vertical movement of the gum.
Rice. 9 - due to vertical retraction, the original preparation at the gingival level became supragingival. It is much easier to prepare with apically displaced gums, because now we have a good view.
Rice. 10 — Displacement of the preparation boundary.
I move the preparation margin from supragingival to gingival level. This is done using a finishing bur at low speed.
Horizontal retraction
I place a second cord for horizontal retraction.
Another frequently asked question is, “How do I select a second retraction cord?”
The second thread is needed to take the impression; its purpose is horizontal retraction to create space for the impression material.
Rice. 12 - Answer to the question: the thread should be completely visible from the occlusal plane. If the entire thread sinks completely into the sulcus, you should replace it with a thicker one, and if only some areas are not visible, it is worth partially placing a third thread.
Rice. 13 - Now we are ready to take the impression.
Imprint
I carefully remove the second thread before making the impression. The gums should not bleed at this moment. To do this, I use threads soaked in aluminum chloride or epinephrine.
Rice. 15 - The exposed sulcus is ready for conventional silicone impression or digital scanning.
Rice. 16 — One-step, two-layer impression made with Honigum from DMG.
Rice. 17 - Both the gingival sulcus and the preparation margin are clearly depicted.
Rice. 18 — Final result of installation of E-max ceramic veneers, 20 months after cementation. Dental technician MDT Florin Stoboran, RO.
conclusions
- To control the depth of preparation, work is performed with healthy gums.
- Always measure the depth of the gingival sulcus before subgingival preparation.
- The first retraction cord is needed for vertical retraction and preparation.
- A second retraction cord is needed for horizontal retraction and impression taking.
- Taking these steps can make taking an impression a much more enjoyable experience.
Translation by M.S. Yankovsky. especially for the OHI-S.COM website. Please, when copying material, do not forget to provide a link to the current page.
- The two rules of subgingival margin placement. Frank Spear
Possible complications
Complications arise only if the dentist performed the preparation poorly. In such a situation, the following most often develop:
- inflammation of the gum tissue (in case of infection);
- secondary caries (with incomplete cleaning of the cavity from carious tissues).
If you do not consult a doctor in a timely manner, complications will subsequently lead to premature loss of supporting elements.
To avoid the negative consequences of grinding, you should contact only a highly qualified dentist.
To do this, having read the reviews and ratings in advance, you need to contact a center that provides quality services to its patients in accordance with all norms and rules, and strictly adhere to all medical recommendations and prescriptions.
Reviews
Modern methods of tooth preparation have made it possible to carry out prosthetics almost painlessly, quickly and with better quality.
This is evidenced by numerous reviews from patients who have undergone the process of restoring teeth with prosthetic structures.
You can share your experience of restoring teeth with orthopedic structures, talk about the impressions and feelings you experienced before and after the procedure, by leaving a comment on this article.
If you find an error, please select a piece of text and press Ctrl+Enter.
Tags fixed prosthetics prosthetics
Did you like the article? stay tuned
Previous article
The importance of timely detection and elimination of hidden caries
Next article
What can lead to darkening of teeth and how to correct the situation