The widespread introduction of casting technology into the practice of dental laboratories has allowed foundry specialists to make thin-walled and high-precision solid-cast crowns from metals and medical alloys, designed to eliminate obvious defects in the dentition.
Such prosthetic devices are widely used in modern dental practice to restore the natural anatomical shape of damaged teeth or as supporting and fixing elements for prosthetic structures.
Indications for placing solid crowns
The most common indications for the use of solid dental crowns in dental practice are:
- significant damage to the crown parts of the teeth;
- unconscious and unreasonable contractions of the masticatory muscles;
- anomalies in the position, size and shape of natural teeth;
- the need to place fixing and supporting clasps on the teeth;
- pathologies of occlusion and bite;
- bruxism;
- pathological abrasion of teeth.
The procedure for prosthetics with solid-cast crowns
All video presentations
The process of installing solid crowns consists of several stages:
- 1. preparation for prosthetics (sanitation of the patient’s oral cavity, treatment of pulpitis, dental caries, root canal filling);
- 2. grinding of the abutment tooth;
- 3. making impressions and transferring them to the laboratory for making a mold for casting a prosthetic structure;
- 4. crown casting;
- 5. fitting of the finished prosthetic device;
- 6. fixation of a one-piece crown in the oral cavity.
The main materials used for the manufacture of solid crowns are:
- cobalt chromium alloy;
- alloys with high titanium content;
- chromium-nickel alloy;
- noble alloys (containing precious metals).
Gold plating
In cases where the patient does not like the shiny polished surface of a metal or alloy, an additional “gold-like” layer is sprayed onto the crown. Meanwhile, some dentists note that sprayed prosthetic devices can have a negative effect on the epithelial tissues of the oral cavity.
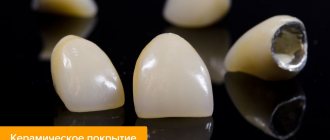
Ceramic coating
If necessary, the patient can order the production of a one-piece prosthetic device with veneer: in this case, the front part of the crown is made of ceramic. Meanwhile, such models are significantly inferior in reliability to all-metal products.
What are the types of cast products?
Modern dentistry has significantly expanded the arsenal of metal casting products. Today the patient can choose designs:
- without spraying: they have a regular metal surface, polished to a shine. Aesthetics are reduced to zero,
- with spraying: to give a white color or a “gold” tint, the solid crown is treated with a special composition using vacuum plasma equipment,
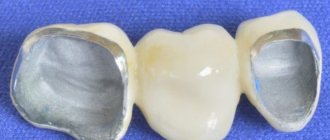
- with partial cladding: ceramic or plastic linings are fixed to the front parts of the products. The teeth look natural, while the design will cost less than classic metal-ceramics,
- with full cladding: this option can no longer be called a product made only of metal. These are rather combined metal-ceramic crowns. Such designs are superior to all others in aesthetics and retain strength due to their metal base.
Spraying options are not suitable for everyone: compositions that are applied to the surface can irritate the oral mucosa. Therefore, to achieve aesthetics on a limited budget, it is still better to choose designs with front cladding, although they also have a drawback - cracks and chips often appear on the linings.
The main advantages of solid crowns
The most important advantages of solid dental crowns are:
- the highest precision of fit of the cast inner part of the crown to the tooth stump (the width of the gaps between the inner part of the prosthetic device and the surface of the tooth does not exceed several microns, and this allows you to avoid saliva, pieces of food and pathogens getting inside the crown);
- availability of spraying on the surface of the crown;
- strength and high wear resistance of the finished crown;
- availability of opportunities to recreate the natural chewing surface of the tooth;
- restoration of the chewing function of a tooth covered with a solid crown;
- availability of opportunities to recreate optimal interdental contacts;
- biological inertness, lack of toxic effects on the tissues of the human body;
- affordable prices for the production and installation of solid crowns;
- reliability (soldering is not required for the manufacture of solid-cast crowns: the prosthesis is solid and consists of one metal or alloy, which makes it more resistant to damage);
- durability of the prosthetic device (the service life of solid-cast prosthetic devices, subject to the rules of use, can exceed 10 years).
What materials are these crowns made from?
In the production of the structures under consideration, the following types of materials are mainly used:
- chromium-based alloys with the addition of nickel or cobalt: these are the most common materials characterized by increased strength - prostheses made from them are called carbide. They have the most affordable price, suitable for low-income people,
On a note! Today, one crown without coating will cost about 4 thousand rubles, with titanium nitride coating - about 5 thousand rubles. Ceramic cladding will increase the cost of the product to at least 7 thousand rubles. Treatment of identified pathologies, the work of a doctor, as well as the manufacture and installation of a temporary crown are paid separately.
- alloys of precious metals: solid gold dental crowns have a big advantage - they are biocompatible with the human body, and therefore do not cause allergic reactions. In its pure form, gold is not suitable for orthopedic purposes: it is too soft. Its alloys are used with copper, silver, palladium and even platinum. These compositions do not differ in color from pure metal, so this option in our time is only suitable for eccentric people. And the price is not affordable for everyone,
- alloys with titanium: structures lead in strength - it is 9-10 times higher than that of other products. Like gold, titanium is biologically compatible with natural tissues and does not have a harmful effect on the roots and adjacent teeth. However, such materials are extremely capricious, and the manufacturing process is labor-intensive. In addition, alloys have low adhesion to ceramics, so it will be difficult to create an aesthetic veneer.
It is better to entrust the choice of material for a crown to a specialist. The doctor will take into account all the features and nuances of the clinical picture, on the basis of which he can offer the most suitable option.
Disadvantages of using solid crowns
The negative features of dental prosthetics using solid crowns include:
- the need to grind down a relatively large layer of surface tissue of the teeth;
- high thermal conductivity of prosthetic devices (if the pulp of the abutment tooth is close, the patient may experience severe discomfort);
- excessive abrasion of antagonist teeth during constant contact with the surface of a solid crown.
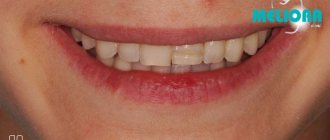
In addition, the disadvantage of such prosthetic devices is their appearance: the color of metal crowns does not match the color of natural tooth enamel. It is for this reason that they are used only for prosthetics of chewing teeth that are not noticeable when smiling and talking.
Otherwise, solid crowns fully perform their assigned tasks and are rightfully considered one of the best prosthetic devices designed to hide dentition defects.
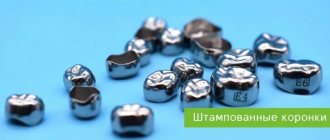
Clinical and laboratory stages of production of stamped crowns - presentation
Clinical and laboratory stages of manufacturing stamped crowns Oleg Isaikin 2nd group, 3rd year 12/13 Moscow, 2013 GBOU VPO First Moscow State Medical University named after. I. M. Sechenova Faculty of Dentistry Department of Orthopedic Dentistry
The first clinical stage is preparing teeth and taking impressions. Preparation of a tooth for a full metal stamped crown involves grinding all five surfaces. The occlusal surface or cutting edge is ground to the thickness of the future crown (0.25 mm). The chewing surface is prepared without significantly disturbing the surface topography, cutting off the tubercles and simultaneously deepening the grooves. The contours of the mesial and distal corners of the incisal edge of the anterior teeth are preserved. Sharp angles that are formed after separation between the buccal and proximal surfaces are smoothed by shaped heads. As a result of preparation, the perimeter of the tooth in the neck area should be equal to the perimeter of the chewing surface or cutting edge while maintaining the anatomical shape of the occlusal surface or cutting edge. Control of the amount of hard tissue that is removed is carried out using carbon paper composed of 16 layers. This approximately corresponds to the thickness of the crown - 0.25-0.3 mm 1
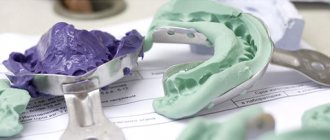
The first clinical stage is preparing the teeth and taking impressions. After preparing the tooth for a stamped crown, it is necessary to obtain an impression that gives an exact impression of the prepared tooth. Impressions are taken from both jaws. This allows the technician to fix the plaster models prepared after impressions in the articulator and easily navigate the relationship of the prepared tooth with its antagonists. An impression of the entire dentition allows the technician to evaluate the shape of the dentition, the position of each tooth on the alveolar process, and easily install models in the position of central occlusion. In addition, the technician can facilitate the modeling of an artificial crown, especially if the prosthetic tooth is significantly damaged. Partial impressions are not suitable for this purpose. 1
The first laboratory stage is the production of a plaster model. After the impressions of the upper and lower jaws obtained in the clinic, plaster models are cast, which the dental technician composes in the position of central occlusion and fixes in the articulator or occluder, checking the degree of separation of the prepared tooth from the antagonists. 1
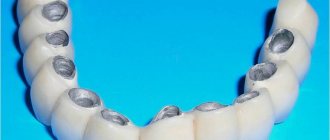
The second laboratory stage is the production of a stamped metal crown. Restoration of the anatomical shape of the tooth (modeling) is carried out by gradually layering molten modeling wax on all surfaces of the stump of a plaster tooth. To obtain the first layer, boiling wax is poured onto the stump of a plaster tooth. The plaster model is held with the base up, and the tip of a spatula with boiling wax is applied at a slight angle to the surface of the tooth from the neck to the cutting edge or chewing surface. This prevents melted wax from getting into the neck area and maintains the accuracy of its contours. Then, by layering the molten wax on the surface of the plaster tooth, we achieve an increase in volume necessary to restore the anatomical shape. The chewing surface is modeled behind the antagonist teeth. The modeled tooth should be smaller than the future crown by the thickness of the metal (0.25-0.3 mm).
The second laboratory stage is the production of a stamped metal crown. After resuming the anatomical shape with wax, they begin to produce a plaster stamp and replace it with a stamp made of a low-melting alloy. To do this, the modeled tooth is cut out of the plaster model using a jigsaw or a plaster knife so that the surfaces of the so-called root part of the plaster die are parallel to the longitudinal axis of the tooth. Then, at a distance of 1 mm from the line of the clinical neck of the tooth and parallel to it, a groove 0.5 mm deep is made. This groove serves as a guide to determine the length of the edge of the metal crown. Metal stamps are prepared using plaster stamps. To do this, the cut-out plaster stamp is immersed in water for 5-10 minutes, after which the plaster is mixed, poured into a rubber ring with a diameter of 3-4 cm and a height of 4-5 cm (if there is 1 crown) - immersed strictly vertically and exactly in the center of the rubber ring ; Place the plaster in an even layer on the table or pour it into special frames (molds) (if there are several crowns) and with the proximal surface the plaster stamp is exactly half-immersed in it.
The second laboratory stage is the production of a stamped metal crown. The hardened gypsum block is pushed out of the rubber ring. Wedge-shaped longitudinal grooves are made on two opposite sides, oriented towards the plaster stamp so that the fracture line passes strictly through its middle. After releasing the gypsum stamp, all parts of the gypsum countermold are assembled, placed in a rubber ring and filled with molten low-melting alloy, which is melted in a special spoon. To make one artificial crown, two metal dies are cast. The first, as the most accurate, is used for final stamping, and the second, less accurate, due to the loss of pieces of the plaster countermold when it is re-formed, is used for the previous stamping. The loss of pieces of the gypsum counterform when composing its parts leads to the formation of irregularities on the surface of the metal 2 stamp, which are removed with a file. In accordance with the diameter of the crown of the metal stamp, a metal sleeve is selected. For this purpose, a special device for prosthetic sleeves is used (Samson device).
The second laboratory stage is the production of a stamped metal crown. To accurately recreate the chewing surface or cutting edge of a metal tooth in a socket, a separate technique can be recommended. The crown part of the metal tooth is wrapped with one layer of adhesive plaster, leaving the occlusal surface free. A molten low-melting alloy is poured into a metal cuvette 1.5 cm high and 3 cm in diameter with a catheter-like recess and a metal stamp is lowered into it with the chewing surface down to a depth of 1-2 mm. After approval of the metal, the tooth is easily removed, and the resulting image of the chewing surface is used for preliminary stamping occlusal surface of the crown. To do this, after removing the adhesive plaster from the stamp, a pre-stamped sleeve is hammered onto it and a low-melting metal plate is hammered into the recess with the blows of a hammer. Using a hammer, the sleeve is given the approximate shape of the future crown, achieving a tighter fit to the entire surface of the metal stamp. This ends the preliminary stamping of the crown, which is performed on the second stamp. Before final stamping, the sleeve is again subjected to heat treatment in the same mode, and the first stamp is prepared for final stamping by an external or combined method. 2
The second clinical stage is the fitting of crowns. A correctly made and fitted crown tightly covers the neck of the tooth and it is often difficult to remove it from the tooth. Then they take a little cotton wool, cover the crown with it, grab the crown with one or two, and the molar with three fingers and with careful movements try to move the crown alternately in the vestibulo-oral direction. If the crown cannot be removed using this technique, it is removed using tools. To do this, use a spatula for mixing cement or a dental spatula. It is more convenient to use a special Kopp crown puller.
The third clinical stage is fixation of the crown in the oral cavity. The stamped metal crown, tested in the patient’s oral cavity, is again transferred to the dental laboratory for polishing. Before applying it to the oral cavity, it is thoroughly washed with hydrogen peroxide and disinfected with alcohol. The abutment tooth is covered with cotton swabs and treated with medication. 2 The tooth surface is thoroughly disinfected with alcohol and dried with ether. Better results can be achieved by drying with warm air, which is supplied through a special drill tip. Fixing cement of a liquid consistency is mixed on a pre-prepared sterile glass plate (lash). The rules for preparing cement and its consistency depend on the brand and the goal that needs to be achieved when strengthening the crown. The prepared cement is introduced into the crown with a clinical spatula, filling it approximately one-third. The inner walls are coated to the edges of the crown. The crown with cement is placed on the tooth, making sure that the cotton swabs do not get under the edge of the crown. To do this, it is useful to fix them with the fingers of your left hand at a certain distance from the neck of the tooth, and put on the stamped crown with your right hand.
The third clinical stage is fixation of the crown in the oral cavity. After applying the crown with cement, it is necessary to immediately check the occlusal relationship according to the central occlusion. If the crown is in close contact with opposing teeth, patients are asked to hold the teeth together for a few minutes until the cement hardens. The remaining cement is carefully removed from the surface of the crown and adjacent teeth. 2 Particular care must be taken to remove the cement that fills the interdental spaces. Remains of cement on the surface of the polished crown can be easily removed with a cotton swab soaked in cement phosphate liquid. After removing cement residues from the surface of the tooth, the patient is recommended to keep the teeth closed for another 1-2 hours until the fixing material completely hardens.